Greatly improved performance, new features and a new real-time HLSL shader editor come with new versions of Ab3d.DXEngine and Ab3d.PowerToys

by abenedik 3. December 2015 23:01

New versions of Ab3d.DXEngine and Ab3d.PowerToys libraries have been published.

The new versions bring improved performance, new features and many bug fixes. 

But let me talk about that later and start with a very interesting new sample that comes with Ab3d.DXEngine – a real-time HLSL shader editor. The following screenshot shows it in action:

Real-time shader editor in Ab3d.DXEngine

On the left side you can see the HLSL editor with full syntax highlighting. The editor is using great AvalonEdit component. The right side shows some options and a real-time preview of the 3D scene and used shader.

The real-time preview means that after each change of HLSL text, the HLSL text is compiled and the new shaders are used to render the preview image on the right.

The opened ComboBox shows that the editor comes with 6 shaders that can be used as a simple step by step HLSL tutorial. The first sample shows how to render all objects with a single color (you can experiment with changing the color components). The following effects add some interesting coloring. And the final shader shows how to create a shader with directional light lighting and with added fog.

So, if you have not tried to program in HLSL, this is your best and easiest chance to try it out.

And if you want to change the 3D scene, you can just open the XAML editor and change the 3D objects defined there.


And there are more great news. 

The new version of Ab3d.DXEngine has significantly better performance. In some cases (for example where many BoxVisual3D or similar objects are shown) the frame rate can be 3 times the previous frame rate. And already the previous version had some impressive performance. Also the time spend in the Update method is greatly reduced.

Also the problems with hardware accelerated 3D lines are now fixed. Because of some problems in the production version preparation, the previous version of Ab3d.DXEngine in many cases did not render the 3D lines with full hardware acceleration.

The biggest performance improvement in Ab3d.DXEngine can be achieved with using object instancing – rendering many instances of the same mesh. The performance is really amazing the following screenshot is showing 16.000 bunnies (each bummy model has 11.553 position) rendered at aroud 20 FPS (on i7 6700 and NVIDIA 970 GTX). Note that statistics in the lower right corner is showing that 184.848.000 positions are rendered:

Instancing in Ab3d.DXEngine

The problem with instancing in the previous version was that it did not support hit testing. This has been improved in the new version. Now you can set the IsWpfHitTestVisible property on InstancedGeometryVisual3D to true and hit testing (also the EventsManager3D from Ab3d.PowerToys) will begin to work. Though this will increase the initialization time because WPF objects need to be created before WPF hit testing can work. 

The new version also adds support for Binding on objects inside DXViewportView. For example, now you can bind IsVisible property on ModelVisual3D objects to CheckBox.IsChecked property.

The following is the full list of changes and improvements:

  • Fixed using Binding on objects inside DXViewportView.
  • Fixed rendering 3D lines with hardware accelerating geometry shader (instead of Ab3d.PowerToys's LinesUpdater).
  • Improved support for transformations on TileBrush (used on ImageBrush, VisualBrush and DrawingBrush).
  • Added IsWpfHitTestVisible to InstancedGeometryVisual3D - this allows WPF hit testing of instanced geometry (though this increased initialization time because WPF's GeometryModel3D objects needs to be created).
  • Improved InstancedGeometryVisual3D so that it is not needed any more to call Update method when the InstancesData is set for the first time. Also fixed problems when the objects were not shown if Update was called before the InstancedGeometryVisual3D was added to Visual tree.
  • Improved performance with moving some matrix calculations to vertex shader.
  • Added support for rendering WPF's UIElement3D objects. NOTE: WpfUIElement3DNode can only show 3D models but does not support the input events on the UIElement3D (MouseEnter, MouseMove, etc.). Those events cannot be supported because Viewport3D control is not visible and does not provide the events to the UIElement3D.
  • Greatly improved Update method call performance when many Visual3D objects from Ab3d.PowerToys are used (for example BoxVisual3D objects).
  • Added IsCheckingChildrenForChanges field to WpfModelVisual3DNode that can be used to skip checking ModelVisual3D's Childen collection and improve Update performance.
  • Added IsCheckingChildrenForChangesDefaultValue static field to WpfModelVisual3DNode - used to set the default value of the IsCheckingChildrenForChanges field.
  • Fixed problems where wrong image was shown when multiple DrawingImage brushes or VisualBrshes were used.
  • Prevented throwing exception when unsupported type of Visual3D (for example UIElement3D) or Model3D was used in the scene.
  • Added Refresh method to Ab3d.DirectX.Material and its derived classes. This allows user to manually update the materials properties and its resources (textures are regenerated).
  • Fixed hit testing on some Viewport3D objects (usually when the Viewport3D was removed from visual tree and then added to DXViewportView).
  • Fixed using IsAutomaticallyUpdatingDXScene when the DXScene was created after the IsAutomaticallyUpdatingDXScene property was set.


The Ab3d.PowerToys library also got some fixes. The following is a full list of changes:

  • Fixed showing 3D lines that were created with IsVisible property set to false. When later the IsVisible is set to true, sometimes the 3D lines were not shown.
  • Fixed rendering 3D lines with arrows that were not rendered correctly under some circumstances.
  • Fixed reporting MouseLeave event that was sometimes not triggered when CustomEventsSourceElement was used.
  • Fixed changing BoxVisual3D and SphereVisual3D objects after Position is changed under some circumstances.
  • Added GetCameraMatrixes to BaseCamera that can calculate view and projection camera even if TargetViewport3D is not assigned to the camera.
  • Prevented throwing null reference exception in Dumper.Dump method when TextureCoordinates or Normals collection was null.
  • Prevented throwing null reference exception that could sometimes occur in MouseCameraControllerInfo when in XAML designer.


The wrapper for assimp importer was also improved. The new library should read some models more correctly (especially models from fbx files). Also, the AssimpWpfImporter class now supports IDisposable interface. This means that it can be now easily disposed to release all managed and unmanaged resources. The following is list of all the changes in this library:

  • AssimpWpfImporter now implements IDisposable and have new Dispose method to easily dispose all managed and unmanaged resources.
  • Improved reading transformations - in case the transformation matrix is identity, the Transform property is set to null; in case the matrix is a simple translation, a TranslateTransform3D is created; in case of simple scale a ScaleTransform3D is created; otherwise a MatrixTransform3D is created.
  • Improved reading 3D models that are stored in left coordinate system.
  • Added ForceConvertToRightHandedCoordinateSystem property to AssimpWpfImporter and AssimpWpfConverter.


I hope that you share the excitement of the new versions with me. And I promise to bring you more great news in the future versions.

Tags: , , , ,

Ab3d.PowerToys | DXEngine

The best platform for business applications that require 3D graphics

by abenedik 11. September 2012 23:18

In the blog posts that were posted so far I was mostly describing new versions of the products. During recent vacation at seaside I have decided to change that and prepare blog posts that would present some of the features of Ab3d.PowerToys and Ab3d.Reader3ds libraries.

I would also like to persuade you that WPF 3D with Ab3d.PowerToys and Ab3d.Reader3ds libraries is the best platform for building business applications that require 3D graphics.


Ab3d.PowerToys library greatly simplifies work with WPF 3D and make WPF 3D the easiest platform for business applications that require 3D graphics.

In this blog post I will try to write about some of the basic new concepts that are introduced with the library.
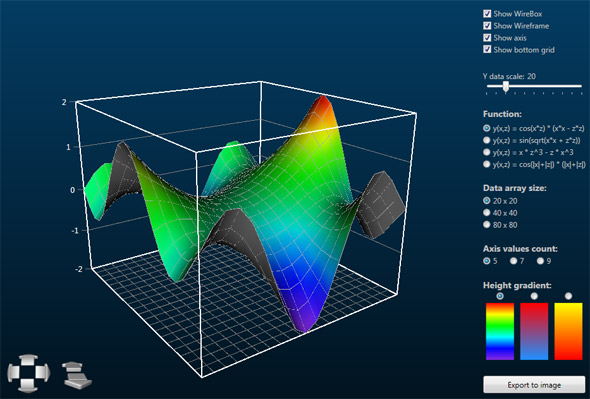
Plot 3D sample

This post is divided into the following sections:

  1. Basic 3D scene setup
  2. Cameras
  3. 3D Objects
  4. Showing objects from 3ds files
  5. Conclusion


1) Basic 3D scene setup

This section shows how to prepare an XAML file to show 3D content.
First we need to add a reference to the Ab3d.PowerToys library. Then the following namespace declarations are usually added to the XAML file:

xmlns:cameras="clr-namespace:Ab3d.Cameras;assembly=Ab3d.PowerToys"
xmlns:controls="clr-namespace:Ab3d.Controls;assembly=Ab3d.PowerToys"  
xmlns:visuals="clr-namespace:Ab3d.Visuals;assembly=Ab3d.PowerToys"

cameras namespace defines the possible cameras (SceneCamera, FirstPersonCamera, ThirdPersonCamera, etc.)

controls namespace defines controls that will be used to control the camera (MouseCameraController, CameraControlPanel).

visuals namespace defines 3D objects that can be added to Viewport3D (BoxVisual3D, SphereVisual3D, ConeVisual3D, LineVisual3D, WireBoxVisual3D, HeightMapVisual3D and many more).


Now we can define our 3D scene with the following XAML:

<Border Name="ViewportBorder" Background="Transparent">
    <Viewport3D Name="MainViewport">
    </Viewport3D>
</Border>

<cameras:SceneCamera Name="Camera1" Heading="40" Attitude="-20" Bank="0" 
                     Distance="250" ShowCameraLight="Always"
                     TargetViewport3D="{Binding ElementName=MainViewport}"/>

<controls:CameraControlPanel VerticalAlignment="Bottom" HorizontalAlignment="Left" 
                             Margin="5" Width="225" Height="75" 
                             ShowMoveButtons="True"
                             TargetCamera="{Binding ElementName=Camera1}"/>

<controls:MouseCameraController UsedMouseButton="Left" 
                                TargetCamera="{Binding ElementName=Camera1}"
                                EventsSourceElement="{Binding ElementName=ViewportBorder}"/>

<controls:CameraAxisPanel HorizontalAlignment="Right" VerticalAlignment="Bottom" />

First we defined a Border that contains an empty Viewport3D control. Then we added SceneCamera, CameraControlPanel (shows buttons to control the camera), MouseCameraController (use mouse to control the camera) and CameraAxisPanel (shows the orientation of the coordinate axes).


An interesting difference from standard WPF’s way is that the camera is not defined inside Viewport3D but outside it as a standard control. The reason for that is that all WPF’s cameras are sealed or contain internal virtual methods that cannot be defined in derived class. Therefore it is not possible to derive custom cameras from any WPF’s camera.

Before describing the cameras let me first describe how the added controls are connected to each other.

First we need to connect our SceneCamera to the Viewport3D. The connected Viewport3D will be controlled by our SceneCamera. This can be done with setting the TargetViewport3D property on SceneCamera. Using that property and simple binding is the most efficient way to connect the camera to the Viewport3D. But it is not the only possible way to do it. Instead it would be also possible to set TargetViewport3DName property to “Camera1”. It would be even possible to skip both that properties. In that case the camera would check the WPF controls tree and connect to the first found Viewport3D. Because the code where the TargetViewport3D property is set with binding is executed slightly faster that other methods, it is recommended to use it. But when there are only a few controls defined in the parent Window or UserControl, it is also ok to skip the TargetViewport3D definition and let the camera to connect automatically. In case when you want to connect the camera to the Viewport3D later in code and do not define TargetViewport3D and TargetViewport3DName in XAML, you can set the IsAutoViewport3DFindingEnabled to false to prevent the automatic camera connection.

In a similar way the CameraControlPanel and the MouseCameraController are connected to the SceneCamera. As with the camera we could use TargetCameraName property or skip the TragetCamera property and leave the control to find the Camera automatically by searching the objects tree.

The MouseCameraController is also connected to the ViewportBorder element. The connection is created with the EventsSourceElement property. This property defines which element is used as the source of mouse events that are used to control the camera. Because this element has a transparent background, the mouse events are triggered on the whole area of the border element (if the background property would not be defined, than the mouse events would be triggered only on areas where some content is shown). This means that when a user would be over the ViewportBorder element the mouse event would be used to control the camera. It is very easy to define what keyboard and mouse button combinations rotate and which move the camera – by default right mouse button is used to rotate the camera and ALT + right mouse button is used to move the camera – see the help file or samples that come with Ab3d.PowerToys for more info. If EventsSourceElement property would not be defined, the source of mouse events would be the Viewport3D that is connected to the camera. But because Viewport3D does not have the Background property, it would be only possible to rotate the camera when the mouse would be over shown 3D objects – clicking on the area around the objects would not trigger any mouse events.

The MouseCameraController also shows a special cursor icon when the camera is rotating or when the user can rotate the camera with left mouse button. If you would like to use different cursor, you can set the RotationCursor property to some other value.

With the CameraControlPanel it is possible to control the camera with clicking on the shown buttons. By default the CameraControlPanel shows buttons to rotate the camera and to change the distance of the camera. With adding ShowMoveButtons property and setting it to true, additional buttons to move the camera would be also shown.


2) Cameras

Now let me describe the cameras in Ab3d.PowerToys in more details.

In the XAML above we are using SceneCamera. This is just one of the cameras that come with Ab3d.PowerToys library. It is the most advanced and the most easy to use. The camera automatically measures the 3D scene (3D objects inside Viewport3D) and shows them from the specified angle (Heading="40" Attitude="-20" Bank="0") and distance (Distance="250"). Those four properties are common to all the cameras in Ab3d.PowerToys. They represent the main advantage over the WPF’s cameras because it is much easier to define the camera with angles than with 3D directional vectors. The following image (taken from Ab3d.PowerToys Samples) is showing how different angles are rotating the camera:

Camera Heading, Attitude, Bank

As sad before SceneCamera measures the objects in 3D scene and calculates the center position of the scene’s bounding box. The value that is specified with the Distance property is the distance of the camera from the center position of the scene.

Because measuring the scene also gives us the size of the shown 3D objects, it is also possible to use the IsDistancePercent property. If that property would be set to true then the Distance value would mean the percentage of the size of shown objects. For example if Distance would be set to 2, this would mean that the camera’s actual distance from the center of the scene would be 2 times the size of the object’s bounding box (length of diagonal). This makes the camera usage really simple because you do not need to worry about the size of the shown 3D objects. But note that if you change the content of the Viewport3D you need to call Refresh method on the SceneCamera so the scene is measured again. You can also set the IsDynamicTarget property to true and the camera will check the size and center position of the scene on every rendering event (on more complex scenes this can take some time, so it is recommended to manually call Refresh method).

If you check the above XAML more carefully you will see that the camera also sets the ShowCameraLight property to Always. This is another great feature of the cameras and simplifies defining the lights. It adds a DirectionalLight to Viewport3D that is illuminating the scene in the same direction as the camera is facing. This is almost the same as a light would be mounted to a real camera because when the camera rotates the light direction will be also changed accordingly. The value “Always” means that the DirectionalLight is always added. We could also set the value of ShowCameraLight to “Auto” – this would mean that the camera would check the scene and if it would not find any light, it would add the DirectionalLight. This is also the default value of the ShowCameraLight property. But if you know that you will define your own lights and want to skip the check for the lights, you can set the ShowCameraLight to “Never”.

SceneCamera is just one of many cameras in Ab3d.PowerToys library. The following is a list of the most useful camera types:

  • SceneCamera
  • ThirdPersonCamera
  • TargetPositionCamera
  • FirstPersonCamea

ThirdPersonCamera is very similar to SceneCamera. But instead of looking at the whole scene it only looks at a specified object (set to CenterObject property). The angles define from which direction the camera looks at the object. The distance in that case defines the distance from the object’s center position. With ThirdPersonCamera it is also possible to use IsDistancePercent property.

TargetPositionCamera is similar to SceneCamera and ThirdPersonCamera but does not have any automatic measurement. Instead there you have full control of the position where the camera is looking at (set with TargetPosition property). If you know the position and size of your 3D objects you can use that camera instead of SceneCamera. TragetPositionCamera is also used when you want full control of the position where the camera is looking at. This camera does not have IsDistancePercent property.

FirstPersonCamera is a camera that does not look at the scene, target position or specified object as previous cameras. Instead it looks at the world from the specified position (set with Position property) – the position of the camera. The angles define the orientation of the camera. This camera does not have the Distance property.

The following pdf file shows samples of using the described cameras:
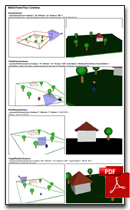
Cameras cheat sheet

The following image shows the class diagram of the cameras (click on the image to see it in full resolution):
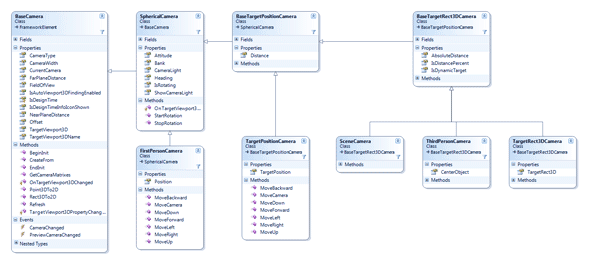
 

Cameras class diagram

This was just a really brief description of the cameras. To learn more about them please see the help file and check the samples that come with the library.


3) 3D Objects

After so many words we still do not have anything to show. So it is really time to add some 3D objects.

Ab3d.PowerToys library comes with many 3D objects. The following are available in version 3.4:

  • Axis
  • Box
  • CenteredLineText
  • Circle
  • ColoredAxis
  • Cone
  • Cylinder
  • HeightMap
  • HorizontalPlane
  • LineArc
  • Line
  • LineWithText
  • MultiLine
  • MultiMaterialBox
  • Plane
  • PolyLine
  • Pyramid
  • Rectangle
  • Sphere
  • Text
  • Tube
  • VerticalPlane
  • WireBox
  • WireCross
  • WireGrid

If you define 3D objects in XAML you have two possible choices: you can create 3D object that are derived from Visual3D or from UIElement3D. For example to define a 3D box you can create a BoxVisual3D or BoxUIElement3D. The later add some additional features like focus, mouse events, tool tip, etc. But if you do not need that features you can use Visual3D objects.

When defining 3D objects in code, you can still create instances of Visual3D or UIElement3D objects. But you can also get a more low level objects (GeometryModel3D) with Model3DFactory, Line3DFactory, WireframeFactory or Text3DFactory classes.

As seen from the list above, the library also supports 3D lines. Here and additional note is needed. Because 3D lines are not supported in WPF 3D, they are not rendered in hardware. Therefore 3D lines are created with triangles that are than send to WPF 3D to render them in hardware.

For example if we need to create a 10 pixels wide 3D line, we are need to calculate the positions that will form two triangles that are oriented in such a way that they are facing the camera. This means that when the camera is changed, we need to recalculate the positions of the triangles so they are still facing the new camera. When we are showing only a few lines this is not a problem. But if we are showing many lines, for example a wireframe from a model with 20.000 vertices, then line recalculation can bring the CPU down and make the application response very bad. There are some tricks that can be used to improve the performance of 3D lines. They are described in the “Lines Stress Test” sample that came with the library (see the comments in the source code of that sample). Here I would just like to notify you that 3D lines in WPF 3D are much slower than solid models and should be used in greater quantities with care. However smaller number of lines are surely not a problem.


Now let’s add some 3D objects.

Insert the following into the Viewport3D:

<visuals:BoxVisual3D CenterPosition="0 5 0" Size="20 10 40" Material="Blue"/>

This will add a blue box to the 3D scene. The box is added to the specified location, with specified size and material. But wait! The Material definition looks very simple. If you are familiar with standard WPF 3D programming than you are more familiar with the following Material definition:

<visuals:BoxVisual3D CenterPosition="0 5 0" Size="20 10 40">
    <visuals:BoxVisual3D.Material>
        <DiffuseMaterial>
            <DiffuseMaterial.Brush>
                <SolidColorBrush Color="Blue"/>
            </DiffuseMaterial.Brush>
        </DiffuseMaterial>
    </visuals:BoxVisual3D.Material>
</visuals:BoxVisual3D>

This is the standard WPF’s way to assign a Blue material. Luckily all the 3D objects in Ab3d.PowerToys library have custom MaterialTypeConverter that enables you to use only one simple word to define the material. The used MaterialTypeConverter is very powerful – with simple strings you can define many possible materials.

For example the same blue material could be specified with Material="#0000FF".

In similar fashion it is also possible to set an image file as a texture. To do that just set the Material to the image file name – for example Material="Images/MyTexture.png".

It is also possible to define a SpecularMaterial. Let’s add a 3D sphere to show you how:

<visuals:SphereVisual3D CenterPosition="30 10 0" Radius="10" Material="S:64;Silver"/>

This creates a MaterialGroup with two children: SpecularMaterial (SpeculaPower = 64, Brush = White) and DiffuseMaterial (Brush = Silver). The SpeculaPower is defined by “S:64;” text. This short material definition always set the SpecularMaterial’s Brush to White (the most common setting). The following string sets a texture image instead of Silver brush: Material="S:64;Images/MyTexture.png".

It is also possible to use EmissiveMaterial. The following will create a sphere that is always Yellow regarding of the lights:

<visuals:SphereVisual3D CenterPosition="30 10 0" Radius="10" Material="E:Yellow"/>

Emissive material is created with a MaterialGroup with black DiffuseMaterial and EmissiveMaterial with brush defined with used string.


The following XAML defines some other 3D objects:

<visuals:BoxVisual3D CenterPosition="0 5 0" Size="20 10 40" Material="Blue"/>

<visuals:SphereVisual3D CenterPosition="30 10 0" Radius="10" Material="s:64;Silver"/>

<visuals:SphereVisual3D CenterPosition="-40 20 40" Radius="3" Material="e:Yellow"/>

<visuals:WireCrossVisual3D Position="-40 20 10" LinesLength="15" 
                            LineColor="Red" LineThickness="3"/>

<visuals:LineVisual3D StartPosition="10 10 -20" EndPosition="20 20 -20"
                        LineColor="Blue" LineThickness="2" StartLineCap="ArrowAnchor" />
                
<visuals:LineWithTextVisual3D StartPosition="20 20 -20" EndPosition="60 20 -20" 
                                LineColor="Blue" LineThickness="2"
                                Text="3D TEXT"/>

<visuals:WireGridVisual3D x:Name="BottomWireGrid" LineColor="#777" LineThickness="1" 
                        WidthCellsCount="10" HeightCellsCount="10" Size="100 100" />

And here is a screenshot from Visual Studio with the 3D scene defined above:
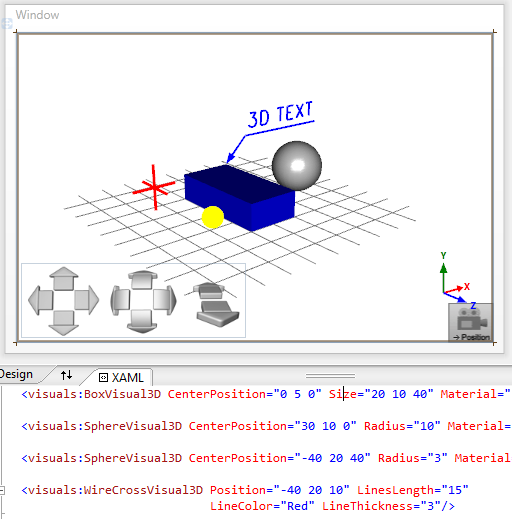
3D Objects in Visual Studio 2010

All the defined 3D objects are seen in the preview window.

In the lower left corner are buttons for the CameraControlPanel. In the lower right corner there is an icon which represents the SceneCamera. This icon is visible only in design time and is there so you can easily select the camera in XAML with simply clicking on the icon (note: if you do not want to see the icon in design time you can set the IsDesignTimeInfoIconShown property to false).

Now you can try out one of the nicest features of the library – the preview of the changes. Everything you change in the XAML, the change will be immediately shown in the preview. This means that you can simple change the heading or attitude of the camera and you will see your objects from another direction. You can also change the position or size of the objects. This way it is very easy to compose your 3D scene. Note: sometimes it can happen that the scene and XAML are not in sync any more – in that case the best solution is to rebuild your project and the preview should be showing the correct image again.

If you run that sample now you will see the 3D objects and will be able to rotate the camera around the objects with left mouse button and move the camera with holding ALT key and left mouse button. You could also rotate the camera with CameraControlPanel buttons. Not bad for just a few lines of XAML.
As shows in the list before the Ab3d.PowerToys define many other 3D objects. The following pdf file shows many of them:
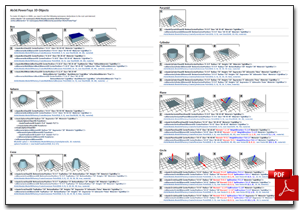
Objects cheat sheet


4) Showing objects from 3ds files

Usually you will want to show more complex 3D models that are defined in some 3D modeling application. This can be done with Ab3d.Reader3ds library.

The Ab3d.Reader3ds library contains classes that can read 3D objects with all of their properties, lights, cameras and animations from 3ds files. The 3ds file format is one of the most commonly used file format for storing 3D models. Therefore almost all 3D modeling applications support exporting into it.

The following schema shows the process of showing 3D objects in WPF application:

Reader3ds Schema

Here let me present just the simplest usage of the Ab3d.Reader3ds.

I will show you how to add 3D objects from 3ds file to your scene defined in XAML file. First you need to add reference to the Ab3d.Reader3ds library and add the following namespace declaration:

xmlns:visual3ds="clr-namespace:Ab3d.Visuals;assembly=Ab3d.Reader3ds"

Than you can use the following XAML to read 3D objects:

<visual3ds:Model3ds Source="Resources/MyObject.3ds" 
                    Position="0 0 0" PositionType="BottomCenter" />

<visual3ds:Model3ds Source="Resources/OtherObjects.3ds" ObjectName="Car01" 
    Position="100 0 0" PositionType="BottomCenter" SizeX="100"/>

The first line reads 3D models from MyObject.3ds file. The model is positioned so that its bottom center position is at (0, 0, 0) coordinates.

The second line reads the OtherObjects.3ds file. It does not show all the objects from that file (as in the first line) but only the object with the “Car01” name. The Car01 object is scaled so its x size is 100 and positioned so that its bottom center is at (100, 0, 0).

Note that when using more than one Model3D with the same 3ds file, the 3ds file is read only once.
Ab3d.Reader3ds also provides many other ways to read 3ds file. To see more please check the samples and help file that come with the library.


5) Conclusion

There are still many features that were not described in this blog post. For example in Ab3d.PowerToys library there is an EventManager3D class that simplifies using mouse events on 3D objects – you can use MouseClick, MouseOver, MouseDrag and other mouse events on specific 3D objects. The library also solves problem with semi-transparent 3D objects with TransparencySorter.

I hope I have persuaded you that the Ab3d.PowerToys and Ab3d.Reader3ds libraries are really easy to use and provide many features to create great WPF 3D applications.

To read more about other advantaged of using WPF 3D and our libraries you are also invited to read the 3D Overview page.

Tags: , ,

Ab3d.PowerToys | Reader3ds

New maintenance release for Ab2d.Reader3ds and Ab3d.PowerToys

by abenedik 3. March 2011 21:37

A minor update for Ab2d.Reader3ds and Ab3d.PowerToys libraries is available.

The update fixes licensing code for WPF Browser applications (partially trusted) - before it was not possible to use both Ab3d.Reader3ds and Ab3d.PowerToys the same WPF Browser application.

The update also fixes problems with reading some tga files with Ab3d.Reader3ds. Because some older 3ds files use tga files for textures quite often, the internal tga file reader was added to version 7.0. This version had problems with some tga files. This problems are now fixed.


Some of you have already noticed that the evaluation version has a brand new installer that enables installing any product from only one installer (before each product has to be installed separately). With the new versions the new installers are now available also for commercial products.

Because of the new installers there are also new commercial versions of Ab2d.ReaderSvg and Ab2d.ReaderWmf libraries available to commercial users. Those versions contain just small changes made for the new installation process and do not bring any new functionality.

Tags: , ,

Ab3d.PowerToys | Reader3ds

New versions of 3D libraries bring WPF 3D to a completely new level

by abenedik 16. December 2010 18:19

With the release of Ab3d.Reader3ds v7.0 and Ab3d.PowerToys v2.0 a new milestone in 3D programming was reached.

The first version of WPF brought us simplified programming with 3D. With WPF there is no need any more to deal with C++, DirectX and graphics drivers. Now programmers can use xaml and managed code to define the 3D scene. Besides this WPF can use high end graphic cards when they are available and can fallback to software rendering when the computer does not have an accelerated graphics.

Of course WPF does not provide all the features of DirectX, so it is not capable of running high end 3D games. But my customers have already proven that it is very capable of showing very complex 3D scenes with models with several hundred thousands triangles.

But WPF still lacks many features to make programming with 3D easy.

Now with Ab3d.Reader3ds and Ab3d.PowerToys users have the ultimate framework to work with WPF 3D.

The Ab3d.PowerToys includes advanced cameras, camera controllers (rotate and move the camera with the mouse, etc.), 3D objects (Box, Sphere, Cone, etc.), 3D lines, 3D text and classes to simplify using mouse events on 3D objects.

With Ab3d.Reader3ds and Viewer3ds it is possible to define 3D models in almost any 3D modeling application (3D Studio Max, Maya, AutoCad, etc.), save the objects into 3ds file and use the 3D models in your WPF application.

The libraries gives you a complete solution for:

  • creating monitoring systems with 3D models,
  • displaying 3D simulations and mathematical models,
  • displaying 3D models of your products or prototypes,
  • creating designing and configuration applications in reality-like 3D scenes,
  • creating interesting 3D effects,
  • etc.


That was a short overview. Now to the details about the libraries and more information about new features.

Viewer3ds

The new version of Viewer3ds application (3ds to xaml converter) that comes with Ab3d.Reader3ds library brings many new improvements.

The application is now using the Ab3d.PowerToys library. Therefore it was really easy to add camera rotation and movement. Among other changes I would also like to mention the new possibility to get detailed information about selected objects (sizes, materials, detailed mesh information, etc.).


The Ab3d.Reader3ds library also got many improvements.

The biggest enhancement is great performance improvement - because of optimized algorithm and multi-threaded processing some 3ds files are read 80% faster. But reading some very large 3ds files can still take a few seconds. To improve user experiance it is now possible to get progress reports while reading the file. The samples that came with the library demonstrate how to show progress window on another thread or read the 3ds file on another thread and show the progress on the main thread.

Let me also mention some other important changes:

  • Improved handling of texture files with simplified notifications about missing texture files.
  • Added GetXaml method to Reader3ds class to get formatted xaml text of the read 3ds file.
  • Improved reading FiledOfView and SpecularMaterials.
  • Improved support for running in partially trusted environment.
  • Added Lights collection.

Complete list of changes can be seen here.


Viewer3ds

I am really proud of the features and capabilities the Ab3d.PowerToys library. They really bring WPF 3D to a completely new level.

The library makes Visual Studio a simple 3D modeling application as all the 3D objects and cameras that are defined in xaml are immediately seen in designer window. This way it is very easy to arrange the objects, set camera or otherwise define the scene.

Already the previous version of the library had advanced cameras (SceneCamera, FirstPersonCamera, ThirdPersonCamera) that enable setting the camera with simply setting heading, attitude and bank angles and defining some other properties like distance. The cameras can be simply rotated with the mouse or camera control panel. The new version goes further with enabling moving the camera. Now any camera can be rotated and moved around. And it is possible to assign rotation and movement of the camera to any mouse button and to any keyboard modifiers. For example the following two lines of xaml add a SceneCamera to the scene and enable rotationg the camera with right mouse button and moving the camera with right mouse button and alt key pressed:

<cameras:SceneCamera Heading="30" Attitude="-20" Distance="200"/>
<ab3dControls:MouseCameraController RotateCameraConditions="RightMouseButtonPressed"
                                    MoveCameraConditions="RightMouseButtonPressed, AltKey"/>

The previous version of Ab3d.PowerToys already included many basic 3D objects (Box, Sphere, Cone, etc), 3D Lines and simplified mouse event handling on 3D objects.

Besides improved cameras the following are the main improvements of the new version:

  • Added support for 3D text.
  • Improved PolyLines - they are now correctly connected to each other.
  • Added MultiMaterialBox where each side of the box can have its own material.
  • Added CreateFrom method to all Ab3d.Cameras - it can be used to create any Ab3d.Camera from existing WPF's Camera (or camera read from 3ds file with Ab3d.Reader3ds).
  • Added CameraAxisPanel - a predefined panel that shows the axis orientation for the target camera.
  • Added RectangleVisual3D, WireBoxVisual3, WireCrossVisual3D, VerticalPlaneVisual3D and LineArcVisual3D.
  • Added IsVisible property to all 3D models derived from Visual3D.
  • Added CreateWireframe method that takes Model3D to create wireframe from Model3DGroup or GeometryModel3D.
  • Fixed for using in partially trusted environment - before creating custom cursor was not allowed - now a Hand cursor is used instead.
  • BREAKING CHANGE: Fixed Bank - now the positive bank values rotate the camera in the clockwise direction (before the direction was counter-clockwise). For example bank angle 30 means that the Camera is rotated as a head would be bended to the right.

The complete list of changes is really long - it can be seen on Abd3.PowerToys web page.


A quick preview of cameras and 3D objects can be seen from two cheat sheets (prepared with WPF; full source code is included with the samples that come with the library):
Cameras cheat sheet
Cameras cheat sheet


Objects cheat sheet
3D Objects cheat sheet


The following are a few screenshots (click on xaml link to see the xaml source code):

[xaml] [xaml] [xaml]
 
 
[xaml] [xaml]  


To see more screenshots and details about the library see Abd3.PowerToys web page.


Ab3d.Reader3ds and Ab3d.PowerToys are separate products, but when the Ab3d.Reader3ds pro library license is purchased, the price for Ab3d.PowerToys library is ONLY 1 USD.


I am already planning to add a few new exciting features to the library. If you have any recommendation and other comments you are most welcome to post them to the library’s forum.


As usual the new version can be downloaded from User Account page (for commercial users) or from my Downloads page (for evaluation version).


PS: For the customers of Ab3d.Reader3ds with expired updates subscription I am preparing a very special offer to renew the subscription – detailed information will be sent to your email in the following days.

Tags: , , , ,

Ab3d.PowerToys | Reader3ds

Ab3d.PowerToys V1.0 released

by abenedik 21. December 2009 09:17

I am happy to announce that the final version of Ab3d.PowerToys has been released.

Ab3d.PowerToys is the ultimate helper library for work with WPF 3D.

The main parts of the library are:

  • Cameras (SceneCamera, FirstPersonCamera, ThirdPersonCamera, etc.),
  • Camera Controllers (MouseCameraController, CameraControlPanel),
  • 3D Models and Visuals (Sphere, Box, Cylinder, etc.),
  • 3D Lines,
  • Event Manager 3D (simplified event handling on 3D objects).

The created 3D objects and used 3D cameras are fully visible in Visual Studio Designer.
This means that the 3D scene can be very easily designed in Visual Studio.

With Ab3d.PowerToys programming with 3D cannot be easier!

Ab3d.PowerToys - All 3D models in Visual Studio Designer


The following is the list of improvements from the Release Candidate version:

  • Added public Model property as Model3D to all 3D UIElements,
  • CenterObject on ThirdPersonCamera now accepts object type instead of Model3D - so it is now possible to assign Visual3D and UIElement3D as center object,
  • Transformed the CurrentSurfaceHitPoint on MouseDrag3DEventArgs when used on Visual3D objects - now the real hit Point3D is get,
  • Fixed EventManager3D when there were no drag surface registered but there were some event sources subscribed to drag event,
  • Added HitObjectName and HitObject to BaseMouse3DEventArgs,
  • Added additional comments and code samples to help file.


There are also a few new samples.

Two new samples show the power of EventManager3D. One show how easy is to create a 3D object that is moved around with the mouse. The other sample shows how to use EventManager3D with Ab3d.Reader3ds library. The sample is similar to Robot Arm sample in Reader3ds samples. But instead of using sliders to move the robot, this sample utilizes the powerful EventManger3D so the robot can be moved around simply by dragging the mouse. Also the light can be switched on and off by clicking on it.

The most interesting new sample is the 3D Cannon simulation. It shows a 3D simulation of a cannon where user can set many parameters like Gravity, Drag factor, ball mass, etc. It is also possible to switch between many possible cameras. The following image shows the sample in action:

Ab3d.PowerToys - Cannon simulation


The 60-days evaluation of Ab3d.PowerToys can be downloaded from Downloads page.

The price for Ab3d.PowerToys license starts from $179.00 (very low price for the amount of work-hours saved). It is also possible to buy full source code for the library.

And that is not all. When a Ab3d.Reader3ds Pro license is bought, the Ab3d.PowerToys license is get for free!

And that is still not all - see the next blog post that is coming very soon Smile

Tags: , ,

Ab3d.PowerToys

Preview the 3D objects from 3ds files in Visual Studio Designer

by abenedik 3. December 2009 23:03

Did you guess it?

A new version of Ab3d.Reader3ds is available!

And it adds great support for showing 3D objects from 3ds file with using only XAML.

By the way, for those who do not know what 3ds is: 3ds is the most commonly used file format for storing 3D content. And Ab3d.Reader3ds is the library that enables you to bring all the 3D models stored in 3ds into the WPF's 3D world.

There are also some other improvements, but let me firstly show you the new XAML support. The following image shows one example of what is possible now:

Viewport3ds in Visual Studio Designer

The image shows that with only one control it is now possible to show 3D models from 3ds file. And it is also possible to see the preview in Visual Studio Designer.

The above code shows the 80th frame of the animation stored in "ab3d drop down.3ds" file. If you would like to play the animation the following can be used:

<controls3ds:Viewport3ds Source="ab3d drop down.3DS"
                         IsAnimated="True"
                         AutoRepeat="True"
                         AnimationDuration="0:0:10"/>

So you only need to set the IsAnimated property to true and the animation stored in 3ds file will be played automatically. It is also possible to set some other animation properties - in our example AutoRepeat and AnimaitonDuration.

This way it has become really easy to include animated 3D content inside WPF applications.


The Viewport3ds is just the most basic way to show the objects from 3ds files. For more advanced users it is now possible to use Model3ds and even Reader3ds in XAML.

The Model3ds is derived from ModelVisual3D. This means it can be used inside Viewport3D. The main advantage of Model3ds over Viewport3ds is that it support precise positioning and sizing of the shown model. Also with Model3ds it is possible to shown just one part of all the models inside the 3ds file. For example the following XAML shows only "Torus01" model from the 3ds file on a custom set position and with custom size:

<model3ds:Model3ds Source="multiple objects.3ds" 
                   ObjectName="Torus01"
                   SizeX="50" SizeY="30" SizeZ="40"
                   PreserveScaleAspectRatio="False"
                   Position="100 20 0" PositionType="BottomCenter"/>	

As with Viewport3ds, the results with Model3ds are also immediately visible in Visual Studio Designer. This way you can simply position and size the 3D element. You can also very easily mix the objects from 3ds file with the basic 3D objects available with Ab3d.PowerToys (for example box, plane, etc.)

This was just a simple sample of Model3ds. For more check out the samples that come with the Ab3d.Reader3ds library.

I have mentioned that now also Reader3ds class can be used in XAML. How is this possible? Until now the class was used in code to read 3ds files. But now it derived from DependencyObject. And this means it can be defined as Resource. For example:

<Page x:Class="Reader3dsSamples.Reader3ds.Reader3dsAsResource"
    xmlns="http://schemas.microsoft.com/winfx/2006/xaml/presentation"
    xmlns:x="http://schemas.microsoft.com/winfx/2006/xaml"
    xmlns:ab3d="clr-namespace:Ab3d;assembly=Ab3d.Reader3ds"
    <Page.Resources>
        <ab3d:Reader3ds x:Key="MyReader3ds" Source="robotarm.3ds"/>
    </Page.Resources>
    <Grid>
        <Viewport3D Camera="{Binding Source={StaticResource MyReader3ds},
                    Path=Cameras[0]}">
            <ModelVisual3D Content="{Binding Source={StaticResource MyReader3ds}, 
                           Path=RootModel3DGroup}"/>
        </Viewport3D>
    </Grid>
</Page>    

The sample shown that because Reader3ds is defined as Page's Resource, it can be used in databinding. In the sample above the Content of the ModelVisual3D and the Viewport3D's Camera are databound to the Reader3d. And this is not all - it is also possible to bind to the Reader3ds NamedObjects dictionary, to Materials dictionary, Cameras list, etc. (see samples with library for more).


As I have already mentioned, the new XAML support is not the only improvement of the Reader3ds.

The 3ds reading engine has been also improved.

Now all the known problems from my very big list of 3ds files (collected with your help also) have been solved.

I have finally managed to find a way to correctly read some 3d objects that were defined with using left-handed coordinate system instead of right-handed one (usually mirrored objects).

Texture mapping is also improved (before some Textures were not placed correctly - in this version I have added DisableTextureOffset property - by default it is true to fix the problems).

Fixed "Object reference not set ..." exception when reading some 3ds files.

Also added support for textures in tif file format.


So now if it looks like Reader3ds or Viewer3ds did not correctly read the 3ds file, please try to open the 3ds file in a 3D modeling application. In almost all the cases the problem is in the 3ds file and not in the Reader3ds. Usually the 3ds file was not correctly exported - probably because you used some advanced features like bones animations, but 3ds file is quite old and cannot store those data. I know, many of you are waiting for some other 3D file format readers - I will make some in the next year for sure.

All of the features of the Ab3d.Reader3ds library still work on .Net Framework 3.0. For performance reasons it is highly recommended that you use .Net 3.5 SP1, but if you develop for .Net 3.0 you still can. But probably the next version will alredy require the 3.5 SP1.


After reading about all the new features, I am sure you agree that the Reader3ds deserved the increase of the version from 5.3 to 6.0.

I also hope that you agree that programming with 3D was never easier!


R2D2 3D model read with Reader3ds


As always the new version can be downloaded from my Downloads page.

Tags: , , ,

Reader3ds

Ab3d.PowerToys library advanced to Release Candidate

by abenedik 20. November 2009 22:16

Ab3d.PowerToys

The Ab3d.PowerToys library has advanced to Release Candidate version.

Here is the list of changes from beta 2:

LIBRARY:
- Added Ab3d.UIElements namespace with 3D objetcs that derive from UIElement3D
- Added ToolTip property to all classes under Ab3d.UIElements namespace
- Added PreviewCameraChanged event to BaseCamera - with the event it is possible to limit the camera movement with setting the Handled property in the event args to true
- Added ShowRotateCursorOnMouseOver property to MouseCameraController - if true it shows the RotationCursor when UsedMouseButton is set to Left and mouse is over the EventsSourceElement
- Added MaterialTypeConverter so it is possible to set Material and BackMaterial on all Ab3d Visuals and UIElements with simply specifying the color name
- Added constructor for Box3DModel that takes Rect3D as parameter
- Improved possibility to set custom images to CameraControlPanel - also added sample to show this
- Redesigned the TargetPositionCamera and TargetRect3DCamera classes - added BaseTargetPositionCamera and BaseTargetRect3DCamera
  This way it was possible to add additional methods to TargetPositionCamera - MoveLeft, MoveUp, etc that move and strafe the camera
  Also now the SceneCamera and other cameras that are derived from TargetRect3DCamera do not have TargetPosition and TragetRect3D properties
- Improved Design Time support:
  Removed all unused properties in VS Properties Editor for cameras
  Added icons for ToolBox (not final yet)
- Changed IsEnabled property in LinesUdater into UpdateMode enum - open for future improvements
- Added IsEmissiveMaterialUsed to LinesUdater to control if EmissiveMaterial is used to create the lines
- Added tons of comments into the code - also improves the help file

SAMPLES:

- Added samples for Ab3d.UIElements
- Added UIElementsToolTipSample - how simple is to use ToolTip property on Ab3d.UIElements
- Added CustomControlPanelSample - demonstrates how to use custom images for CameraControlPanel
- Added simple camera animation sample
- Added sample to demonstrate how to limit the camera movement with using PreviewCameraChanged event
- Improved LinesStressTest sample to show how to manually update the lines to improve the performance of the application

OTHER:

- Added ClassDiagram images to Resources directory so the class diagrams can be printed by the users


The Release Candidate version can be downloaded from my https://www.ab4d.com/Downloads.aspx

If you already have a previous version installed, just install the new version over the previous one (no need to uninstall the previous version first).


Note: This version will expire on on 31th January 2010.

Release is planned for the first half of December 2009.

Tags: , , , ,

Ab3d.PowerToys