New Ab3d.PowerToys and Ab3d.DXEngine version published

by abenedik 14. December 2023 16:06

New maintenance release for Ab3d.PowerToys and Ab3d.DXEngine has been published.

The new version does not come with any bigger new features and only brings a few fixes and improvements. Because of this, only the build version was increased, but the major and minor versions remained the same.

This version also comes with a new build for .Net 8.0. .Net 8.0 that was released a few days ago. At that point, I would like to thank the .Net team, which is doing a great job with each new .Net release. For example, the last version again came with many new performance improvements - see the article about that: Performance Improvements in .NET 8. This means that without any changes in the code, your code will run faster just by using the latest version of .Net.

I did a quick performance test by running the DXEngine multi-threading sample in .Net framework 4.8 and then in .Net 8.0. I used only single-threaded rendering with disabled commands caching and by showing 160.000 3D boxes and 3D lines. This means that for each frame the engine needed to set shader states and issue 160.000 draw calls. The results were astonishing. When running in .Net framework 4.8, the code required around 47 ms to render one frame. But when using .Net 8.0, only around 33 ms was needed for the same job. This is a 30% performance improvement. 

Ab3d.DXEngine performance in .Net 8.0

The new version also comes with an updated Assimp importer. There is a new native Assimp library (v5.3.1) and a new managed Ab3d.PowerToys.Assimp library. Using a newer native library provides a more accurate importer and can read more files correctly. On top of that the Ab3d.PowerToys.Assimp was also improved. This version adds support for reading files with non-ASCII file names. Also, now it is possible to read diffuse textures with emissive materials. And in case you were using hardcoded object names, then I need to inform you that the new version also comes with a breaking change because the new version may set the object names differently. The latest version tries to use names so that they are as close to the original name as possible. In case when an object group also defines its own meshes, the previous version set the name of the Model3DGroup by adding the "__Group" suffix. The new version set the Model3DGroup's name to the original name without any suffix. To prevent using duplicate names, it adds a mesh name as a suffix to the GeometryModel3D's name that is added as a child of the Model3DGroup. If you want to preserve the previous naming, then set the PreserveGroupNames property to false. Note, then in WPF, an object's name must start with a letter or underscore and can contain only letters, digits, or underscores. Because of this, the object names may still be different from the original names in the file. For example, "12-material#10" would become "_12_material_10".

The updated Assimp importer files can found in the libs folder on GitHub.

To see the list of other fixes and changes, see the change log web pages: Ab3d.PowerToys history and Ab3d.DXEngine history.

As mentioned last week, when the new SharpEngine was released, I am planning to release a new major version of Ab3d.PowerToys and Ab3d.DXEngine at the end of Q1 2024 . The following are planned new features:

  • Add support for Screen Space Ambient Occlusion (SSAO) - this can significantly improve the visual quality.
  • Add new options to render pixels and point clouds (world-size pixels in addition to screen-size; render circular pixels or pixels with custom textures).
  • Add support for rendering 3D lines and line segments to an object ID bitmap (can be used for faster line hit testing; especially for MultiLineVisual3D).
  • Add options to copy only part of the object ID bitmap from GPU memory to CPU memory - this would make using ID bitmaps for hit objects much faster.
  • Trying to improve the performance of calculating edge lines by using oct-tree.

For 2024, I would also like to introduce a new product that would allow importing 3D models from STEP and IGES file formats that are commonly used by CAD applications. Later, there would also be improved support for geometric and surface modeling that is based on mathematical surfaces and not triangles.

If you have any additional requests or wishes, please contact us. Otherwise, stay tuned.

Tags: , , , ,

Ab3d.PowerToys

Major versions for Ab3d.PowerToys and Ab3d.DXEngine published

by abenedik 5. July 2023 20:27

I am happy to inform you that new major versions of Ab3d.PowerToys and Ab3d.DXEngine have been published.

The new release brings many great new features and one bigger breaking change.

The breaking change is the removal of the ViewCubeCameraController:

ViewCubeCameraController

A customer recently informed me that the ViewCube is patented by Autodesk. It seems that the patent is active only in the USA. See here: https://patents.google.com/patent/US7782319

Therefore I have decided to remove that control from the library. Instead of ViewCubeCameraController the new version of the Ab3d.PowerToys library now provides the CameraNavigationCircles control. See the screenshot of the new sample that demonstrates the CameraNavigationCircles:

CameraNavigationCircles Sample


And an animation showing that control in action:

CameraNavigationCircles animation

As you can see, the new control provides many customization options and can be used in many different ways. What is more, it can replace both ViewCubeCameraController and also CameraAxisPanel.

However, if you are already using the ViewCubeCameraController and would like to continue using it, then please first carefully study the patent, and consult with a layer. If you still want to use the ViewCubeCameraController, then please contact me and I will send you the source code for that control so you will be able to integrate it into your project.


Another major new feature of this release is improved support for line caps (line endings). Previous versions supported only arrow line caps. The new version adds support for additional arrow types, boxes, diamonds and circles. See the screenshot from the new sample that demonstrates that:

3D lines with different line caps

What is more, the Ab3d.DXEngine finally gets full hardware acceleration of all 3D lines, including lines with line caps. Before, lines with line caps were generated on the CPU (on each camera change the MeshGeometry3D of the line was regenerated and this was very slow). The new version solves that and moves the generation of the lines to the geometry shader. This means rendering millions of 3D lines with different line caps is now possible.

The new Ab3d.DXEngine also improves line initialization time, so if you define many 3D lines, the engine will show them faster. Also, the order in which lines and other 3D objects are rendered is defined by an improved sorting mechanism, so there should be fewer DirectX state changes when rendering, resulting in slightly faster rendering.

The new release also comes with a new build of native Assimp library that can be used to import 3D models from almost any 3D file format. Unfortunately, it seems that the version number of that library has been stuck at v5.2.5 for almost a year, regardless of hundreds of commits. To still be able to see what version is used, a new GitCommitHash property was added. It returns the Git commit hash of the version. For example, the Assimp library that comes with this release has GitCommitHash set to 0dcfe2f - from 2023-07-03. 

The new Ab3d.PowerToys.Assimp library now also supports reading lights and camera data from the imported file.


There are also many other improvements and fixes. Even though a lot of time was spent on the new Ab4d.SharpEngine, the list of changes is still very long - see the change logs for Ab3d.PowerToys and Ab3d.DXEngine.

Tags: , , , ,

Ab3d.PowerToys | DXEngine

New Ab3d.PowerToys and Ab3d.DXEngine with .Net 7 build

by abenedik 10. November 2022 19:58

New versions of Ab3d.PowerToys and Ab3d.DXEngine have just been released. The new versions bring many great new features and because they were released just after the .Net 7 release, the new versions also come with a new .Net 7 build.

Because this release is also linked to a new .Net version release, this blog post also shows some performance numbers related to running Ab3d.DXEngine by using different .Net versions. See the end of this blog post for more information.


Now back to new features. In the past there were many requests to improve the triangulator that was part of the Ab3d.PowerToys library. If we want to show a filled 2D shape, for example an ellipse, as a 3D object, we need to first convert 2D points to 3D points and then define the triangles that will connect the positions. This can be done by using a triangulator. The old version of Ab3d.PowerToys already has a triangulator, but it could process only simple polygons. This was improved in the new version so that the new triangulator can now process multiple polygons and also supports polygons with holes.

Triangulated 3D text

As seen from the image above, this allows generating a 3D mesh from any text (text is represented by a series of 2D shapes). The sample also shows how to generate a 3D mesh from multiple 2D shapes (ellipses, rectangles, paths with bezier curves, etc.). The lower part of the sample shows individual triangles that were generated. There is also a Slider control that can be used to show how the triangles are laid out from the first to the last.

In some cases the new triangulator can also be used instead of Boolean operations. This requires that the main 3D object has a constant height (for example represents a sheet of metal or wood). In case when user wants to subtract a cylinder or some other object that can be extruded from a 2D shape, then using the triangulator instead of a Boolean subtract operation will be much faster and will provide better results (fewer triangles will be created).

Another highly requested feature is better support for collision detection. By using bounding boxes it was already possible to do some collision detection. However, because the bounding box is only an approximation of the space occupied by the object, this was not very precise. The new version of Ab3d.DXEngine brings a new MeshCollider object that can be used to check if one 3D position is inside another 3D mesh. By checking all the positions of one mesh, it is possible to check if one mesh collides with another mesh. The new sample demonstrates that (when checking the sample use arrows, PgUp and PgDown keys):

MeshCollider

An interesting new material type that will greatly simplify work for some users is the new FaceColorMaterial. It supports defining different colors for each of the triangles in the mesh. Before it was already possible to achieve that by using a VertexColorMaterial. But this required that the positions of the mesh were duplicated so that each triangle used its own unique set of positions. Now this is greatly simplified because the original mesh can be used. What is more, by setting the alpha color to zero, the individual triangles can be discarded from rendering. The new sample nicely demonstrates that:

Face color material

Improving the performance of the Ab3d.DXEngine is a never-ending job. This version brings two new performance improvements. The first one is for those that use DXEngine's SceneNode objects and meshes. The new version significantly improves performance of hit testing because it can use OctTree objects on DXEngine's meshes. Before OctTree objects were created only from WPF's MeshGeometry3D objects. 

OctTree object organizes the triangles in a mesh in hierarchically organized 3D space regions so that when triangles are checked if they are intersected by a 3D ray, the number of checked triangles is much much lower. This makes hit testing almost instant even on huge meshes.

Now the DXScene.DXHitTestOptions.MeshPositionsCountForOctTreeGeneration property is also used when doing hit tests on DXEngine's meshes. Its default value is 512. This means that an OctTree will be automatically generated when the mesh has more than 512 positions. You can also manually generate the OctTree by calling the CreateOctTree method.

The second performance improvement will be great news for those who are rendering many polylines (lines where line segments are connected to each other). Multiple polylines are usually defined by a single MultiPolyLineVisual3D object. But though one object is used to define multiple lines, each line was still rendered by its own DirectX draw call. And if there were thousands of lines to render, it took quite some time to issue draw calls for each line. The good news is that with the new version, all the polylines can be rendered with only one draw call. This means that there will be almost no CPU cost for rendering any number of polylines.

As always, there are also many other improvements and fixes. See the change logs for more details here: Ab3d.PowerToys changelog and Ab3d.DXEngine changelog. Also get the latest samples (Ab3d.PowerToys.Wpf.Samples and Ab3d.DXEngine.Wpf.Samples) and check for UP and NEW icons to see new or updated samples.


And as promised before, let me show you some additional performance numbers. Each .Net version brings many performance improvements. There are new classes that can be used to write faster code. But also existing .Net code can run faster because each version improves the JIT compiler so it produces faster assembler code. The following graph shows how performance of the Ab3d.DXEngine can be improved when the application is run in a newer .Net version (running in .Net 4.8 is shown with a blue rectangle that represents 100% of the time; running in .Net 6.0 and .Net 7.0 executed the code faster and therefore the rectangles are shorter):

Ab3d.DXEngine performance in .Net versions

(1) "Multi-threading and caching" sample was run with showing 20000 boxes, using no background threads and disabled DirectX caching. The DrawRenderTime performance parameter measures the time that Ab3d.DXEngine needs to issue all DirectX draw calls. This requires going through all objects, checking their state, setting the DirectX state and calling DirectX Draw method. In this sample most of the time is spent in native DirectX code so the performance gains cannot be huge. But still, there is almost 10% better rendering performance just by using a newer .Net version.

(2) "Instanced animated arrows" sample was run with showing 1 million arrows. The graph shows values for the time that is required to calculate 1 million transformation matrices - each matrix is defined so that an arrow mesh will point toward the animated sphere. The values are based on highly optimized code (manually inlined and optimized math operations) that run on multiple threads (using Parallel.For).

(3) "Instanced animated arrows" sample showing 1 million arrows but this time the source code without any manual optimization is executed. The graph shows that the new JIT compiler can greatly optimize the generated assembler and in this case can provide a 25% performance boost.

(4) "Transparency sorting performance" sample shows the performance of different sorting algorithms that sort 3D objects to prevent transparency artifacts (the sample was updated to show 7200 instead of 720 boxes). The values under (4) show the difference of sorting that sort WPF 3D objects and is implemented by TransparencySorter from Ab3d.PowerToy library. Working with WPF objects is not very fast and there will be no changes in the WPF to make this faster. So it is great news that only using a new version of .Net can significantly improve the performance.

(5) The values here are again from the "Transparency sorting performance" sample, but this time showing the performance improvements of the transparency sorting from Ab3d.DXEngine. The source code for this sorting algorithm is already highly optimized, but still newer versions of .Net can squeeze some more juice from that.

So, Microsoft, keep up the great work!


And finally, the first open beta version of the new Vulkan based cross-platform rendering engine will be available before the end of this year! Let's conclude with the new logo for the engine:

Ab3d.SharpEngine logo

Tags: , , , , , ,

Ab3d.PowerToys | DXEngine

New versions of 3D libraries released

by abenedik 28. April 2022 19:57

I am happy to inform you that new versions of Ab3d.PowerToys and Ab3d.DXEngine libraries have been published.

This is a maintenance release with many improvements, fixes, and some new features.

The most interesting new feature in the Ab3d.DXEngine is added support for XRayEffect. The XRayEffect can render objects that look as they would be photographed by an x-ray. This can be useful when you work on a complex model with many parts and want to select one part while the other parts are just barely visible. In that case it is possible to make other parts semi-transparent. Another option that is available with the new version is to use the new XRayEffect or XRayMaterial. This works especially well when showing models with many triangles and with curved shapes. See example (this is a screenshot from slightly modified XRayEffect sample):

X-Ray effect on Ab3d.DXEngine

The new XRayEffect can be also used in the updated "Model Viewer" sample in the Ab3d.DXEngine samples (to use it check the new "Use X-Ray material" CheckBox in the second tab).

Another new feature can be used by those who use object instancing to render thousands of objects and want to do fast hit testing on the instanced objects. In this case, the new version allows rendering instance id bitmap from instanced objects. This generates a bitmap where colors represent the ids of the instances. By checking the color at a specific pixel, you can get the instance id that was rendered at that screen coordinates. This can also be used to do a rectangular selection or selection of the instance around the mouse cursor.

Also, the standard RenderToBitmap method got an improvement. With the new version it is possible to get direct access to the memory of the rendered bitmap. This way you can reuse the WritableBitmap or use any other method of using the rendered image. This is very useful when you are calling RenderToBitmap method very often because you can optimize and reuse the used objects (before a new WritableBitmap object was created on each call of RenderToBitmap method and this could generate many objects on the large memory heap).

The new version also improves stability in case of disconnecting an external monitor. Stability is also improved in some cases when rendering through a remote desktop.

The previous version introduced two-sided material that doubles the performance of rendering models that had the same front and back side materials. But this did not work in all the cases. This version fixes this issue.

There are also some other fixes and improvements. See the full list here: https://www.ab4d.com/DXEngine-history.aspx


The Ab3d.PowerToys library also got a few new features and improvements.

One interesting new feature is an improved algorithm for extruding a shape along a path. Now you can use two new options. One is to preserve the size of the shape at junctions and the other is to preserve the orientation of the shape's Y direction. See screenshot (the right side shows the extruded model using the new option):

Extrude a shape along a path

The new version of the library also comes with an updated Assimp importer and exporter. It now supports reading embedded textures and saving textures into fbx and glft files. There is also a new native Assimp library v5.2.3 that should improve the accuracy of importing and exporting files (https://github.com/assimp/assimp/releases/tag/v5.2.3)

To see the full list of changes see the change log here: https://www.ab4d.com/PowerToys-history.aspx


You can get the new version by updating the NuGet packages or by downloading the new evaluation or commercial version from your User Account web page. Note if you are using libraries from NuGet and you have recently renewed the updated subscription, then you will probably need to generate a new license activation code for the new version to work (this code can be generated from your User Account web page).


The list of new features is not as long as with some previous versions. The reason for this is that a lot of development effort is now spent on the new Vulkan based rendering engine (Ab3d.SharpEngine). This new engine is progressing very well. This engine will be fully cross-platform so the same code should be able to run on many different hardware devices. Recently we were able to run the code that works on Windows and desktop Linux on Raspberry Pi with a small touch screen attached - see photo:

SharpEngine on Resberry Pi with touch screen (pre-alpha)

Such a setup makes the engine great for controlling some industry machines or equipment.

The engine can also work on Android:

SharpEngine on Android phone (pre-alpha)

Many features from Ab3d.PowerToys and Ab3d.DXEngine were already ported to the new engine. But before releasing an alpha version, the core of the engine still needs some polishing and testing. I expect that the first alpha can be released in a month or two. The plan is to release a closed alpha version and later an open beta version. If you are interested in trying the new engine, please write me an email or feedback and you will be informed when the alpha version is available. This will allow you to test the engine on your hardware and on your devices. It will aso give you some influence on which features will make it to the first official and production-ready version.

Tags: , , , , , ,

Ab3d.PowerToys | DXEngine | SharpEngine

New major versions for 3D libraries released

by abenedik 26. November 2021 10:08

I am happy to inform you that new major versions for Ab3dPowerToys and Ab3d.DXEngine libraries have been released. 

The Ab3d.DXDXEngine has reached version 5.0. This is the 21st release of the library. The Ab3d.PowerToys library has climbed even higher and has reached version 10.0, having the 34th release of the library. The high number of releases is even more impressive when checking the actual change logs (see https://www.ab4d.com/PowerToys-history.aspx and https://www.ab4d.com/DXEngine-history.aspx). The long list of new features and changes that were often requested by the users shows that the libraries have become very mature and that they can be used for many different types of business, technical and scientific applications with 3D graphics. To make the numbers even more interesting, the build number of the new version is set to 8000. Because the build number is calculated as the number of days since 1st January 2000, this means that this release has happened on the 8000th day of the new Millenium (on 26th November 2021).

The highlights of the new versions are:

  • New Model viewer sample.
  • Rendering two-sided materials in one render pass.
  • Triangles sorting for transparent meshes.
  • Updated assimp importer that can read 3D models from almost any file format.
  • Added FitIntoView method for FreeCamera.


The first great new added value of the new version is a new Model viewer sample:

DXEngine Model Viewer

This sample does not provide any new feature but demonstrates many features of the Ab3d.PowerToys and Ab3d.DXEngine libraries. And because almost any application with 3D graphics requires object loading, mouse selection, wireframe and solid object rendering and showing object hierarchy, the sample is an excellent source of code snippets that you can use in your applications.

You can also use the sample to inspect the 3D models that are loaded from many file formats with Assimp importer. As shown in the following screenshot, it is possible to show mesh normals, position indexes and triangle orientations for the selected model:

DXEngine Model Viewer

Additional information can be obtained when an object without children (a GeometryModel3D) is selected. Then clicking on the "Show info" button will show the details about the mesh with a generate c# code that defines the mesh (creating arrays for all positions, normals, texture coordinates and triangle indices).

I am sure that you will find the new Model viewer interesting. Now let me provide some information about new features. Let me start with some background knowledge.

In 3D graphics the most fundamental building block of a 3D object is a triangle. And each triangle has its front and its backside. By default the front side of the triangle is the side where the vertices are defined in counter-clockwise order. The backside is the other side where the vertices are defined in clockwise order (see more here https://www.khronos.org/opengl/wiki/Face_Culling). In 3D graphics you can assign one material to the front side of the triangles and another material to the back side of the triangles. When using a GeometryModel3D object, the front material is assigned to the Material property, and the backface material is set to the BackMaterial property.

Many times the 3D models are solid and closed so we cannot see inside the 3D model. In those cases we can render only the front sides of the triangles and skip rendering the backsides. This reduces the number of rendered pixels by half. For example, 3D box and 3D sphere are solid and closed models and therefore the graphics card does not need to render the inner sides of the triangles. But when rendering a 3D plane, opened cylinder or any other model with holes, the graphics card needs to render both front and back triangles (both Material and BackMaterial properties need to be set). This is needed because the user can rotate the camera to see the other side of the plane or inside the model. The other case when we need to render both sides is when the object uses semi-transparent material. There the user can see the inner side of the 3D model. The models that use the same material for both the front and back sides are described as using a two-sided material. Two-sided materials are used many times for all the objects in technical 3D graphics.

Usually, the rendering of two-sided materials is done in two passes. First, the backside of the material is rendered, then the front side is rendered. When rendering the backside, the DirectX rasterizer state needs to be changed to prevent culling (skipping) the backside. Also, the code in the shader needs to invert the normal vector so that the lighting calculations are correct. This means that rendering models with two-sided material requires two DirectX draw calls and therefore takes twice as much time as rendering models with single-sided materials (actually, there is also an additional performance penalty because of rasterizer state changes).

The new version of Ab3d.DXEngine can use the DirectX SV_IsFrontFace semantics (https://docs.microsoft.com/en-us/windows/win32/direct3dhlsl/dx-graphics-hlsl-semantics) that is used in the shader to check if the front side or the backside of the triangle is being rendered. This information is needed to invert the normal in the case of backside rendering. Also, the backside culling needs to be disabled in the DirectX rasterizer state. This allows the new version of Ab3d.DXEngine to render two-sided materials in one rendering pass. This means that 3D scenes where all 3D models have two-sided materials will be rendered twice as fast as before.

When using DXEngine's materials (supported by StandardMaterial, VertexColorMaterial, PhysicallyBasedMaterial and WpfMaterial), the two-sided rendering can be enabled by setting the IsTwoSided property to true. When using WPF 3D objects, then two-sided rendering will be used when the Material and BackMaterial on the GeometryModel3D are set to the same material instance. This will set the IsTwoSided property to true in the DXEngine's WpfMaterial that is created from the WPF's material. 

It is possible to prevent this new functionality by changing the static DXViewportView.UseTwoSidedMaterialsForSolidObjects and DXViewportView.UseTwoSidedMaterialsForTransparentObjects fields. As seen from the field names, there are different settings for solid and for transparent objects. By default, solid two-sided objects are rendered in one rendering pass (UseTwoSidedMaterialsForSolidObjects is true). But by default, transparent objects are still rendered in two passes (UseTwoSidedMaterialsForTransparentObjects is false) - first rendering the back material and then the front material. This is needed to preserve the rendered result as it was before. It is possible to set the UseTwoSidedMaterialsForTransparentObjects to true, but then it is recommended to set the new DefaultTransparentDepthStencilState field to DepthRead (from DepthReadWrite). This will render transparent objects in one render pass and correctly render the inner side of the objects. See the new "TwoSided materials" sample for more info.

DXEngine Model Viewer


The next new feature of the engine is the support for sorting individual triangles in a mesh. This may be required when showing semi-transparent meshes that have complicated geometry, as for example the following torus knot:

DXEngine Model Viewer

On the left the screenshot shows the object without sorted triangles. Red arrows mark the parts that are not correctly visible through the mesh. Green arrows indicate the correctly rendered pars of the object. Note, if the object would be rotated to the other side, then the correctly visible parts would change.

The new version of Ab3d.DXEngine has a highly optimized triangle sorting code that works on low-level triangles and positions data (WPF's MeshGeometry3D objects are not used because they are very slow). The code changes the data in the index buffer. After sorting is done on the CPU, then the changed index buffer needs to be sent to get GPU. Those two processes can take some time, so you should consider using triangle sorting only when really needed. 

Ab3d.DXEngine has got some other great new features and bug fixes. And there are also two new additional samples that are designed to improve understanding of GraphicsProfiles and different options to render wireframe lines. See screenshots:

DXEngine Model Viewer

DXEngine Model Viewer


The Ab3d.PowerToys library also got some great new features. In my opinion the most important new feature is an updated Assimp importer. The Assimp importer is a third-party native library that can import 3D models from more than 40 file formats. The previous version 5.0.1 of Assimp was released a long time ago, in January 2020. After that release, the library got many improvements and also some breaking changes that crashed the .Net wrapper. But because there was no increase in the library's version number, it was not possible to update the wrapper to work with the newer build of the library. Finally, on 20th November (last week) a new official version 5.1.1 of Assimp library was released. This meant that it was possible to update the AssimpNet (.Net wrapper for the native library) and the Ab3d.PowerToys.Assimp library (helper library that converts the read 3D models into WPF 3D objects). The new libraries improve support for many file formats and add some new file formats to the supported list.

Those two libraries and the compiled native Assimp library are available with the new Ab3d.PowerToys sample on GitHub (https://github.com/ab4d/Ab3d.PowerToys.Wpf.Samples/tree/master/lib). Those libraries are also installed by the evaluation installer of the AB4D products (https://www.ab4d.com/Downloads.aspx) and the commercial installer for the Ab3d.PowerToys library (available from User Account web page).

The new version of Ab3d.PowerToy also comes support for calling the FitIntoView method when using FreeCamera (a highly requested feature). This provides the same functionality to FreeCamera as available by the TargetPositionCamera.


As always, please update to the new versions and check the new samples projects (https://github.com/ab4d/Ab3d.DXEngine.Wpf.Samples, https://github.com/ab4d/Ab3d.PowerToys.Wpf.Samples). In the new samples check the samples that are marked with NEW and UP icons. The icons mark new samples and the samples that were updated in the last version (hovering the mouse over the UP icon will show you more information about the change).

Tags: , , , ,

Ab3d.PowerToys | DXEngine

Super-smooth lines with many other features in new versions of 3D libraries

by abenedik 12. November 2020 11:12

I am happy to inform you that new versions of Ab3d.DXEngine and Ab3d.PowerToys have been released.

By the new version numbers you may think that this is just a smaller update, but I am sure that the content that follows will persuade you that this is another big and great update that can significantly improve the value of your application and provide you with some great new tools for your work with 3D graphics.

Here are the highlights of the new version:

  • Added support for super-sampling provides rendering of super-smooth 3D lines and better rendering of details.
  • Added support for creating edge lines and improved support for rendering object outlines. This can render the scene in a way that is standard for CAD programs.
  • Improved support for rendering the same 3D scene with different DXViewportView (each with different camera and render settings).
  • Significantly improved the performance of the DXEngine's update step.
  • Simplified hierarchical organization of Visual3D objects with using ContentVisual3D that defines IsVisible property and now also supports showing and hiding Visual3D objects in Children collection. This also greatly improves the performance of showing and hiding Visual3D objects.
  • Improved ViewCubeCameraController - the new version supports clicking on cube edges and corners. 
  • Added custom wpf3d file format that can store WPF 3D scene. The full source code to read and write wpf3d file is available with the samples project. This way the code can be adjusted to your needs.
  • Many other improvements and fixes.


The following image demonstrates the first two highlights:

Super-smooth 3D lines with using super-sampling in new Ab3d.DXEngine

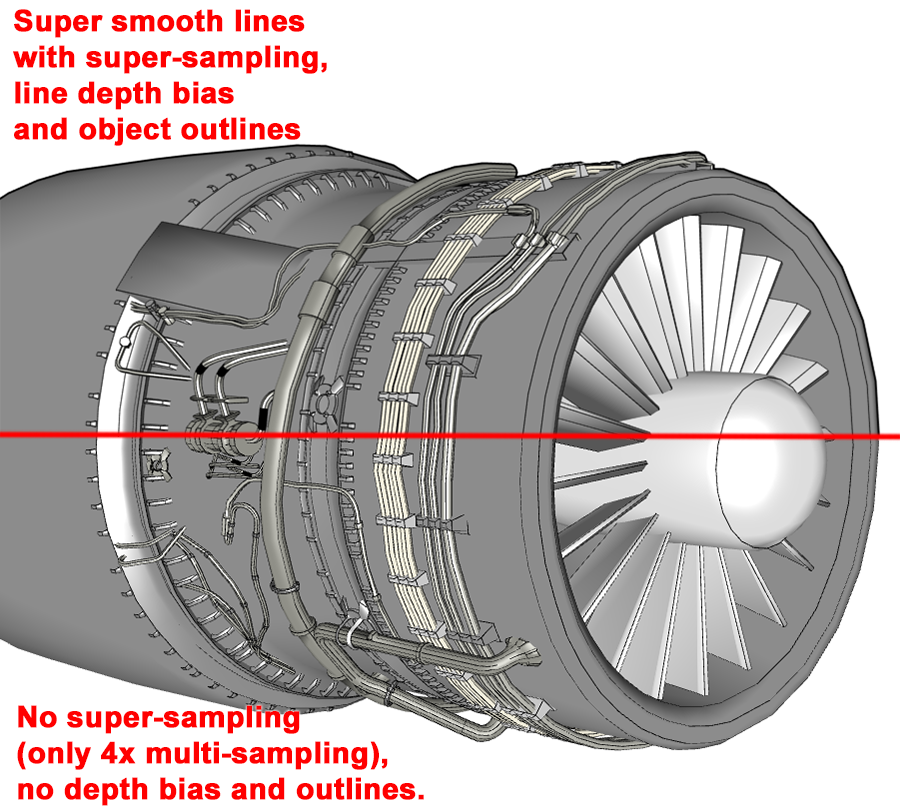
The first step in creating the image above was to import an aircraft engine model from a file. Then a new EdgeLinesFactory.AddEdgeLinePositions method was called. This method analyses the 3D model and creates edge lines if the angle between two adjacent triangles is bigger than the specified angle. This way it is possible to get much more accurate edge lines than by showing the wireframe of the model. The problem with showing the wireframe is that it shows lines around all triangles even if they lay on the same plane (for example, a diagonal line on cube sides). After having the edge lines, we can show the lower part of the image.

But as the upper part of the image shows, with the new version of Ab3d.DXEngine it is possible to create a superior and much more professional looking result. 

The first thing that can be done with the Ab3d.DXEngine is to set line depth bias. This moves the 3D lines towards the camera and away from the solid model so it cannot occlude the lines when they occupy the same 3D space. In the upper image, this can be seen in the lower right part of the image where the line thickness changes because the solid model occludes the lines. The new version of Ab3d.DXEngine also improves using line depth by preventing the lines from being moved away from the 3D model (when using a perspective camera). This simplifies setting the correct line depth bias.

The second feature that improves appearance in the image above is the object's outline. This renders a thicker line around 3D models. The line is also drawn on places where there are no edge lines - for example, when a curved model ends - in the image above this is just below the "objects outlines" text.

But the most significant improvement of using the new Ab3d.DXEngine is the use of super-sampling that can produce super-smooth 3D lines. In the last few months a lot of effort was put into improving the quality of 3D lines. I first tried to create smooth lines by adjusting the alpha values on pixels near the edge of the line. This slightly improved line quality. But because of using transparency on the edges, this could create artifacts if lines were not rendered in the correct order. After some other tests, it finally became apparent that using super-sampling can provide the best results. Click here to see a screenshot from a line quality testing sample.

Super-sampling (SSAA) is an anti-aliasing technique where the 3D scene is rendered to a bigger image and then down-sampled to the final image. For example, 4x SSAA means that the rendering is performed to an image that has twice the width and twice the height of the final image (has 4 times the number of pixels). The image quality can be further improved when down-sampling uses a special filter that reads samples in a slightly rotated pattern and uses different weights on the read samples. As the image above shows, this can produce highly superior results.

The difference between super-sampling and multi-sampling is that with multi-sampling, the number of pixel shader invocations is the same as with no multi-sampling. In this case, the color that the pixel shader returns is saved to multiple pixels (samples). At the end of rendering the multi-sampled texture is resolved so that all the samples are used to produce the final pixel color. This can significantly improve edge aliasing. But because there were no more pixel shader invocations, this does not produce an image with more details. For example, 4x MSAA requires 4 times the memory because each pixel shader result is shared with 4 pixels, but the number of pixel shader invocations is the same as when no multi-sampling is used. This is the main difference compared to super-sampling. There the scene is rendered to a bigger texture. This means that 4x SSAA requires four times the memory and also four times the number of pixel shader invocations. As seen in the image above, using 4x MSAA can significantly improve line quality compared to using no multi-sampling. But using 8x MSAA does not provide any more significant quality improvement. But using super-sampling can provide much better results.

Because of much higher memory usage and the number of pixel shader invocations, using super-sampling comes with high costs. This may not provide a significant difference on a high-end graphics card, but on an integrated graphics card, the slow-down may be noticeable. Though the max supported super-sampling count is 64 (rendering to 8 times width and height), the high super-sampling count should be avoided in most cases. You should also be careful because the maximum texture width and height in DirectX 11 is 16384. For example, this limit is reached on a 4k monitor when 16x SSAA is used. The Ab3d.DXEngine knows about this limitation and can dynamically reduce the super-sampling count to stay below this limit. Also, because SSAA can be combined with multi-sampling (MSAA), the recommended setting to achieve super-smooth lines is to use 4x SSAA with 4x MSAA (this was also used to produce the image above). To see the memory requirements of the various settings, open the diagnostics window that now shows the required amount of memory. The diagnostics window can be opened in the samples project by clicking on the Diagnostics button. In your application you can show the diagnostics window by using the DXEngineSnoop tool and attaching to your application (more info on Ab3d.DXEngine diagnostics web page).

Also note, that because of super-sampling, the settings for standard GraphicProfiles have changed:

  • NormalQualityHardwareRendering is the same as before - using 4x MSAA and no super-sampling.
  • HighQualityHardwareRendering is now using 4x MSAA and 4x SSAA (before 8x MSAA was used - so now twice the memory is required and 4 times the number of pixel shaders invocations).
  • UltraQualityHardwareRendering is now using 2x MSAA and 16x SSAA (before 8x MSAA was used - so four times the memory is required and 16 times the number of pixel shaders invocations).

This is important because if you are using HighQualityHardwareRendering or UltraQualityHardwareRendering you should not be surprised if the new version will be slower than the previous version. To compare the performance, use the same settings, or keep in mind that the new super-sampling requires much more work behind the scene.

To summarize, if you show 3D lines, then the superior line quality should justify the costs of super-sampling - especially using 4x SSAA with 4x MSAA. But my recommendation is that you still use it wisely. The easiest option is that your application provides a setting that can change the graphics quality. This way users on slower computers can disable or reduce the super-sampling and still enjoy in great application performance but with reduces quality. To provide a suitable default quality setting, you may check the amount of graphics card memory, display's size and monitor DPI setting (see source code of SystemInfo class for a sample on how to get GPU memory size; you can get DPI settings by a new static GetDpiScale method on DXViewportView).


Ok, we have covered the first two points in the highlights list. Let's move on. The most obvious way to hide some of the 3D objects is to remove them from the 3D scene. But when this is done with Ab3d.DXEngine (and if the objects are not added back to the scene in the same frame), then the DirectX resources for the removed objects are disposed and removed from the graphics card. This also means then when those objects are added back to the scene, then the DirectX resources will need to be regenerated and sent to the graphics card.

Ab3d.DXEngine tried to solve this with improved support for IsVisible property that was available with the BaseVisual3D class from Ab3d.PowerToys library. In this case when the IsVisible property was set to false, then all the DirectX resources are preserved, but the rendering of the object is skipped in the rendering loop. This means that when the IsVisible property was set back to true, the object can be shown instantly as no resources need to be created.

Because all Visual3D objects from Ab3d.PowerToys are derived from that class, they all received that improved support. With using ContentVisual3D (also derived from BaseVisual3D) it was also possible to show and hide any GeometryModel3D or Model3DGroup objects that was set to ContentVisual3D.Content property. But if you want to show or hide a hierarchy of Visual3D objects, then you still needed to remove those objects from the scene and then add them back. This was finally solved with the new version of Ab3d.PowerToys and Ab3d.DXEngine that now also fully supports showing and hiding Visual3D objects from ContentVisual3D.Children collection.

What is more, because ContentVisual3D now defines a new ChildrenChanged event, it is much easier (and requires much less CPU time) for the Ab3d.DXEngine to check the changes in the Children collection. This makes the ContentVisual3D class a much more appropriate object to hold other 3D objects than the ModelVisual3D class. To simplify the usage of ContentVisual3D, there is also a new CreateContentVisual3D extension method that can simplify creating ContentVisual3D objects from any GeometryModel3D or Model3DGroup objects.

So using ContentVisual3D with Ab3d.DXEngine can reduce the time in the update phase (in this phase the objects are checked for changes and the RenderingQueues are updated). The new version also significantly reduces update time in some other very common cases. One such case is when an object's transformation is changed. Now, this is processed much faster and in a 3D scene with many objects can provide significantly lower update times. Also, changing individual positions or triangle indices in MeshGeometry3D now takes the faster update path.

Another great new feature is improved support for having different views of the same 3D scene. Each view can have a different camera and use different rendering settings. Before, this was possible only by creating new Viewport3D objects and duplicating the Visual3D objects in each Viewport3D (the MeshGeometry3D and Model3D objects can be shared). What is more, it was not possible to use the same SceneNode objects in multiple views. With the new version of Ab3d.DXEngine it is possible to create a DXViewportView by passing a master DXViewportView as a constructor parameter. This creates a child DXViewportView that uses the same 3D scene (DXScene object) but can provide its own camera and its own rendering settings (rendering scene as wireframe, rendering just some objects of the scene, or using some special effects on some views).

The new samples projects for Ab3d.PowerToys library also comes with a new Wpf3DFile class. This class provides the full source code to read and write wpf3d files. wpf3d is a custom binary file format that can save WPF 3D scene. It can save the hierarchy of Model3D objects with their materials. It can also save model metadata with a preview bitmap. This way you can quickly read the metadata and show that to the user. The following screenshot is showing a sample with four possible wpf3d files:

Simple dialog to import wpf3d files shows some file metadata and preview bitmap

The main use case for using this file format is to convert existing files in other file formats (for example fbx) into wpf3d files. Then you can simply use the Wpf3DFile class to read the files and do not need to distribute the native Assimp library with your application anymore. You can also change the Wpf3DFile source code and store some additional data relevant to you into the file. You may also want to encrypt the data, use any other file extension (not .wpf3d), or make any other change to the file structure.

The last feature that I would like to mention is an improvement to the ViewCubeCameraController.  Because the ViewCubeCameraController provides such an intuitive way to show the orientation of the camera, it is used by many users. Therefore, you will be happy to hear that the new version of ViewCubeCameraController supports clicking on the cube's edges or corners to rotate the camera. For users this is a very nice and useful feature. And what is the best - you just need to update to the latest version of Ab3d.PowerToys and do not need to change anything in your core to provide this new feature.

As always, there are many other new features and fixes. The best way to check them is to see them in action with new samples projects that come with both libraries - start the samples and pay attention to the NEW and UP icons in the samples list on the left (the UP icon also provides a tooltip of what is changed). You can also read the full change log on Ab3d.PowerToys history and Ab3d.DXEngine history.

You can get the new versions from new NuGet packages. If you have a valid updates subscription, you can download new installers from your User Account web page. To just test the new version you can also download the new evaluation version from the Downloads page.


Let me conclude with some future plans. 

The .Net 5 was just released two days ago (on 10 November). I did some testing with .Net 5 RC versions and both Ab3d.PowerToys and Ab3d.DXEngine compiled and ran without any problems there. But I run out of time to thoroughly test and update the release process to provide an official .Net 5 versions of the assemblies. But this will be done in the near future. So stay tuned for news about that.

And finally, a sneak peek of a more distanced future:

Early preview of Vulkan rendering engine for .Net running on Linux

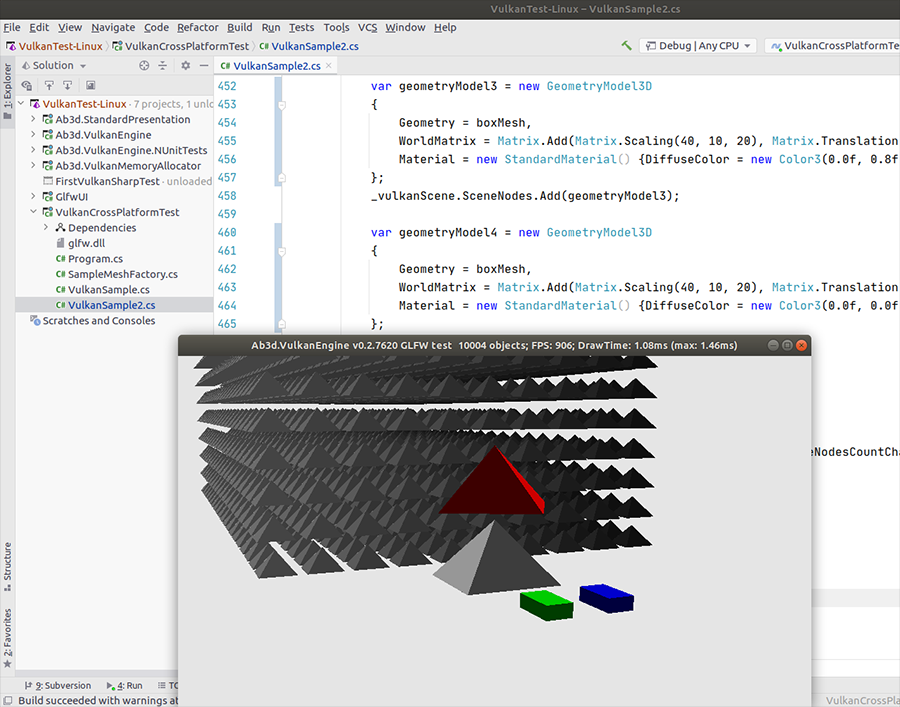
This screenshot shows v0.2 of the new Vulkan based rendering engine. The screenshot shows it can run on Linux. There is a Rider IDE in the background. See great performance figures in the window title - note that this is running on an older system with i7 3770 @ 3.4 GHz and NVIDIA 970 GTX. The new rendering engine is being written from the ground up and will use the latest .Net features and all the know-how from Ab3d.PowerToys and Ab3d.DXEngine.

It is hard to say when the first official version of the new engine will be available. Using Vulkan API and different platforms is much more challenging than using DirectX 11 and Windows. Therefore, if you would like to speed up the development, participate in the development by providing feedback and testing on other platforms or would just like to share your wishes and ideas, you are most welcome to contact me.

As always, the goal is to provide you an awesome cross-platform rendering engine for technical, scientific and CAD-like 3D visualizations.

Tags: , , , , , ,

Ab3d.PowerToys | DXEngine

New version of Ab3d.DXEngine comes with DirectX command list caching and many new features

by abenedik 1. June 2020 11:48

I am proud to inform you that a new major release of the Ab3d.DXEngine has been released. There is also a new minor version of Ab3d.PowerToys.

Let's start with a question: what makes a rendering engine faster? The answer is simple: a faster rendering engine will render the 3D scene quicker and achieve higher frames per second. This can be achieved in two ways. The first option is to provide special rendering techniques to the end-user that can optimize the rendering (for example, object instancing). The second option is to organize the data for the 3D scene so that it can be sent to the graphics card as quickly as possible and in a way that allows the graphics card to render the scene the most optimally.

This part of the job is done internally by the DXEngine. This process was already highly optimized for CPU, memory access and can be executed using multiple threads. Still, a 3D scene with a few thousand objects may require a few milliseconds of CPU time to render. In this case, a rendering engine written in C++ or another low-level language may be faster because its code can be better optimized.

But with the introduction of DirectX commands caching in the new version of Ab3d.DXEngine, this advantage of low-level languages is significantly reduced. In case when only camera or lights are changed (the majority of cases in a typical business or scientific 3D application), then the new version of Ab3d.DXEngine can render the new frame with only updating the camera and lights data and then "instructing" the graphics card to re-render the new frame with using the DirectX commands that were recorded in one of the previous frames. This requires so little code to be executed on the CPU, that even if the engine were written in C++, the performance difference would not be noticeable.

Therefore I would like to conclude the first part of this post with a statement that in cases when DirectX commands caching can be used (in a typical business 3D application this is most of the cases) the Ab3d.DXEngine is as fast as if it would be written in C++. 

Let me show you that in action:

Ab3d.DXEngine with DirectX command list caching

As seen from this screenshot, in case of rendering 160.000 individual 3D objects, the time required to send all that data to the graphics card is only 0.14 ms (see DrawRenderTime which shows time to execute 160.000 draw calls with all required state changes). This way, it would be possible to achieve almost 3000 FPS. When the command list caching would be disabled, then the DrawRenderTime would be around 16 ms. This is still a fantastic result and can be achieved using multi-threading and many other optimizations.

Another area that received some great new features is rendering transparent objects. Rendering transparent objects can be hard in 3D graphics. The reason for that is that when a transparent object is rendered, the colors of the already rendered objects are blended with the color of the transparent object. This means that if we want to see the objects through transparent objects, they need to be rendered before the transparent object. Usually (when the objects are not self-intersecting), this can be solved with sorting the objects so that the objects that are farther away from the camera are rendered first. To help you with sorting, you can use the TransparencySorter class from the Ab3d.PowerToys library. But this class work only for WPF 3D objects. What is more, sorting WPF 3D objects can be a very slow process and in case of complex hierarchy, it may not be possible to sort all the objects correctly.

The new version of Ab3d.DXEngine provides a better way of sorting transparent objects. With setting the DXScene.IsTransparencySortingEnabled property to true (by default it is set to false to make the engine work as in the previous version), the engine automatically sorts all the objects in the TransparentRenderingQueue. Because the objects there are defined in a flat queue, there is no problem with the hierarchical organization of objects. Also, sorting is highly optimized and uses multi-threading, so it is much faster than TransparencySorter. And finally, the DXEngine's SceneNodes can also be sorted in this way.

Another new feature regarding transparent objects is the added support for alpha-clipping and alpha-to-coverage. Those two techniques can be used to render textures that have opaque and also transparent pixels (for example, text with a transparent background or threes). An advantage of those two techniques is that they do not require the objects to be sorted by camera distance. But they can produce some artifacts on the areas where the transparent part of the texture is transitioned to the opaque part. If this transition is small, then the results can be very good. In the case of using alpha-clipping, the user can select an alpha clip threshold - this is a value that specifies at which alpha value the pixels are clipped. When using alpha-to-coverage, it is possible to use MSAA (multi-sample anti-aliasing) to provide a more accurate level of transparency with making some sub-pixel samples transparent and some opaque. See the comments in the new sample for more information.

There are also improvements in how textures are loaded. First, all textures that are created from WPF BitmapImage objects are checked if they actually contain transparent pixels. In the previous version, only the file format was checked and if it supported transparency, then the texture was considered transparent. In this case, the object that used that texture was put into the TransparentRenderingQueue - requiring alpha blending (more GPU memory transfer), transparency sorting and having no rendering optimizations. In the version, the DXEngine "knows" if the texture does not have any transparent pixels so its object can be put into the StandardGeometryRenderingQueue. This way, it gets support for multi-threaded rendering and DirectX commands caching.

The last new feature related to transparency is that the TextureLoader.LoadShaderResourceView method has been significantly improved. The method loads a texture into a DirectX resource and now also sets a new TextureInfo class that describes the loaded texture: image size, dpi, format, has transparent pixels. That information can help you correctly set the properties in the StandardMaterial or any other material that is showing the texture.

There are also some other great new features. Let me quickly mention some of them.

Object instancing also received a few improvements. The first improvement is that it is now possible to quickly hide (discard) some instances when setting their alpha color to 0. In the previous version, such instances were still rendered - they were not visible because of alpha value 0, but their depth values were still written and therefore this prevented rendering of all objects behind them. So in the previous version, you needed to re-create the InstancesData array with removing some items from the array.

The next new feature is that now you can render instanced objects with a single color without any light shading. Another instancing improvement is that it is now possible to specify the size of each instance in screen-space units. This means that even when you zoom in or out, the size of the instances on the screen will remain the same (the size calculations are done on the graphics card).

Another performance-related improvement is that now multi-threaded rendering is also supported for 3D lines. Before, it was supported only for standard and opaque 3D objects. It is still better to combine many 3D lines into a single 3D line object (for example, MultiLineVisual3D or even better ScreenSpaceLineNode), but if you happen to have many individual 3D line objects, then the new version could now render at more then 4-times the speed.

If you are an advanced DXEngine user, you will be interested in that the GeometryRenderingQueue has been split into 4 different rendering queues: 

  • ComplexGeometryRenderingQueue - used for instanced objects and very complex meshes (with more than 100.000 triangle indices or 20.000 lines) - the idea is to send such objects to GPU as soon as possible,
  • StandardGeometryRenderingQueue - highly optimized for rendering standard 3D objects - supports multi-threading and command list caching,
  • OtherGeometryRenderingQueue - used for other 3D objects with non-standard effects,
  • LineGeometryRenderingQueue - used for opaque and solid color 3D lines - support multi-threading),

The old GeometryRenderingQueue is still defined in the DXScene class. But it is marked as obsolete and points to the OtherGeometryRenderingQueue. If you are using the GeometryRenderingQueue, please change that to any of the 4 new rendering queues instead.

Advanced users will be also happy to hear that there are some interesting improvements in the Diagnostics project that is also used in the DXEngineSnoop tool (see also Diagnostics Guide). Now you can render an object-id bitmap of the 3D scene - there the colors in the bitmap represent the ids of the rendered objects. You can also disable and enable rendering of some RenderingQueues and RenderingSteps. With those new features, you can diagnose some low-level rendering problems and get some additional understanding of how the rendering engine works.


As always, there are many other new features, improvements and bug fixes. This is also true for Ab3d.PowerToys. To get the full list of changes see Ab3d.DXEngine versions history and Ab3d.PowerToys versions history.

From the number of support requests, I have seen that the corona crises have significantly slowed down the development worldwide. This lasted for around a month and a half. Then suddenly, there was a burst of activity that highly exceeded the time before the pandemic. So it looks like during the quarantine, you had time to gather many great new ideas. So, when the development started again, you wanted to try them right away. I was pleased to see that. I hope that the newly published versions will allow you to realize your ideas even more quickly and have better results.

Tags: , , , ,

Ab3d.PowerToys | DXEngine