Ab3d.PowerToys library advanced to Release Candidate

by abenedik 20. November 2009 22:16

Ab3d.PowerToys

The Ab3d.PowerToys library has advanced to Release Candidate version.

Here is the list of changes from beta 2:

LIBRARY:
- Added Ab3d.UIElements namespace with 3D objetcs that derive from UIElement3D
- Added ToolTip property to all classes under Ab3d.UIElements namespace
- Added PreviewCameraChanged event to BaseCamera - with the event it is possible to limit the camera movement with setting the Handled property in the event args to true
- Added ShowRotateCursorOnMouseOver property to MouseCameraController - if true it shows the RotationCursor when UsedMouseButton is set to Left and mouse is over the EventsSourceElement
- Added MaterialTypeConverter so it is possible to set Material and BackMaterial on all Ab3d Visuals and UIElements with simply specifying the color name
- Added constructor for Box3DModel that takes Rect3D as parameter
- Improved possibility to set custom images to CameraControlPanel - also added sample to show this
- Redesigned the TargetPositionCamera and TargetRect3DCamera classes - added BaseTargetPositionCamera and BaseTargetRect3DCamera
  This way it was possible to add additional methods to TargetPositionCamera - MoveLeft, MoveUp, etc that move and strafe the camera
  Also now the SceneCamera and other cameras that are derived from TargetRect3DCamera do not have TargetPosition and TragetRect3D properties
- Improved Design Time support:
  Removed all unused properties in VS Properties Editor for cameras
  Added icons for ToolBox (not final yet)
- Changed IsEnabled property in LinesUdater into UpdateMode enum - open for future improvements
- Added IsEmissiveMaterialUsed to LinesUdater to control if EmissiveMaterial is used to create the lines
- Added tons of comments into the code - also improves the help file

SAMPLES:

- Added samples for Ab3d.UIElements
- Added UIElementsToolTipSample - how simple is to use ToolTip property on Ab3d.UIElements
- Added CustomControlPanelSample - demonstrates how to use custom images for CameraControlPanel
- Added simple camera animation sample
- Added sample to demonstrate how to limit the camera movement with using PreviewCameraChanged event
- Improved LinesStressTest sample to show how to manually update the lines to improve the performance of the application

OTHER:

- Added ClassDiagram images to Resources directory so the class diagrams can be printed by the users


The Release Candidate version can be downloaded from my https://www.ab4d.com/Downloads.aspx

If you already have a previous version installed, just install the new version over the previous one (no need to uninstall the previous version first).


Note: This version will expire on on 31th January 2010.

Release is planned for the first half of December 2009.

Tags: , , , ,

Ab3d.PowerToys

Ab3d.PowerToys Beta 2 available

by abenedik 4. November 2009 00:23

The new version of Ab3d.PowerToys brings you even more useful classes and utilities for WPF 3D.

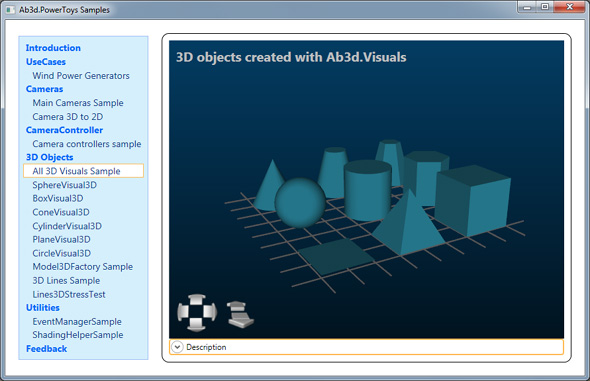
The sample application that comes with the library is again a very good demonstration of capabilities of the WPF 3D engine.


The main new part of the library is added support for creation of basic 3D objects and 3D lines.

Now the library contains all the essential parts that are needed with 3D WPF development:

  • advanced cameras
  • camera controllers
  • simplified mouse events handling on 3D objects (improved in beta 2)
  • basic 3D models (new in beta 2)
  • 3D lines (new in beta 2).


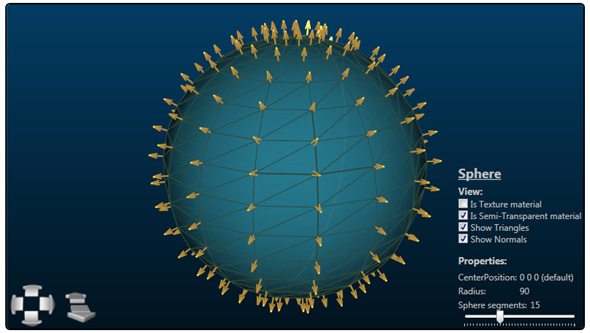
The following basic 3D objects can be created: Plane, Circle, Box, Pyramid, Sphere, Cone and Cylinder.

Advantages of the 3D models in Ab3d.PowerToys are:

  • The biggest list of supported 3D objects with lots of propertes for customization of objects.
  • Many different ways to create 3D objects: in XAML with Visual3D classes, in code with Model3DFactory class (to create GeometryModel3D objects) or in code with classes under Ab3d.Meshes namespace to create MeshGeometry3D objects.
  • Highly optimized code to make the creation as fast as possible.

Ab3d.PowerToys Samples - All 3D models

Ab3d.PowerToys Samples - All 3D models


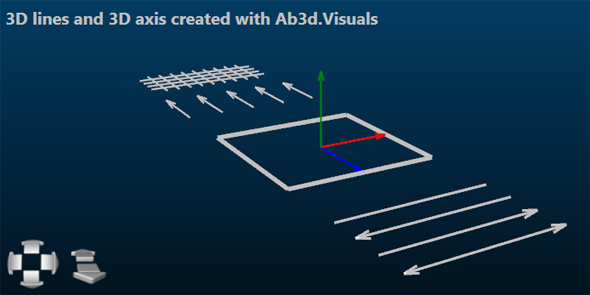
3D lines can be created from code with Ab3d.Models.Line3DFactory. The methods in the Line3DFactory return 3D lines as GeometryModel3D objects. This means that you can add 3D lines to the existing Model3DGroup.

The lines can be also created as Visual3D objects with the following classes: LineVisual3D, MultiLineVisual3D, PolyLineVisual3D, AxisVisual3D, ColoredAxisVisual3D or WireGridVisual3D. The visuals can be used in XAML which means that you can see the results in Visual Studio designer.

There is also a Ab3d.Models.WireframeFactory to create wireframe objects from existing 3D models. WireframeFactory also contains methods to create lines for 3D model normals.

Because WPF does not natively support 3D Line, the line must be created with 3D model that consists of two triangles. The positions of the triangles depend on the position of the camera and size of Viewport3D. This means the code that draws the line must constantly check if the camera was changed, the parent Viewport3D or Visual3D is changed or the parent is not visible any more. This process can normally affect performance. The implementation in Ab3d.PowerToys library is designed in such a way that the performance impact is minimal. The code caches many properties and updates only those lines that need update. When the update is needed the new MeshGeometry3D is not rebuild from stretch but instead only positions are changed. It also checks if the lines were removed from the visual and acts accordingly. There are a few 3D lines implementation for WPF, but the highly optimized lines updater makes this implementation the most advanced.

Ab3d.PowerToys Samples - All 3D models


Important:

The Ab3d.PowerToys will be available as a standalone product.

It will also be available for free with Ab3d.Reader3ds Pro version (existing customers of Ab3d.Reader3ds Pro will also get the license).


Beta notice:

The current version of Ab3d.PowerToys is in Beta 2. That means that it is almost feature complete but is not yet fully tested and documented. This version will expire on 31th January 2010.

Roadmap:

  • Beta 2 - start of November 2009
  • Release Candidate - middle of November 2009
  • Release - start of December 2009


To read more about Ab3d.PowerToys see Ab3d.PowerToys web page.

The Ab3d.PowerToys Beta 2 and the samples can be downloaded from my Downloads page.

Tags: , , , , , , , ,

Ab3d.PowerToys

Ab3d.PowerToys beta 1 introduced

by abenedik 13. October 2009 23:13

The Ab3d.PowerToys library is a collection of classes and utilities that simplify programming with 3D in WPF. With Ab3d.PowerToys programming with 3D was never easier!

The following are the main parts of the library:

  • Cameras
  • Camera Controllers
  • Mouse Event Manager 3D

Ab3d.PowerToys Samples - Wind Generator sample

The library defines a few new Cameras that can be used instead of the current WPF's cameras. The main difference between Ab3d Cameras and WPF cameras is that Ab3d Cameras does not use Vectors to define the LookDirection, but instead use angles in degrees to define it. This is much more natural. For example if you want to look at the scene a little bit from the right and from above, you just define the Heading to be 30 and Attitude to be -45. You can also define the Distance from the scene. The most important Ab3d Cameras are: SceneCamera, FirstPersonCamera and ThirdPersonCamera. All the Ab3d Cameras with their properties can be seen on the class diagram.

Camera Controllers are used to control the camera. The MouseCameraController can be used to change the angle and distance of the camera with the mouse. This way it is very simple to rotate the camera around. The CameraControlPanel shows nice buttons to rotate the camera and move the camera closer or farther away. There is also a CameraPreviewPanel that graphically shows at which angle the camera is looking at the object or scene.

The following code demonstarates that with only a few lines of xaml a WPF application can use a camera that is showing the whole scene (SceneCamera) and can be rotated by the mouse (MouseCameraController) or by nice buttons (CameraControlPanel). There is also a preview of the camera that is showing from which angle the camera is looking at the scene. Also if the WindGeneratorModel model does not contain a light, a camera light is automatically added to the scene and it is iluminating the scene from the camera's position (ShowCameraLight="Auto").

<Window x:Class="Ab3d.PowerToys.Samples.Window1"
xmlns="http://schemas.microsoft.com/winfx/2006/xaml/presentation"
xmlns:x="http://schemas.microsoft.com/winfx/2006/xaml"
xmlns:cameras="clr-namespace:Ab3d.Cameras;assembly=Ab3d.PowerToys"
xmlns:ab3d="clr-namespace:Ab3d.Controls;assembly=Ab3d.PowerToys">
  <Grid>
     <Viewport3D Name="MainViewport3D">
         <ModelVisual3D Content="{StaticResource WindGeneratorModel}"/>
     </Viewport3D>
     
     <cameras:SceneCamera Name="SceneCamera1"
                             Heading="30" 
                             Attitude="-30" 
                             Distance="3" IsDistancePercent="True"
                             IsDynamicTarget="True"
                             ShowCameraLight="Auto"/>
                          
     <ab3d:MouseCameraController TargetCameraName="SceneCamera1" 
                                    IsMouseWheelZoomEnabled="True"/>
                               
     <ab3d:CameraControlPanel TargetCameraName="SceneCamera1"
                                 VerticalAlignment="Bottom" 
                                 HorizontalAlignment="Left"/>
                              
     <ab3d:CameraPreviewPanel TargetCameraName="SceneCamera1" 
                                 Width="100" Height="100" 
                                 VerticalAlignment="Bottom" 
                                 HorizontalAlignment="Right"/>
  </Grid>
</Window>


The EventManager3D class is a helper class that enables user to simply subscribe to mouse events on 3D objects. The following mouse events are supported: MouseEnter, MouseLeave, MouseDown, MouseUp, MouseClick, BeginMouseDrag, MouseDrag, EndMouseDrag (MouseDoubleClick is not in available in beta). This way you do not need to do the complicated 3D hit testing any more. You can simply subscribe to mouse events. This way you the code is much simpler and better organized.

The following code shows a sample used of EventManager3D:

                    
EventSource3D eventSource;
EventManager3D eventManager;

eventManager = new EventManager3D(MainViewport);                                 


eventSource = new EventSource3D();
eventSource.TargetObject = myButton3D;
eventSource.MouseClick += new MouseButton3DEventHandler(myButton3D_MouseClick);

eventManager.RegisterEventSource3D(eventSource);                                 


eventSource = new EventSource3D();
eventSource.TargetObject = myMovableObject3D;
eventSource.BeginMouseDrag += new Mouse3DEventHandler(myMovableObject3D_BeginMouseDrag);
eventSource.MouseDrag += new MouseDrag3DEventHandler(myMovableObject3D_MouseDrag);
eventSource.EndMouseDrag += new Mouse3DEventHandler(myMovableObject3D_EndMouseDrag);

eventManager.RegisterEventSource3D(eventSource);                    


Beta notice:

The current version of Ab3d.PowerToys is in beta. That means that it is not yet features complete and not fully tested.

Roadmap:

  • Beta 1 - 13th October 2009
  • Beta 2 - end of October 2009
  • Release Candidate - middle of November 2009
  • Release - start of December 2009


The Ab3d.PowerToys beta 1 and the samples can be downloaded from my Downloads page.

Tags: , , , ,

Ab3d.PowerToys