All AB4D libraries improved with new licensing code and many new features

by abenedik 26. April 2016 21:39

I would like to inform you that today new versions of all the AB4D products have been published.

The main reason for this release is that the evaluation and commercial licensing code that is included in all the products have been greatly improved. What is more, the deployment script that I use to prepare all release version have been improved.

Also, all the products got some additional functionality or fixed bugs. For example, the following image shows new ViewCubeCameraController from Ab3d.PowerToys library:

3D ViewCube in Ab3d.PowerToys library

The main benefits of the new licensing and deployment are:

  • All products are now also compiled for .Net 4.5 target framework. This means that all products are available for .Net 3.5, .Net 4.0 and also .Net 4.5 (an exception is Ab3d.DXEngine that does not support .Net 3.5). This will allow using new language features in the libraries – especially async and await support.
  • New evaluation and commercial licensing code is now faster and required less resources.
  • New evaluation code allows starting ad-hock evaluation on a computer that do not have the evaluation version installed. This means that you will be able to create a sample project with an evaluation version and then just copy your application to another computer. At the first start of your application you will get a dialog to start a new evaluation and then be able to continue running your application. In the previous version you needed to install evaluation version on the other computer too.
  • Improved commercial licensing code that brings new options to embed license key into your project and allows using special license key for application. This simplifies compiling projects on cloud base build servers and allows some other non-standard distributions. More details about that can be found in the new “Using commercial version” help file.

The new version also introduces new directory structure that is created after the libraries are installed. In the previous version the libraries for .Net 3.5 framework were installed into “bin” folder and libraries for .Net 4.0 framework were installed into “bin\.Net 4” folder. Now the organization is much more standard: the .Net 3.5 assemblies are in “bin\net35” folder, .Net 4.0 assemblies are in “bin\net40” folder and .Net 4.5 assemblies are in “bin\net45” folder.

This means that you might need to update your references.

The new .Net 4.5 versions of the libraries will allow using async keywords. Currently this has not yet been added to any of the libraries. But in the near future I plan to add support for async to all of the libraries. For example, async loading of 3D models or svg files. Another possibility is to create async methods to animate camera or ZoomPanel.


As mentioned before, this release also brings other improvements and fixes.

Ab3d.PowerToys got some great new features. The most highly anticipated feature is the ability to control the camera with 3D cube. The image with three possible cubes was shown before.

Another great addition to the library are new TubePathVisual3D and TubePathMesh3D that allows creating various tube based objects:

3D tube path in Ab3d.PowerToys library

The following is a full list of new features in Ab3d.PowerToys library

  • Added ViewCubeCameraController.
  • Added TubePathVisual3D and TubePathMesh3D.
  • Added support to create extruded MeshGeometry3D that has custom orientation (not only in the direction of Y axis). This can be achieved with using a new override of CreateExtrudedMeshGeometry that also takes shapeYVector parameter.
  • Added IsStartPositionClosed and IsEndPositionClosed properties to TubeLineVisual3D. Also added additional isStartPositionClosed and isEndPositionClosed constructor parameters to the TubeLineMesh3D.
  • Added FreezeMeshGeometry3D to BoxVisual3D and SphereVisual3D to control if the MeshGeometry3D is frozen.
  • Improved TubeVisual3D that now allows setting Height to 0 - this creates an optimized TubeVisual3D without creating both bottom and top ring - in this case only bottom ring is created.
  • Fixed using adjustmentFactor in FitIntoView method.
  • Fixed using FitIntoView when it is called in Loaded method and the Viewport3D is shown in Ab3d.DXEngine.
  • Fixed type used by ShowMovablePlanes property.
  • Improved MouseCameraController to capture the mouse only when the mouse rotation / movement is bigger than a few pixels. This prevents "swallowing" MouseUp event for processing mouse click in EventManager3D.
  • Added UsePreviewEvents property to EventManager3D – when set to true the EventManager3D subscribes to Preview mouse and touch events instead of standard events - for example PreviewMouseUp event instead of MouseUp event. This can be used to use left mouse button for camera rotation and also for click events.
  • Added TurnTo method to FirstPersonCamera - this turns the camera towards the specified position or to the specified direction vector.
  • CameraControlPanel now moves the FirstPersonCamera forward or backwards when ZoomIn or ZoomOut buttons are clicked.
  • When MouseCameraController is used for FirstPersonCamera the mouse wheel now moves camera forward and backwards.

The library also got a few new samples. Two are to demonstrate the ViewCubeCameraController and TubePathVisual3D. There is also a greatly improved FirstPersonCamera sample that also shows how to turn the camera toward the clicked object. Another new sample shows how to create an application where user can draw to a 3D texture – for example to write annotation to a 3D height map.


Ab2d.ReaderSvg library that can read svg files also got many new features. 

The new version now supports textPath element that can render text on a path:

Support for svg textPath element in Ab2d.ReaderSvg

Another very interesting new feature is the new GetElementSvgText method that returns the outer xml text of the specified element. This can be very useful when you add some special attributes or elements to the svg elements. If those elements are not standard svg elements, then ReaderSvg cannot read them. But with using GetElementSvgText you can get the xml text from the specified element and then parse the data out of the xml.

The following is a list of all new features:

  • Added support for textPath elements (positioning text on a path).
  • Added GetElementSvgText to get the svg text of the element with the specified id (can be used to read some additional svg properties that are not read by ReaderSvg).
  • Added support for dx and dy properties on the text element.
  • Fixed writing new line characters in XAML.
  • Added support for vertical text (glyph-orientation-vertical svg property).
  • Improved writing images in XAML that are now written in more clear XAML. Also fixed setting Source for images that are created from foreign objects.
  • Added support for reading number lists that end with comma - for example "12, 34, 56," - this prevented reading svg file in the previous version.
  • Improved support for rounder corners on rectangles in case when only rx or only ry is specified - in this case the other value is set to the same value.


Other libraries got only a few updates.

For example, the Ab3d.DXEngine library does not have any new feature in the core libraries but there are three new samples that show how to use standard DirectX rendering code inside DXEngine. The samples show how to render 3D cube with SharpDX code, use the camera and camera controller from Ab3d.PowerToys and mix the rendered 3D cube with other 3D objects from Ab3d.PowerToys library.

Ab2d.ReaderWmf got the following new features:

  • Improved reading images with negative scale transformations.
  • Improved positioning text for some special use cases (correctly position text based on the TextAlign mode).
  • Fixed ResourceDictionaryWriter so that the ResolveResourceKeyCallback is called also for root keys.


ZoomPanel library was only slightly improved – the number of history items was increased to 100.

Also Ab3d.Reader3ds got only one improvement. The support for reading broken 3ds files has been improved so that some invalid positions that are not used in TriangleIndices are fixed. This prevents creating too big bounds value that is usually used to position the camera after the model is loaded. 


I am really excited about this release. It improves many aspects of the libraries that are not related to the core functionality but are needed because of licensing. It also enables many new features that are possible with .Net 4.5 and allows creating more user friendly APIs with async methods.

Tags: , , , , ,

Ab3d.PowerToys | DXEngine | Reader3ds | ReaderSvg | ReaderWmf | ZoomPanel

New major version of 3ds file reader brings a major price reduction for the library

by abenedik 22. April 2015 09:37

This time I have one great and one even greater news for you.

The first great news is that a new major release of the best 3ds file reader (Ab3d.Reader3ds) brings some great new features to the library.

And an even greater news is that all this come with greatly reduced price. For example, the price for Ab3d.Reader3ds single developer library has been lower from $489 to only $199! Prices for Viewer3ds and for team and site developer license have been also reduced accordingly. To see the new prices, please visit our Purchase page.


And now to new features of the 9th major version of the library.

The library is mostly used for reading 3D models into WPF applications where the models are shown. But because of the great accuracy of importing 3ds file (in some cases the library imports 3D models even when 3D Studio Max does not import the models) the library is sometimes used as a converter to some other data format – for example to read 3D models from 3ds file and create an objective C code that defines 3D objects for iOS application. 

Such custom converter applications read 3D models from 3ds file into WPF 3D models and then convert that models into some other data format. But the problem with such approach is that some of the data is lost when converting to WPF objects. For example if 3ds file defines materials with bump and reflection map, those two textures are not available in WPF. Also when 3ds file contains animations, the animation can be played in WPF application, but you were not able to access the raw animation data.

With the new version of Ab3d.Reader3ds you are now able to get all the materials and animation key frames data that are stored in 3ds file.


The materials data can be get with the new Materials3ds dictionary on Reader3ds object. The key in the dictionary represents the model name. The model name is the same as in the NamedObjects dictionary (note that you can get all the names of the objects with running the DumpNamedObjects method in Visual Studio immediate window after the 3ds file has been read). The value in the Materials3ds dictionary represents a new Material3ds type. This type contains all the material data that are defined in 3ds file specification. The Material3ds type also contains a Maps list that contain all the maps (textures) used by the material. 3ds file support the following map type: DiffuseColor (the only one supported in WPF), SpecularLevel, Opacity, Bump and Reflection.

The following Class diagram shows all the fields of Material3ds and MaterialMap3ds:

Material3ds Class diagram

It may appear that there are many fields defined for materials. But compared to animation data, materials are really elementary. The Class diagram for animation data is as follows:

Reader3ds key frames data Class diagram

And that are only the classes. Each class also defines their own fields.

The key frame data can be get with calling the new GetKeyFramesData method. The method takes the model name as parameter and returns a list of BaseKeyframesTrack objects (for example PositionTracks and RotationTracks).

Each Tracks object defines their own array of Keys that define data about the object at specific time. For example PositionTracks use PositionKeys to define different positions of object at various time stamps.

To demonstrate the ability to get raw 3ds file data I have added a new sample to Reader3dsSamples project. With the sample users can drag and drop 3ds files to the sample Window and see the materials and key frames data for the 3ds file.


The next very interesting new feature of the new version of Reader3ds is that now it is possible to get the OptimizedMeshGeometry3D object for any 3D model read from 3ds file. The OptimizedMeshGeometry3D is a simple struct that is defined with the following code:

public struct OptimizedMeshGeometry3D
{
    public List<Point3D> Positions;
    public List<Vector3D> Normals;
    public List<Point> TextureCoordinates;
    public List<Int32> TriangleIndices;
}

As you see this is very similar to WPF’s MeshGeometry3D. The field names are the same, but the types of collections are fundamentally different. The OptimizedMeshGeometry3D uses simple Lists but MeshGeometry3D uses Point3DCollection, Vector3DCollection, PointCollection and Int32Collection.

The difference between those two types of collections is that the simple Lists are very fast when accessing individual items in the list. On the other hand the collection used in MeshGeometry3D are much more complex – on each get or set the code checks if the call is done on the correct thread, then after a few other ifs the data is get to the underlying FrugalStructList that is also not well optimized for performance.

When the Positions[i] is converted into assembly language the getter from List is converted in only a few lines of code, but in the MeshGeometry3D many lines of assembly code is executed.

This means that if you want to manipulate the 3D models with changing the individual positions, texture coordinates or other low lever data, it is much faster to change the data in a List and then regenerate the Point3DCollection from the changed list then to modify the data inside the Point3DCollection. Also if you are just reading the positions (for example to calculate the bounds), it is much faster when reading data from List then from Point3DCollection.

So, to allow using the faster lists, it is now possible to get the OptimizedMeshGeometry3D for any model read from 3ds file with the new GetOptimizedMeshGeometry3D method.

To demonstrate the performance gains, there is also a new sample in the Reader3dsSamples project.

The following are some of the results get from this sample:

Start performance tests on models with 34.403 positions and with executing each test 10 times
  Calculate bounds with MeshGeometry3D: 20,464ms
  Calculate bounds with OptimizedMeshGeometry3D: 13,779ms
  Change positions with MeshGeometry3D: 84,531ms
  Change positions with MeshGeometry without disconnecting MeshGeometry3D: 363,597ms
  Change positions with OptimizedMeshGeometry3D: 7,788ms


Start performance tests on models with 1.644.282 positions and with executing each test 10 times
  Calculate bounds with MeshGeometry3D: 1001,744ms
  Calculate bounds with OptimizedMeshGeometry3D: 669,594ms
  Change positions with MeshGeometry3D: 4191,129ms
  Change positions with MeshGeometry without disconnecting MeshGeometry3D: 11469,894ms
  Change positions with OptimizedMeshGeometry3D: 493,173ms

As you can see, calculating bounds is almost 40% faster. Changing positions (y += 10) is almost 10 times faster! And this with already optimizing the code with disconnecting MeshGeometry3D object from its parent GeometryModel3D. Without disconnecting the MeshGeometry3D object, using OptimizedMeshGeometry3D is more than 20 times faster.

To see the full test code please check the source of the sample.


And this is not the end of improvements.

The new version also prevents a "cross thread access" exception that could be thrown when the Reader3ds instance is created on another thread then the Read method is called.

And lastly, the new version improves animating objects when the animation does not start at first frame. In some cases the previous version wrongly positioned the objects on frames before first frame.

I hope that you like the new improvements to the Reader3ds library.

To check the new features, please download the latest trial version from the Downloads page or use your User Account page to download the latest commercial version.

Let me finish with a great news for everyone that already own a Reader3ds license, but have expired updates period: because the license renewal price is calculated based on the current price, you can now renew the Redader3ds license with greatly reduced renewal price.

Tags:

Reader3ds

New maintenance release for almost all products published

by abenedik 15. October 2013 23:02

After quite a long time I am happy to announce that a maintenance release for the following products has been released:

  • Ab2d.ReaderSvg with ViewerSvg,
  • Ab2d.ReaderWmf with Paste2Xaml,
  • Ab2d.ZoomPanel,
  • Ab3d.Reader3ds with Viewer3ds.


New version mainily include some bug fixes and improvements that were created based on users feedback.

The following is the what's new list:


Ab2d.ReaderSvg

  • Fixed reading text with gradient fill or stroke brush.
  • Prevent throwing exception when incorrect number text was used for numbers.
  • Invisible objects (Visibility != Visible) are not exported to geometry any more.
  • Shapes with Opacity set (Opacity < 1.0) are now correctly exported as geometries.


Ab2d.ReaderWmf

  • Added reading images from EMR_ALPHABLEND records. Note that usually those images are not rendered correctly because the blend dwRop operations are not supported by WPF, but at least user can get the image and convert it manually to a transparent image that could be used to achieve correct results.
  • Added ResolveBitmapOperation that is called in processing EMR_ALPHABLEND record - here the user can change the bitmap to get correct results - for example convert black to transparent.
  • Invisible objects (Visibility != Visible) are not exported to geometry any more.
  • Shapes with Opacity set (Opacity < 1.0) are now correctly exported as geometries.


Ab2d.ZoomPanel

  • Fixed using ZoomPanel under some circumstances when viewbox limits is set.


Ab3d.Reader3ds

  • Small fix for a problem that can occure when one object has multiple materials assigned.
  • Improved reading broken files - no exception is thrown when the animation data for camera is broken.


You could say that this is not much for quite a long time since last update. And you would be right.

The reason for that is that I am preparing a new major release of Ab3d.PowerToys which will be hopefully ready until beginning of the next week. It will have much much more to show.

And that is not all. With the release of the new version of Ab3d.PowerToys I will also announce a brand new project that I have been working on for almost a year. I am very excited about that project and I am sure you will also like it.

Tags: , , ,

Reader3ds | ReaderSvg | ReaderWmf | ZoomPanel

Minor improvements for Ab3d.Reader3ds, Ab2d.ReaderWmf and Ab2d.ReaderSvg published

by abenedik 15. January 2013 13:54

I would like to inform you that new versions for Ab3d.Reader3ds, Ab2d.ReaderWmf and Ab2d.ReaderSvg has been published.

The new version contains a fix for generating object names for exported XAML. A bug in one of the previous version prevented the exporter code to check and fix the object's name.

There is also an additional minor improvement in Ab2d.ReaderWmf library that now correctly position text is some of the rare cases.

Tags: , ,

Reader3ds | ReaderSvg | ReaderWmf

New version of our products brings improved support for Windows 8 and some other goodies

by abenedik 28. December 2012 10:55

I am very happy to announce that a new version of all our products is available.

The biggest improvement of the new version is better support for Window 8. This includes improved installer that now works correctly without .Net 2.0 installed on the system. Also the Viewer3ds, ViewerSvg and Paste2Xaml applications are now build on .Net 4.0 framework and do not require .Net 3.5 any more. The applications also use different obfuscation method - the previous obfuscation crashed the applications on startup in Windows 8.

What is more, the ViewerSvg and Paste2Xaml now fully support exporting XAML for Windows Store applications (Windows Runtime). This means that you can use almost any svg file, metafile or get drawing from clipboard and use ViewerSvg or Paste2Xaml to create vector graphics for Windows Store applications.

With this release all libraries now target .Net 3.5 Client profile (before some of them targered .Net 3.0).
As before all the libraries also contain an additional assembly that is built on .Net 4.0 framework.


This version also brings some additional improvements to Ab3d.PowerToys, Ab3d.Reader3ds and ZoomPanel libraries.

The following are the changed in the Ab3d.PowerToys:

  • Added GetCameraPosition method to BaseCamera.
  • Fixed creating geometry for Visual 3D objects when no property is changed on the visual (for example if default size is used).
  • Fixed showing long 3D lines that cross the near camera plane (before such lines were not correctly shown).
  • Improved measuring size of CameraControlPanel - now it is possible to define only desired Width or Height and the control automatically sets the other (Height or Width).
  • In MouseCameraController the StartMouseProcessing and EndMouseProcessing are now protected virtual and can be overriden (before they were private).
  • Improved creation of sphere mesh - before some triangles were defined in such a way that they represented a line instead of triangle (two positions in the triangle were defined in the same position in space).
  • Added possibility to create a slightly improved sphere mesh when there is no need to create texture coordinates (this can be done with specifying generateTextureCoordinates as false in the Ab3d.Meshes.SphereMesh3D constructor).
  • Added DumpMatrix3D to Dumper class.
  • Improved FpsMeter when custom DisplayFormatString property is set.
  • Fixed creating PolyLines when they are created with duplicate positions - Index out of range exception was thrown before.


Scene editor in Ab3d.PowerToys samples

There is also a new and very interesting sample available with the new Ab3d.PowerToys. A screenshot from the sample is shown in the image above. The sample is showing how to create a simple 3D editor. It allows the user to create 3D boxes with the mouse (the current position of the mouse in the 3D scene is shown with two green lines). The box is created by first defining the base rectangle with dragging the mouse and then defining the height with moving the mouse up and clicking at desired height. The sample also shows how to create simple snap to grid. User can rotate or move the camera around. It is also possible to change camera to show all the objects (zoom to content).

The Ab3d.PowerToys help has also been improved. It now contains the "Quick start tutorial" that is basically the content of one of my previous blog posts. What is more, there is also a "Tips and Tricks" help section that describes some techniques that can help or improve working with WPF 3D. I will write the content of that help section in my next post.


And the following are two additional changed in Ab3d.Reader3ds:

  • Added CreateTextureCallback delegate to Reader3ds - it can be used to customize the process of creating the texture images.
  • Fixed reading 3ds files that define material with names longer than 17 characters (the 3ds documentation defines max length of material name to be 17 characters - but it looks that in reality the material names can be longer).


As mentioned before, ZoomPanel also has an improvement. But not in the library itself but as an additional sample that describes how to limit the zoom to specific zoom factor.


As always if you are new to our tools, you are most welcome to download a 60-day trial from the Download page. Existing customers can get the updated versions from their User Account page.

Tags: , , , ,

Ab3d.PowerToys | Reader3ds | ReaderSvg | ReaderWmf | ZoomPanel

The best platform for business applications that require 3D graphics

by abenedik 11. September 2012 23:18

In the blog posts that were posted so far I was mostly describing new versions of the products. During recent vacation at seaside I have decided to change that and prepare blog posts that would present some of the features of Ab3d.PowerToys and Ab3d.Reader3ds libraries.

I would also like to persuade you that WPF 3D with Ab3d.PowerToys and Ab3d.Reader3ds libraries is the best platform for building business applications that require 3D graphics.


Ab3d.PowerToys library greatly simplifies work with WPF 3D and make WPF 3D the easiest platform for business applications that require 3D graphics.

In this blog post I will try to write about some of the basic new concepts that are introduced with the library.

Plot 3D sample

This post is divided into the following sections:

  1. Basic 3D scene setup
  2. Cameras
  3. 3D Objects
  4. Showing objects from 3ds files
  5. Conclusion


1) Basic 3D scene setup

This section shows how to prepare an XAML file to show 3D content.
First we need to add a reference to the Ab3d.PowerToys library. Then the following namespace declarations are usually added to the XAML file:

xmlns:cameras="clr-namespace:Ab3d.Cameras;assembly=Ab3d.PowerToys"
xmlns:controls="clr-namespace:Ab3d.Controls;assembly=Ab3d.PowerToys"  
xmlns:visuals="clr-namespace:Ab3d.Visuals;assembly=Ab3d.PowerToys"

cameras namespace defines the possible cameras (SceneCamera, FirstPersonCamera, ThirdPersonCamera, etc.)

controls namespace defines controls that will be used to control the camera (MouseCameraController, CameraControlPanel).

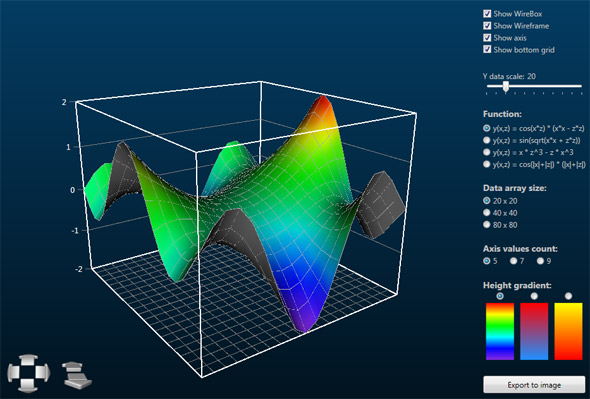
visuals namespace defines 3D objects that can be added to Viewport3D (BoxVisual3D, SphereVisual3D, ConeVisual3D, LineVisual3D, WireBoxVisual3D, HeightMapVisual3D and many more).


Now we can define our 3D scene with the following XAML:

<Border Name="ViewportBorder" Background="Transparent">
    <Viewport3D Name="MainViewport">
    </Viewport3D>
</Border>

<cameras:SceneCamera Name="Camera1" Heading="40" Attitude="-20" Bank="0" 
                     Distance="250" ShowCameraLight="Always"
                     TargetViewport3D="{Binding ElementName=MainViewport}"/>

<controls:CameraControlPanel VerticalAlignment="Bottom" HorizontalAlignment="Left" 
                             Margin="5" Width="225" Height="75" 
                             ShowMoveButtons="True"
                             TargetCamera="{Binding ElementName=Camera1}"/>

<controls:MouseCameraController UsedMouseButton="Left" 
                                TargetCamera="{Binding ElementName=Camera1}"
                                EventsSourceElement="{Binding ElementName=ViewportBorder}"/>

<controls:CameraAxisPanel HorizontalAlignment="Right" VerticalAlignment="Bottom" />

First we defined a Border that contains an empty Viewport3D control. Then we added SceneCamera, CameraControlPanel (shows buttons to control the camera), MouseCameraController (use mouse to control the camera) and CameraAxisPanel (shows the orientation of the coordinate axes).


An interesting difference from standard WPF’s way is that the camera is not defined inside Viewport3D but outside it as a standard control. The reason for that is that all WPF’s cameras are sealed or contain internal virtual methods that cannot be defined in derived class. Therefore it is not possible to derive custom cameras from any WPF’s camera.

Before describing the cameras let me first describe how the added controls are connected to each other.

First we need to connect our SceneCamera to the Viewport3D. The connected Viewport3D will be controlled by our SceneCamera. This can be done with setting the TargetViewport3D property on SceneCamera. Using that property and simple binding is the most efficient way to connect the camera to the Viewport3D. But it is not the only possible way to do it. Instead it would be also possible to set TargetViewport3DName property to “Camera1”. It would be even possible to skip both that properties. In that case the camera would check the WPF controls tree and connect to the first found Viewport3D. Because the code where the TargetViewport3D property is set with binding is executed slightly faster that other methods, it is recommended to use it. But when there are only a few controls defined in the parent Window or UserControl, it is also ok to skip the TargetViewport3D definition and let the camera to connect automatically. In case when you want to connect the camera to the Viewport3D later in code and do not define TargetViewport3D and TargetViewport3DName in XAML, you can set the IsAutoViewport3DFindingEnabled to false to prevent the automatic camera connection.

In a similar way the CameraControlPanel and the MouseCameraController are connected to the SceneCamera. As with the camera we could use TargetCameraName property or skip the TragetCamera property and leave the control to find the Camera automatically by searching the objects tree.

The MouseCameraController is also connected to the ViewportBorder element. The connection is created with the EventsSourceElement property. This property defines which element is used as the source of mouse events that are used to control the camera. Because this element has a transparent background, the mouse events are triggered on the whole area of the border element (if the background property would not be defined, than the mouse events would be triggered only on areas where some content is shown). This means that when a user would be over the ViewportBorder element the mouse event would be used to control the camera. It is very easy to define what keyboard and mouse button combinations rotate and which move the camera – by default right mouse button is used to rotate the camera and ALT + right mouse button is used to move the camera – see the help file or samples that come with Ab3d.PowerToys for more info. If EventsSourceElement property would not be defined, the source of mouse events would be the Viewport3D that is connected to the camera. But because Viewport3D does not have the Background property, it would be only possible to rotate the camera when the mouse would be over shown 3D objects – clicking on the area around the objects would not trigger any mouse events.

The MouseCameraController also shows a special cursor icon when the camera is rotating or when the user can rotate the camera with left mouse button. If you would like to use different cursor, you can set the RotationCursor property to some other value.

With the CameraControlPanel it is possible to control the camera with clicking on the shown buttons. By default the CameraControlPanel shows buttons to rotate the camera and to change the distance of the camera. With adding ShowMoveButtons property and setting it to true, additional buttons to move the camera would be also shown.


2) Cameras

Now let me describe the cameras in Ab3d.PowerToys in more details.

In the XAML above we are using SceneCamera. This is just one of the cameras that come with Ab3d.PowerToys library. It is the most advanced and the most easy to use. The camera automatically measures the 3D scene (3D objects inside Viewport3D) and shows them from the specified angle (Heading="40" Attitude="-20" Bank="0") and distance (Distance="250"). Those four properties are common to all the cameras in Ab3d.PowerToys. They represent the main advantage over the WPF’s cameras because it is much easier to define the camera with angles than with 3D directional vectors. The following image (taken from Ab3d.PowerToys Samples) is showing how different angles are rotating the camera:

Camera Heading, Attitude, Bank

As sad before SceneCamera measures the objects in 3D scene and calculates the center position of the scene’s bounding box. The value that is specified with the Distance property is the distance of the camera from the center position of the scene.

Because measuring the scene also gives us the size of the shown 3D objects, it is also possible to use the IsDistancePercent property. If that property would be set to true then the Distance value would mean the percentage of the size of shown objects. For example if Distance would be set to 2, this would mean that the camera’s actual distance from the center of the scene would be 2 times the size of the object’s bounding box (length of diagonal). This makes the camera usage really simple because you do not need to worry about the size of the shown 3D objects. But note that if you change the content of the Viewport3D you need to call Refresh method on the SceneCamera so the scene is measured again. You can also set the IsDynamicTarget property to true and the camera will check the size and center position of the scene on every rendering event (on more complex scenes this can take some time, so it is recommended to manually call Refresh method).

If you check the above XAML more carefully you will see that the camera also sets the ShowCameraLight property to Always. This is another great feature of the cameras and simplifies defining the lights. It adds a DirectionalLight to Viewport3D that is illuminating the scene in the same direction as the camera is facing. This is almost the same as a light would be mounted to a real camera because when the camera rotates the light direction will be also changed accordingly. The value “Always” means that the DirectionalLight is always added. We could also set the value of ShowCameraLight to “Auto” – this would mean that the camera would check the scene and if it would not find any light, it would add the DirectionalLight. This is also the default value of the ShowCameraLight property. But if you know that you will define your own lights and want to skip the check for the lights, you can set the ShowCameraLight to “Never”.

SceneCamera is just one of many cameras in Ab3d.PowerToys library. The following is a list of the most useful camera types:

  • SceneCamera
  • ThirdPersonCamera
  • TargetPositionCamera
  • FirstPersonCamea

ThirdPersonCamera is very similar to SceneCamera. But instead of looking at the whole scene it only looks at a specified object (set to CenterObject property). The angles define from which direction the camera looks at the object. The distance in that case defines the distance from the object’s center position. With ThirdPersonCamera it is also possible to use IsDistancePercent property.

TargetPositionCamera is similar to SceneCamera and ThirdPersonCamera but does not have any automatic measurement. Instead there you have full control of the position where the camera is looking at (set with TargetPosition property). If you know the position and size of your 3D objects you can use that camera instead of SceneCamera. TragetPositionCamera is also used when you want full control of the position where the camera is looking at. This camera does not have IsDistancePercent property.

FirstPersonCamera is a camera that does not look at the scene, target position or specified object as previous cameras. Instead it looks at the world from the specified position (set with Position property) – the position of the camera. The angles define the orientation of the camera. This camera does not have the Distance property.

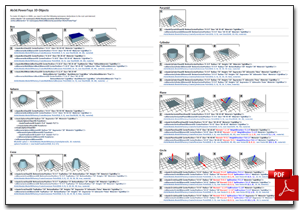
The following pdf file shows samples of using the described cameras:
Cameras cheat sheet

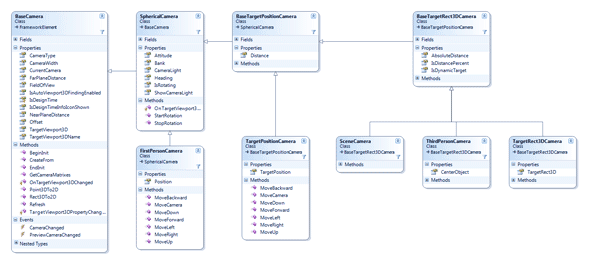
The following image shows the class diagram of the cameras (click on the image to see it in full resolution):


Cameras class diagram

This was just a really brief description of the cameras. To learn more about them please see the help file and check the samples that come with the library.


3) 3D Objects

After so many words we still do not have anything to show. So it is really time to add some 3D objects.

Ab3d.PowerToys library comes with many 3D objects. The following are available in version 3.4:

  • Axis
  • Box
  • CenteredLineText
  • Circle
  • ColoredAxis
  • Cone
  • Cylinder
  • HeightMap
  • HorizontalPlane
  • LineArc
  • Line
  • LineWithText
  • MultiLine
  • MultiMaterialBox
  • Plane
  • PolyLine
  • Pyramid
  • Rectangle
  • Sphere
  • Text
  • Tube
  • VerticalPlane
  • WireBox
  • WireCross
  • WireGrid

If you define 3D objects in XAML you have two possible choices: you can create 3D object that are derived from Visual3D or from UIElement3D. For example to define a 3D box you can create a BoxVisual3D or BoxUIElement3D. The later add some additional features like focus, mouse events, tool tip, etc. But if you do not need that features you can use Visual3D objects.

When defining 3D objects in code, you can still create instances of Visual3D or UIElement3D objects. But you can also get a more low level objects (GeometryModel3D) with Model3DFactory, Line3DFactory, WireframeFactory or Text3DFactory classes.

As seen from the list above, the library also supports 3D lines. Here and additional note is needed. Because 3D lines are not supported in WPF 3D, they are not rendered in hardware. Therefore 3D lines are created with triangles that are than send to WPF 3D to render them in hardware.

For example if we need to create a 10 pixels wide 3D line, we are need to calculate the positions that will form two triangles that are oriented in such a way that they are facing the camera. This means that when the camera is changed, we need to recalculate the positions of the triangles so they are still facing the new camera. When we are showing only a few lines this is not a problem. But if we are showing many lines, for example a wireframe from a model with 20.000 vertices, then line recalculation can bring the CPU down and make the application response very bad. There are some tricks that can be used to improve the performance of 3D lines. They are described in the “Lines Stress Test” sample that came with the library (see the comments in the source code of that sample). Here I would just like to notify you that 3D lines in WPF 3D are much slower than solid models and should be used in greater quantities with care. However smaller number of lines are surely not a problem.


Now let’s add some 3D objects.

Insert the following into the Viewport3D:

<visuals:BoxVisual3D CenterPosition="0 5 0" Size="20 10 40" Material="Blue"/>

This will add a blue box to the 3D scene. The box is added to the specified location, with specified size and material. But wait! The Material definition looks very simple. If you are familiar with standard WPF 3D programming than you are more familiar with the following Material definition:

<visuals:BoxVisual3D CenterPosition="0 5 0" Size="20 10 40">
    <visuals:BoxVisual3D.Material>
        <DiffuseMaterial>
            <DiffuseMaterial.Brush>
                <SolidColorBrush Color="Blue"/>
            </DiffuseMaterial.Brush>
        </DiffuseMaterial>
    </visuals:BoxVisual3D.Material>
</visuals:BoxVisual3D>

This is the standard WPF’s way to assign a Blue material. Luckily all the 3D objects in Ab3d.PowerToys library have custom MaterialTypeConverter that enables you to use only one simple word to define the material. The used MaterialTypeConverter is very powerful – with simple strings you can define many possible materials.

For example the same blue material could be specified with Material="#0000FF".

In similar fashion it is also possible to set an image file as a texture. To do that just set the Material to the image file name – for example Material="Images/MyTexture.png".

It is also possible to define a SpecularMaterial. Let’s add a 3D sphere to show you how:

<visuals:SphereVisual3D CenterPosition="30 10 0" Radius="10" Material="S:64;Silver"/>

This creates a MaterialGroup with two children: SpecularMaterial (SpeculaPower = 64, Brush = White) and DiffuseMaterial (Brush = Silver). The SpeculaPower is defined by “S:64;” text. This short material definition always set the SpecularMaterial’s Brush to White (the most common setting). The following string sets a texture image instead of Silver brush: Material="S:64;Images/MyTexture.png".

It is also possible to use EmissiveMaterial. The following will create a sphere that is always Yellow regarding of the lights:

<visuals:SphereVisual3D CenterPosition="30 10 0" Radius="10" Material="E:Yellow"/>

Emissive material is created with a MaterialGroup with black DiffuseMaterial and EmissiveMaterial with brush defined with used string.


The following XAML defines some other 3D objects:

<visuals:BoxVisual3D CenterPosition="0 5 0" Size="20 10 40" Material="Blue"/>

<visuals:SphereVisual3D CenterPosition="30 10 0" Radius="10" Material="s:64;Silver"/>

<visuals:SphereVisual3D CenterPosition="-40 20 40" Radius="3" Material="e:Yellow"/>

<visuals:WireCrossVisual3D Position="-40 20 10" LinesLength="15" 
                            LineColor="Red" LineThickness="3"/>

<visuals:LineVisual3D StartPosition="10 10 -20" EndPosition="20 20 -20"
                        LineColor="Blue" LineThickness="2" StartLineCap="ArrowAnchor" />
                
<visuals:LineWithTextVisual3D StartPosition="20 20 -20" EndPosition="60 20 -20" 
                                LineColor="Blue" LineThickness="2"
                                Text="3D TEXT"/>

<visuals:WireGridVisual3D x:Name="BottomWireGrid" LineColor="#777" LineThickness="1" 
                        WidthCellsCount="10" HeightCellsCount="10" Size="100 100" />

And here is a screenshot from Visual Studio with the 3D scene defined above:

3D Objects in Visual Studio 2010

All the defined 3D objects are seen in the preview window.

In the lower left corner are buttons for the CameraControlPanel. In the lower right corner there is an icon which represents the SceneCamera. This icon is visible only in design time and is there so you can easily select the camera in XAML with simply clicking on the icon (note: if you do not want to see the icon in design time you can set the IsDesignTimeInfoIconShown property to false).

Now you can try out one of the nicest features of the library – the preview of the changes. Everything you change in the XAML, the change will be immediately shown in the preview. This means that you can simple change the heading or attitude of the camera and you will see your objects from another direction. You can also change the position or size of the objects. This way it is very easy to compose your 3D scene. Note: sometimes it can happen that the scene and XAML are not in sync any more – in that case the best solution is to rebuild your project and the preview should be showing the correct image again.

If you run that sample now you will see the 3D objects and will be able to rotate the camera around the objects with left mouse button and move the camera with holding ALT key and left mouse button. You could also rotate the camera with CameraControlPanel buttons. Not bad for just a few lines of XAML.
As shows in the list before the Ab3d.PowerToys define many other 3D objects. The following pdf file shows many of them:
Objects cheat sheet


4) Showing objects from 3ds files

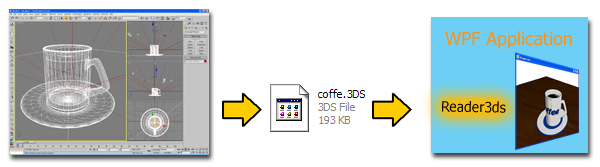
Usually you will want to show more complex 3D models that are defined in some 3D modeling application. This can be done with Ab3d.Reader3ds library.

The Ab3d.Reader3ds library contains classes that can read 3D objects with all of their properties, lights, cameras and animations from 3ds files. The 3ds file format is one of the most commonly used file format for storing 3D models. Therefore almost all 3D modeling applications support exporting into it.

The following schema shows the process of showing 3D objects in WPF application:

Reader3ds Schema

Here let me present just the simplest usage of the Ab3d.Reader3ds.

I will show you how to add 3D objects from 3ds file to your scene defined in XAML file. First you need to add reference to the Ab3d.Reader3ds library and add the following namespace declaration:

xmlns:visual3ds="clr-namespace:Ab3d.Visuals;assembly=Ab3d.Reader3ds"

Than you can use the following XAML to read 3D objects:

<visual3ds:Model3ds Source="Resources/MyObject.3ds" 
                    Position="0 0 0" PositionType="BottomCenter" />

<visual3ds:Model3ds Source="Resources/OtherObjects.3ds" ObjectName="Car01" 
    Position="100 0 0" PositionType="BottomCenter" SizeX="100"/>

The first line reads 3D models from MyObject.3ds file. The model is positioned so that its bottom center position is at (0, 0, 0) coordinates.

The second line reads the OtherObjects.3ds file. It does not show all the objects from that file (as in the first line) but only the object with the “Car01” name. The Car01 object is scaled so its x size is 100 and positioned so that its bottom center is at (100, 0, 0).

Note that when using more than one Model3D with the same 3ds file, the 3ds file is read only once.
Ab3d.Reader3ds also provides many other ways to read 3ds file. To see more please check the samples and help file that come with the library.


5) Conclusion

There are still many features that were not described in this blog post. For example in Ab3d.PowerToys library there is an EventManager3D class that simplifies using mouse events on 3D objects – you can use MouseClick, MouseOver, MouseDrag and other mouse events on specific 3D objects. The library also solves problem with semi-transparent 3D objects with TransparencySorter.

I hope I have persuaded you that the Ab3d.PowerToys and Ab3d.Reader3ds libraries are really easy to use and provide many features to create great WPF 3D applications.

To read more about other advantaged of using WPF 3D and our libraries you are also invited to read the 3D Overview page.

Tags: , ,

Ab3d.PowerToys | Reader3ds

Solution for problematic 3ds files exported from 3ds Max 2013

by abenedik 24. August 2012 09:17

Recently some customers reported that they have problems with reading some 3ds files with Ab3d.Reader3ds and Viewer3ds.

After investigating the files I have found out that the material names were not correctly written - only the first character of the material name was written to the 3ds file. For example instead of "Wood" only "W" was written as material name. In 3ds file, materials are defined first. After materials 3d objects are defined. Each object defines the used material by its name. In the broken files the full name was used - for example "Wood". But because the materials were defined by wrong names, the objects did not get the materials assigned. This problem was common in all the broken files I got recently. In some of the files there were also some other problems that broke the structure of 3ds file so much that only a first few objects could be read.

Soon we have found out that all the files with the above symptoms were exported from 3ds Max 2013. Previous versions of 3ds Max created valid 3ds files, but some changes in the new version broke the exported 3ds files.

After some search on the internet, a fix for that problem was found. It can be downloaded from:

http://area.autodesk.com/forum/autodesk-3ds-max/autodesk-3ds-max--3ds-max-design-2013/max2013-3ds-importexport-modules-fixedrecompiled


Until an official fix from Autodesk, I recommend applying this fix. It was tested from some of our customers and they confirmed that the problems were gone after installing it.

The new version of Viewer3ds (published yesterday) can also detect the problematic files and based on the above symptoms can alert the user that the file was probably exported from 3ds Max and that a fix should be applied.


UPDATE:

This problem has been fixed by an official 2013 PU6 update.

See more: http://forums.autodesk.com/t5/3ds-Max-3ds-Max-Design-General/Max2013-3ds-Import-Export-modules-fixed-recompiled/td-p/4254875

Tags:

Reader3ds