I am happy to inform you that new versions of Ab3d.PowerToys and Ab3d.DXEngine libraries have been published.
The new libraries bring many new features and improvements. But probably the most important is that both libraries now support .NET Core 3.1 (released on 3rd December) - see more: https://devblogs.microsoft.com/dotnet/announcing-net-core-3-1/. This version of .Net is a long-term supported (LTS) release. Therefore it is recommended to use that version instead of .NET Core 3.0.
Let's go back to the new features.
Probably the most interesting new feature is support for planar shadows. Shadows are very important to give the viewer a real sense of depth and distances between objects. Consider the following two images that show the differences.
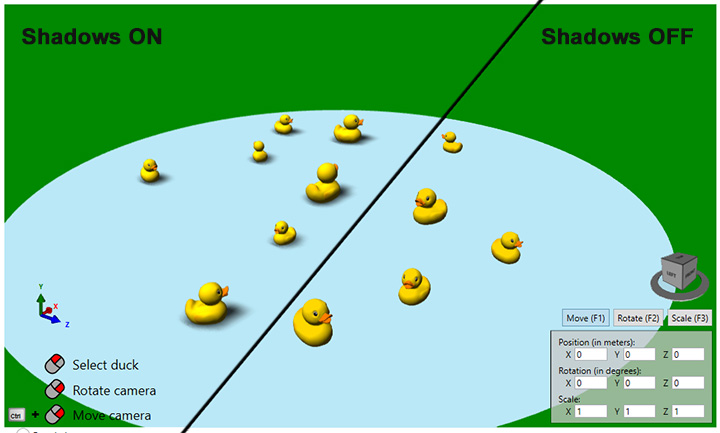
The first image is showing a Ducks lake sample - there a VarianceShadowRenderingProvider is used to provide nice soft shadows that add a much more realistic feeling where it is very clearly seen that the ducks are actually swimming in the lake. In the right part of the image the ducks might also be floating in the air.
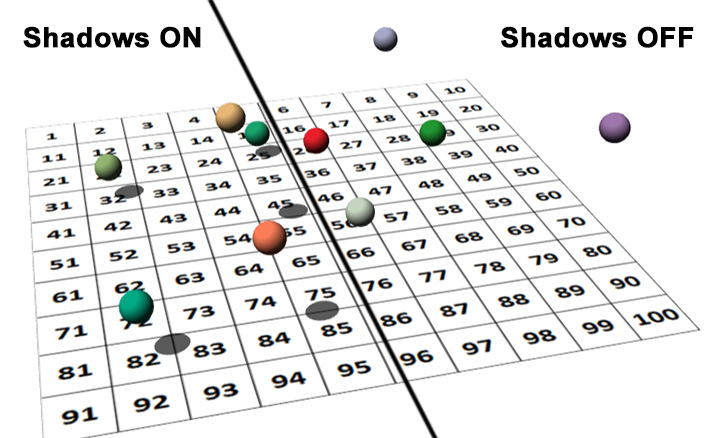
The image below is showing a new sample that uses a new PlanarShadowRenderingProvider. Again, in the part with shadows it is very easy to see the distance between the spheres and the plane. But in the right side without shadows this information is totally lost.
What are the differences between those two shadow rendering techniques?
The VarianceShadowRenderingProvider uses a variance shadow mapping algorithm that can render nice soft shadows with minimal artifacts (compared to some other shadow rendering techniques). The shadows can be rendered to all 3D objects.
In this algorithm, the whole 3D scene is rendered from the light's position into a special texture - a shadow map. The values in this texture do not represent object colors but float values that describe distances from the light. Because the shadow information for the whole 3D scene (not only for visible part) is written into one texture, the resolution of the shadow depends on the size of the shadow texture and the size of the 3D scene. Sometimes it is desirable to have a more blurry shadow. But other times, especially in technical applications, users want to have more precise shadows. To increase the shadow resolution, the shadow texture size needs to be increased (with ShadowMapSize property), or the size of the whole 3D scene needs to be decreased. Increasing the shadow map size can significantly reduce performance. Also, decreasing the size of the 3D scene is not always possible. So this shadow rendering is not ideal for all the cases (there is actually no such technique except ray tracing).
On the other hand, the planar shadow rendering always renders perfectly sharp shadows without any loss of details. But as its name suggests, the shadows can be rendered only to a 3D plane. This techinque is also faster to render. There the shadows are rendered with applying a shadow matrix transformation to all objects. This matrix flattens all the objects so that they have no height and become only 2D shapes that represent the shadows. Those shapes are then rendered as 3D objects on top of the 3D plane.
Disadvantages of planar shadows are that they can be rendered only to 3D planes, they cannot have soft edges, shadows are also rendered for objects behind the plane or point light, some objects that lie on the plane or are very close to the plane may get invalid shadow (too wide). But still, they are an excellent choice for many scenarios.
Anyway, you as a user now have more choice regarding the shadow rendering. What is more, the planar shadows can be also rendered with WPF 3D rendering and do not require Ab3d.DXEngine.
In this case the new PlanarShadowMeshCreator class from Ab3d.PowerToys can generate the 3D mesh that can be rendered as a planar shadow. This class can even clip the shadow to the edges of the 3D plane. But the mesh generation is 100% done on the CPU. And each time the light or the objects are changed, the whole shadow mesh needs to be regenerated. When the 3D scene is complex, this shadow mesh generation can present a performance problem. What is more, WPF 3D cannot render semi-transparent shadows correctly. The problem is that the shadow is darker and less transparent in the areas where multiple parts of the 3D objects are rendered. This means that with WPF 3D only opaque shadows can be correctly rendered. But still, it is possible to significantly improve the visual appearance of some 3D scenes by adding planar shadows without any transparency.
To correctly render the semi-transparent shadows and to avoid the slow 3D mesh generation on the CPU, it is possible to use the PlanarShadowRenderingProvider from Ab3d.DXEngine library. It provides full hardware acceleration for rendering planar shadows and uses the stencil buffer to clip the shadow to the edges of the plane and to prevent semi-transparent shadow artifacts (it ensures that each shadow pixel is rendered only once).
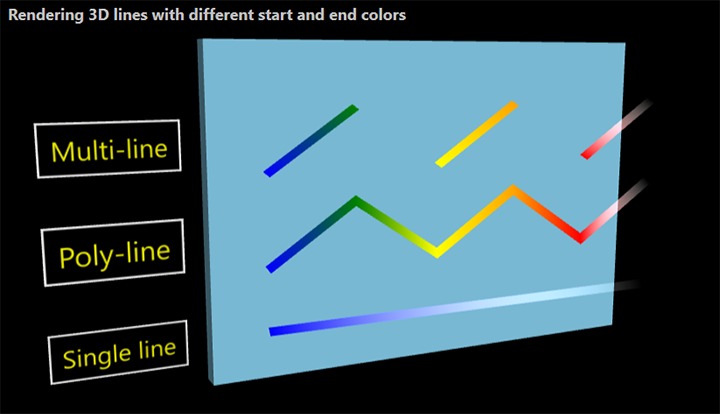
Another great new feature of the Ab3d.DXEngine library that was requested from some users is the ability to render 3D lines with different start and end colors. In this case, the line color is interpolated from the start to the end color. It is also possible to specify color's alpha values so that the line slowly fades away (its alpha value goes from 1 to 0). This is very useful for showing trails of moving 3D objects (for example orbits of planets). The following image shows a screenshot from a simple sample that demonstrates that new feature:
Ab3d.DXEngine can already render huge point clouds with hundreds of millions of points. To optimize rendering in such extreme cases, a OptimizedPointMesh can be used. This object can significantly reduce the number of points that need to be rendered. But until now all the points need to be in the same color. With the new version of Ab3d.DXEngine it is possible to specify a different color for each point.
The new version also improves the mouse rotation and movement when showing point clouds. This is done with new methods that return the 3D position that is closest to the mouse position. This way it is possible to use camera rotation around mouse position when showing point cloud data. Also, because the distance from the camera to the position under the mouse can be correctly calculated, the mouse movement is more precise.
The last new feature in Ab3d.DXEngine that I would like to mention here is that with the new version of the library it is possible to recover from rare cases when the DirectX device is removed or reset by the OS. This happens when the graphics driver is updated while the application is running. This can also happen in case when there is some problem with the driver (very rare). Note that this does not happen when the operating system is restored from sleep or hibernation or when the window is minimized and then opened again.
To handle the DirectX device removal, there is a new DeviceRemoved event in the DXScene class. In the event handler the application can save the current state of the 3D scene, then dispose the current DXViewportView and other 3D objects and finally create a new DXViewportView and recreate the 3D scene from the saved data. There is a simple sample that demonstrates that.
Regarding the new Ab3d.PowerToys library I would like to mention that now it works with a new Assimp library v5.0. This provides improved support for importing 3D models from many file formats. What is more, the Ab3d.PowerToys has improved skeletal (skinned) animation that can animate 3D objects with a more complex hierarchy of bones.
Another nice new feature is that the ViewCubeCameraController can now show different bitmaps for selected planes. This gives users a nice indication that they can click on the plane to rotate the camera to see the 3D scene from the selected angle.
And finally, I would like to mention two new samples that come with Ab3d.PowerToys.
The first one is called "Basic WPF 3D objects tutorial". I have seen many users that wanted to create an application with 3D graphics and just jumped in and started using the Ab3d.PowerToys library. They may be able to do some complicated things because some powerful features of the library are very easy to be used. But sometimes, when it comes to some relatively simple tasks, they are stuck because they do not know the basics of the WPF 3D objects. This new sample should help such users to be quickly back on track.
Another new sample is called "Standard WPF hit testing". The reasons why I wrote this sample are very similar to the reasons mentioned before. When it comes to 3D hit testing, many users thought that the only way to do that is to use the EventManager3D. The reason for that was that the samples that come with Ab3d.PowerToys were only showing the features of the library and therefore only the usage of EventManager3D was mentioned. So many users were not aware that there is also a low-level way to do the 3D hit testing. In this way, the user can get the closest or all the 3D objects that are behind some specified 2D position (for example mouse position). This approach is actually more useful and can be used in more cases, especially in situations when there are many possible hit objects and when the objects are dynamically added and removed. EventManger3D is more suited for simple 3D scenes where the number of 3D objects is low and does not change a lot.
As always, there are many other new features and improvements. For the full list of changes see the https://www.ab4d.com/DXEngine-history.aspx and https://www.ab4d.com/PowerToys-history.aspx.
At this point, I would also like to tell you something about an exciting new feature that is already in development and is planned for the next version. It is called "reused DirectX command lists". With technical 3D applications it is very usual that the 3D scene is mostly static and many times only the camera is changing. With DirectX 11 it is possible to render such 3D scenes extremely fast with almost no CPU overhead. This is done with recording a command list that contains all the DirectX commands that are required to render one 3D scene. After the command list is generated, we can reuse it for other frames. So if only the camera is changed, then we just send new camera information to the graphics card and then instruct it to render the same command list as before. This can be done with almost no CPU time spent. The results are stunning. See the following screenshot:
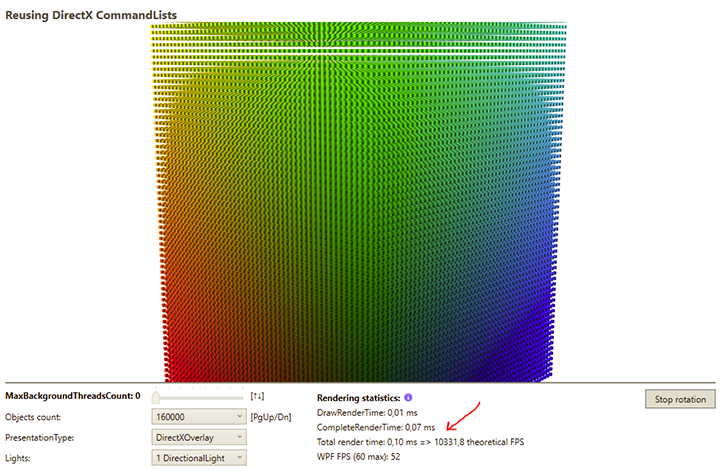
The arrow is pointing to the area that is showing the CPU time to render the scene. In this case, the CPU time to render 160.000 individual boxes (without using instancing but with creating one draw call for each object) is only 0.10 ms. Now compare that with what is possible to achieve with standard rendering process and with full multi-threading - see the screenshot from https://www.ab4d.com/images/DXEngineGallery/DXEngine-Multi-threaded-rendering.png
There you can see that the CPU time to render the scene is almost 15 ms. This is still an incredible achievement, but compared to 0.10 ms it is a lot.
There are some complex challenges that need to be solved before reused command lists can be used in a generic purpose rendering engine as Ab3d.DXEngine is. As you can see, a special demo version is already running. A more generic version will be ready for the next release, so stay tuned.
As it was already announced in the previous blog post, the new versions of Ab3d.PowerToys and Ab3d.DXEngine are available through multiple sources:
- NuGet packages (https://www.nuget.org/packages/Ab3d.PowerToys/ and https://www.nuget.org/packages/Ab3d.DXEngine/). This distribution includes assemblies for .NET Framework 4.0 and 4.5+ and for .NET Core 3.1. The same dll (assembly) is used for both evaluation and commercial usage. By default, the evaluation license is started. The commercial license can be activated with calling the SetLicense method and providing the license information. In the near future, it will be possible to get the license parameters from the Users Account web page. Until then, please contact us for the parameters.
- The commercial version installer can be downloaded from the User Account web page. Because the old licensing system that uses license.licx files cannot be used in .NET Core, this distribution contains only assemblies for .NET Framework 4.0 and 4.5+.
- The evaluation installer can be downloaded from Downloads web page - https://www.ab4d.com/Downloads.aspx. Also contains only assemblies for .NET Framework 4.0 and 4.5+.