Major new version of Ab4d.SharpEngine v5.0

by abenedik 20. November 2026 15:46

I'm delighted to inform you that a new major release of Ab4d.SharpEngine has been released.

This version brings many great new features to the Vulkan and WebGL versions of the library.

Here is a list of major new features for the Ab4d.SharpEngine (Vulkan version):

  • OptimizedGroupNode that can render all its children with one or two draw calls.
  • New Ab4d.SharpEngine.IfcLite library that can import BIM models from IFC files.
  • New CameraNavigationCircles camera controller.
  • New OverlayPanelBase class that significantly improves performance of CameraAxisPanel.
  • World size line thickness and pixel size.

Major new features for the Ab4d.SharpEngine.WebGL are:

  • Added support for hardware-accelerated thick lines (LineThickness > 1).
  • Implemented PixelsNode and PixelsMaterial.
  • Implemented rendering PhysicallyBasedMaterial (PBR), including support for environment mapping.
  • Implemented rendering per-vertex colored models by using VertexColorMaterial or setting VertexColors data to a mesh.
  • Added ModelMover, ModelRotator and ModelScalar that can be used to move, rotate and scale the selected 3D models.
  • Added TwoDimensionalCamera that can be used to show 2D shapes and lines.
  • Added MultiMaterialModelNode that can show one mesh with different materials. For example, it is used to show a skybox.
  • Implemented importing keyframe and skeletal animations from glTF files.

One of my most beloved programming tasks is optimizing performance. And when I advise the customer on how to improve performance, in most cases the goal is to reduce the number of draw calls that are required to render the 3D scene.

Therefore, for me, the best new feature in this release is the new OptimizedGroupNode.

Here is a screenshot of the new OptimizedGroupNode sample:
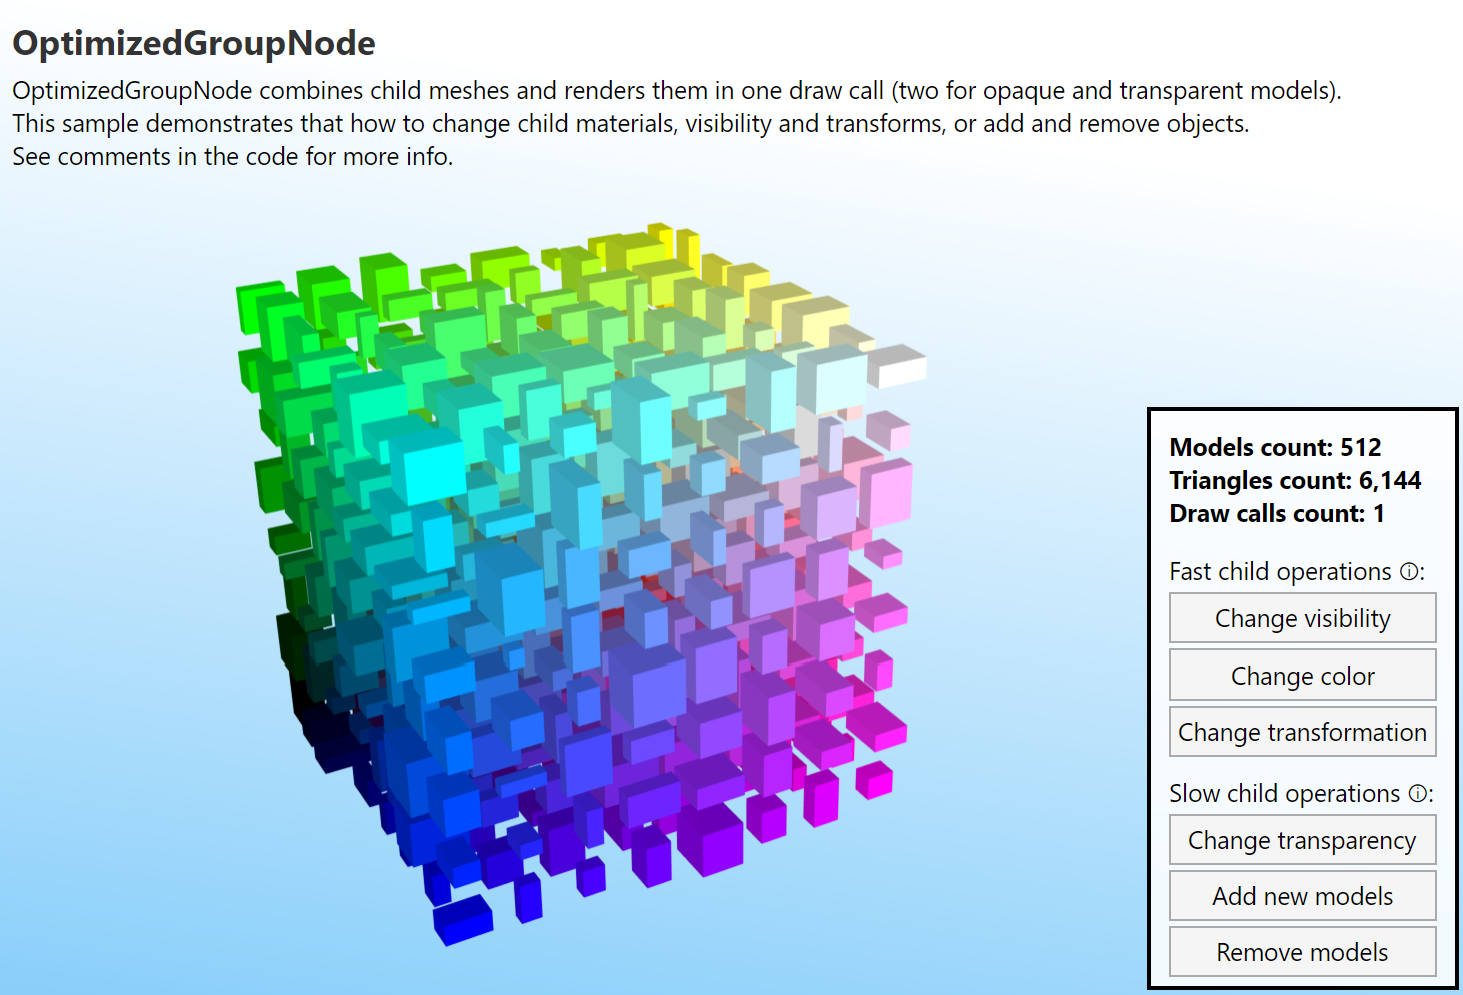
OptimizedGroupNode can render thousands of individual models with a single draw call

OptimizedGroupNode object in many ways acts just like a standard GroupNode object. You can add and remove child SceneNode objects to and from it. But behind the scenes, it works very differently. Instead of rendering each child SceneNode individually, it combines vertices from all child nodes and creates one giant vertex buffer and one index buffer. Then it stores all the transformations and material colors into an instance buffer. Finally, it creates a draw indirect buffer that specifies where to get the vertex and index data for each model. After that, all child nodes can be rendered with a single draw call (for opaque and transparent models, two draw calls are needed).

This provides huge performance gains. Many times the 3D scene consists of many simple 3D objects and when rendering them, the code in Ab4d.SharpEngine, the graphics driver and the graphics card need to create a lot of instructions on how to render the scene. In this case, the graphics card spends a lot of time waiting for those instructions. But if we give it all the data to render all the objects in one draw call, the graphics card can fully optimize all its threads and render the scene as fast as possible.

What is more, OptimizedGroupNode still allows updating the child objects. Here we need to distinguish between fast and slow update operations. Fast operations require just a simple change in a buffer and the 3D scene can be rendered again. Slower operations require regeneration of buffers and new recording of Vulkan draw commands (command buffers).

The following are fast child operations:

  • Change material's color (change the DiffuseColor property) or change material object (assign a new StandardMaterial to ModelNode.Material property)
  • Change visibility of a child ModelNode or GroupNode
  • Change transformation of a child node

Slow child operations are:

  • Change transparency of a material from opaque to transparent or vice versa (this will be improved in the future)
  • Add or remove child nodes (including GroupNode objects)

This means that you can show a very complex 3D model with OptimizedGroupNode and are still be able to hide some of its parts or change the color of the selected model.

Of course, there are also some limitations of the OptimizedGroupNode:

  • Only StandardMaterial without a texture and specular color is supported (SolidColorMaterial, VertexColorMaterial and PhysicallyBasedRenderingMaterials are not supported).
  • Only the Material property is used (not BackMaterial). However, with the IsTwoSided property, it is possible to render all objects with a two-sided material.
  • Only meshes of type StandardMesh and GeometryMesh are supported (PositionsMesh and TriangleMesh with other vertex layouts are not supported).
  • Changing the mesh or individual positions or triangle indices of a child MeshModelNode is not supported.
  • OptimizedGroupNode requires vkCmdDrawIndexedIndirect so it is supported only on Vulkan and not with WebGL.

Preparing all the buffers can take some time. Therefore, OptimizedGroupNode also provides the InitializeAsync method, which builds the data and GPU buffers on a background thread.

I am sure that OptimizedGroupNode will be used by many users. I am also sure it will be used by ALL users of the next new feature: Ab4d.SharpEngine.IfcLite library.

Ab4d.SharpEngine.IfcLite library can be used to import BIM (Building Information Modeling) models from IFC files. Those files are typically used to store huge architectural models that can consist of several thousand smaller building blocks. Rendering such models with the standard rendering model, where each scene node is rendered by its own draw call, can be slow. But the new OptimizedGroupNode can render the whole building with one draw call (or two when the building has semi-transparent materials).

The Ab4d.SharpEngine.IfcLite library uses an open-source native IFC-Lite library (https://github.com/LTplus-AG/ifc-lite). This library can import models from IFC files and produce a json text with all the meshes and model properties. But parsing the json can be slow. To solve that, I have forked the source (https://github.com/ab4d/ifc-lite) and added additional export functions that can be used from .Net app to get meshes (vertices, triangle indices) and other data directly from native memory without converting them to a string and then back.

The library also supports batch import. This means that 3D meshes are provided to the .Net application as they are loaded from the IFC file. For huge IFC files, this means that the user can see the progress of loading the file.

Here is a screenshot of the new sample:
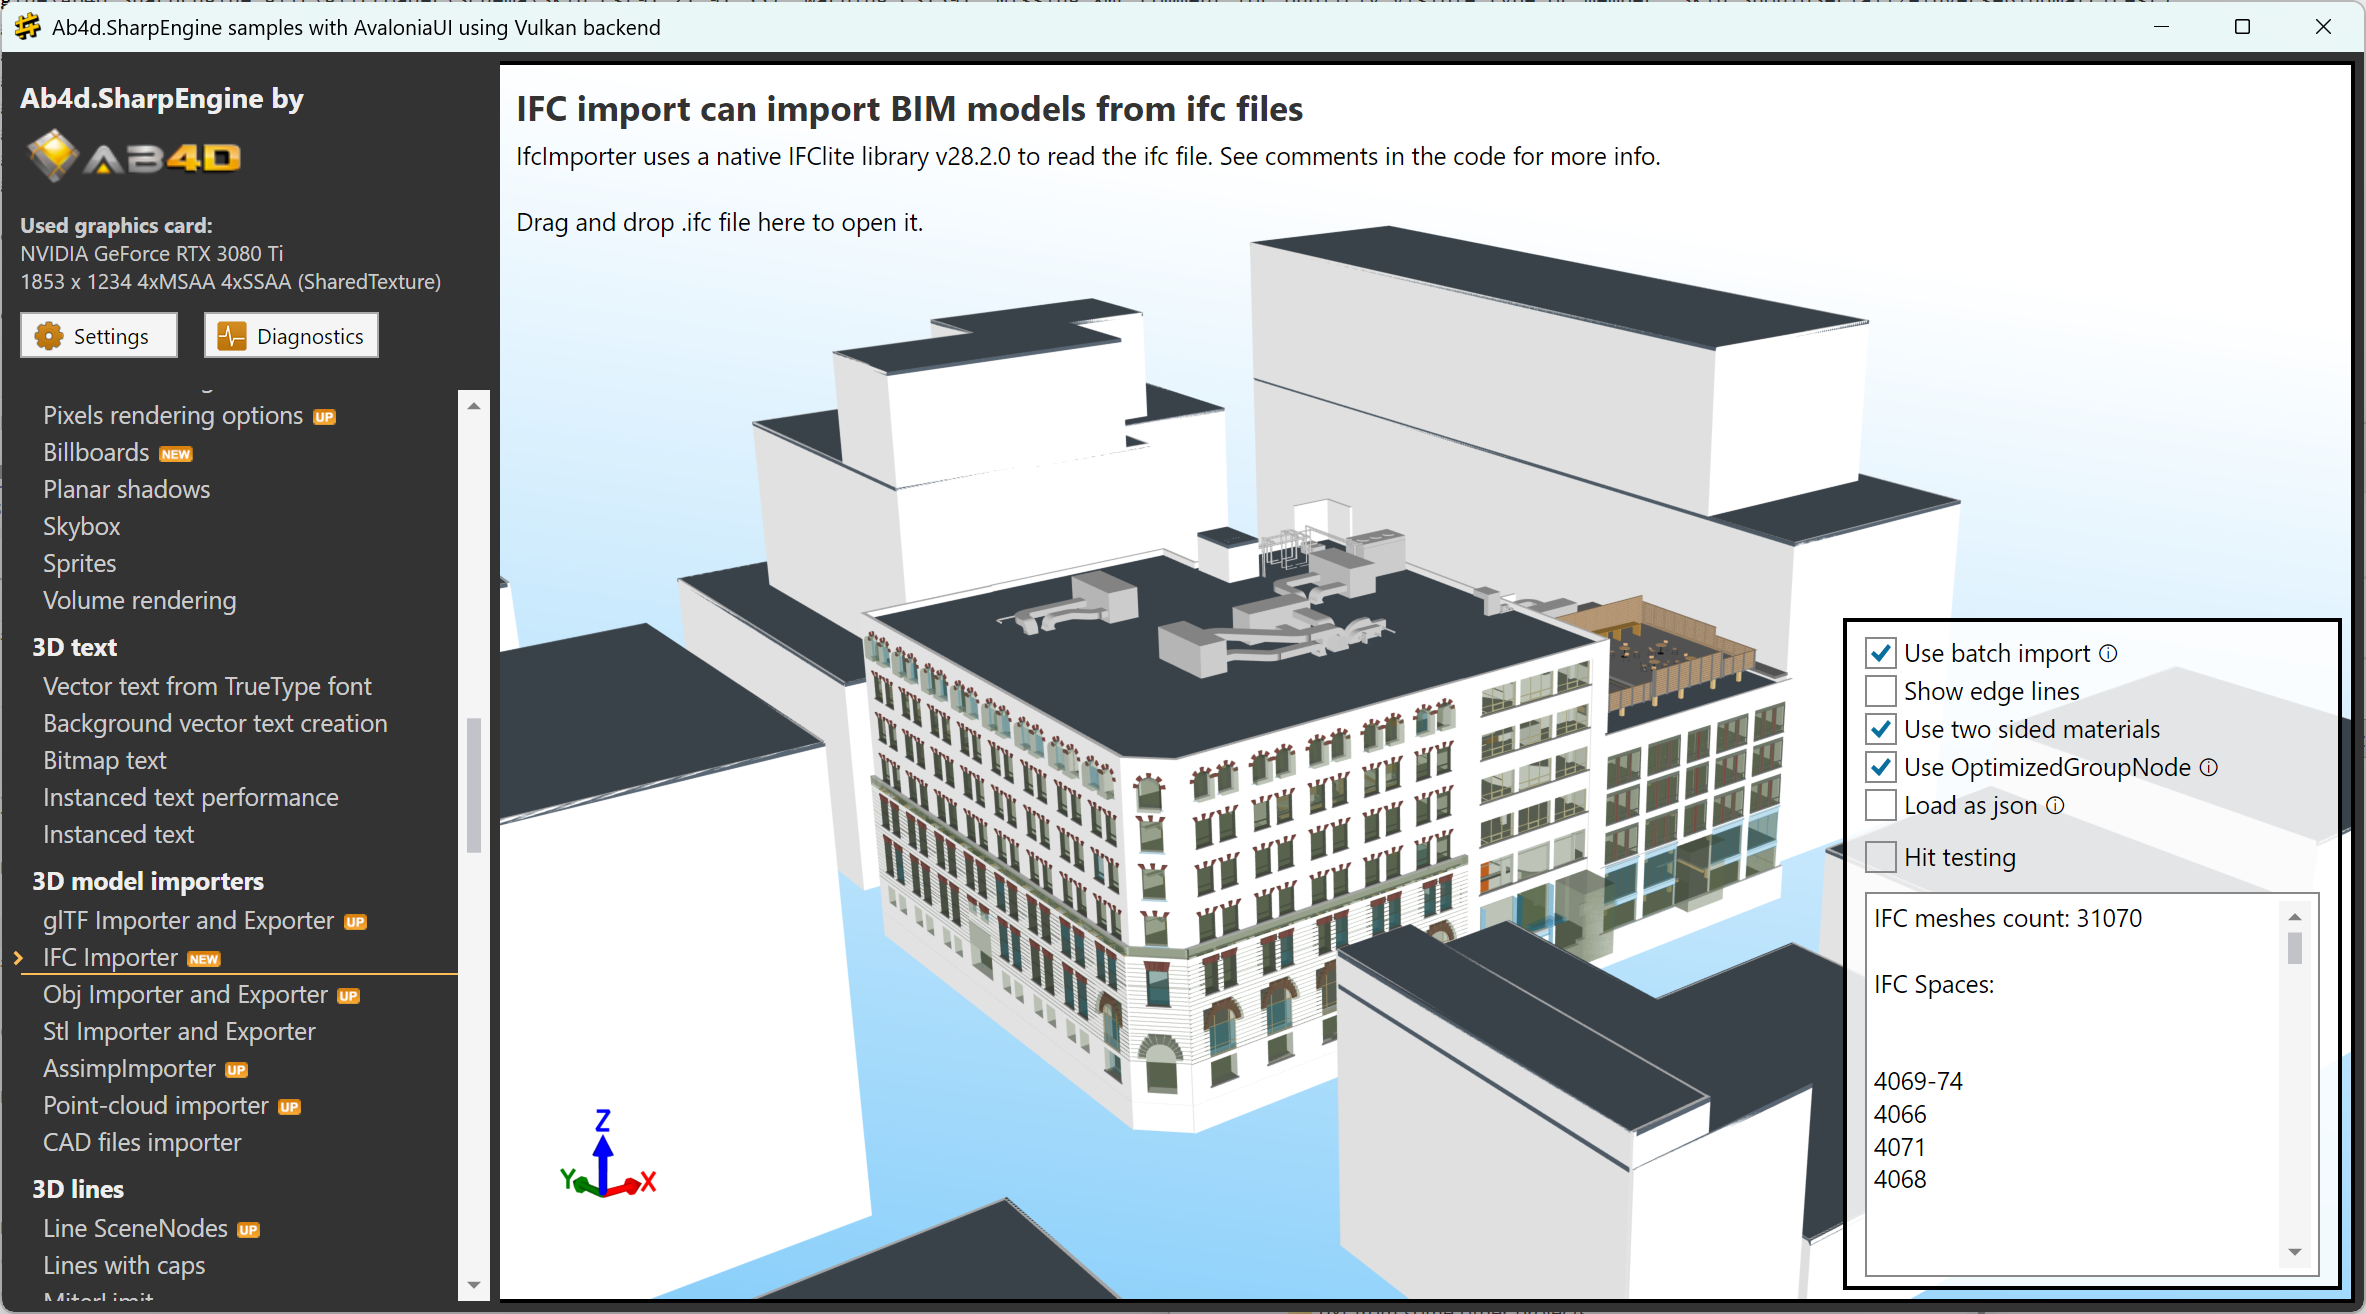
Imported BIM model from an ifc file

The next major new feature was highly requested by customers who previously used Ab3d.PowerToys and Ab3d.DXEngine. This is the CameraNavigationCircles camera controller.

See the following video to see it in action:
Animated CameraNavigationCircles

CameraNavigationCircles shows the current camera orientation with 3D axes and axis circles. It can also be used to rotate the camera. This can be done by dragging the mouse or pointer over the CameraNavigationCircles. The user can also click an axis circle to rotate the camera to that axis. By holding down the control key (which can be changed in the PreserveAttitude property) and clicking an axis circle, the user rotates to that axis without changing the camera's attitude (vertical direction).

The following screenshot from the new sample shows many settings for the CameraNavigationCircles:
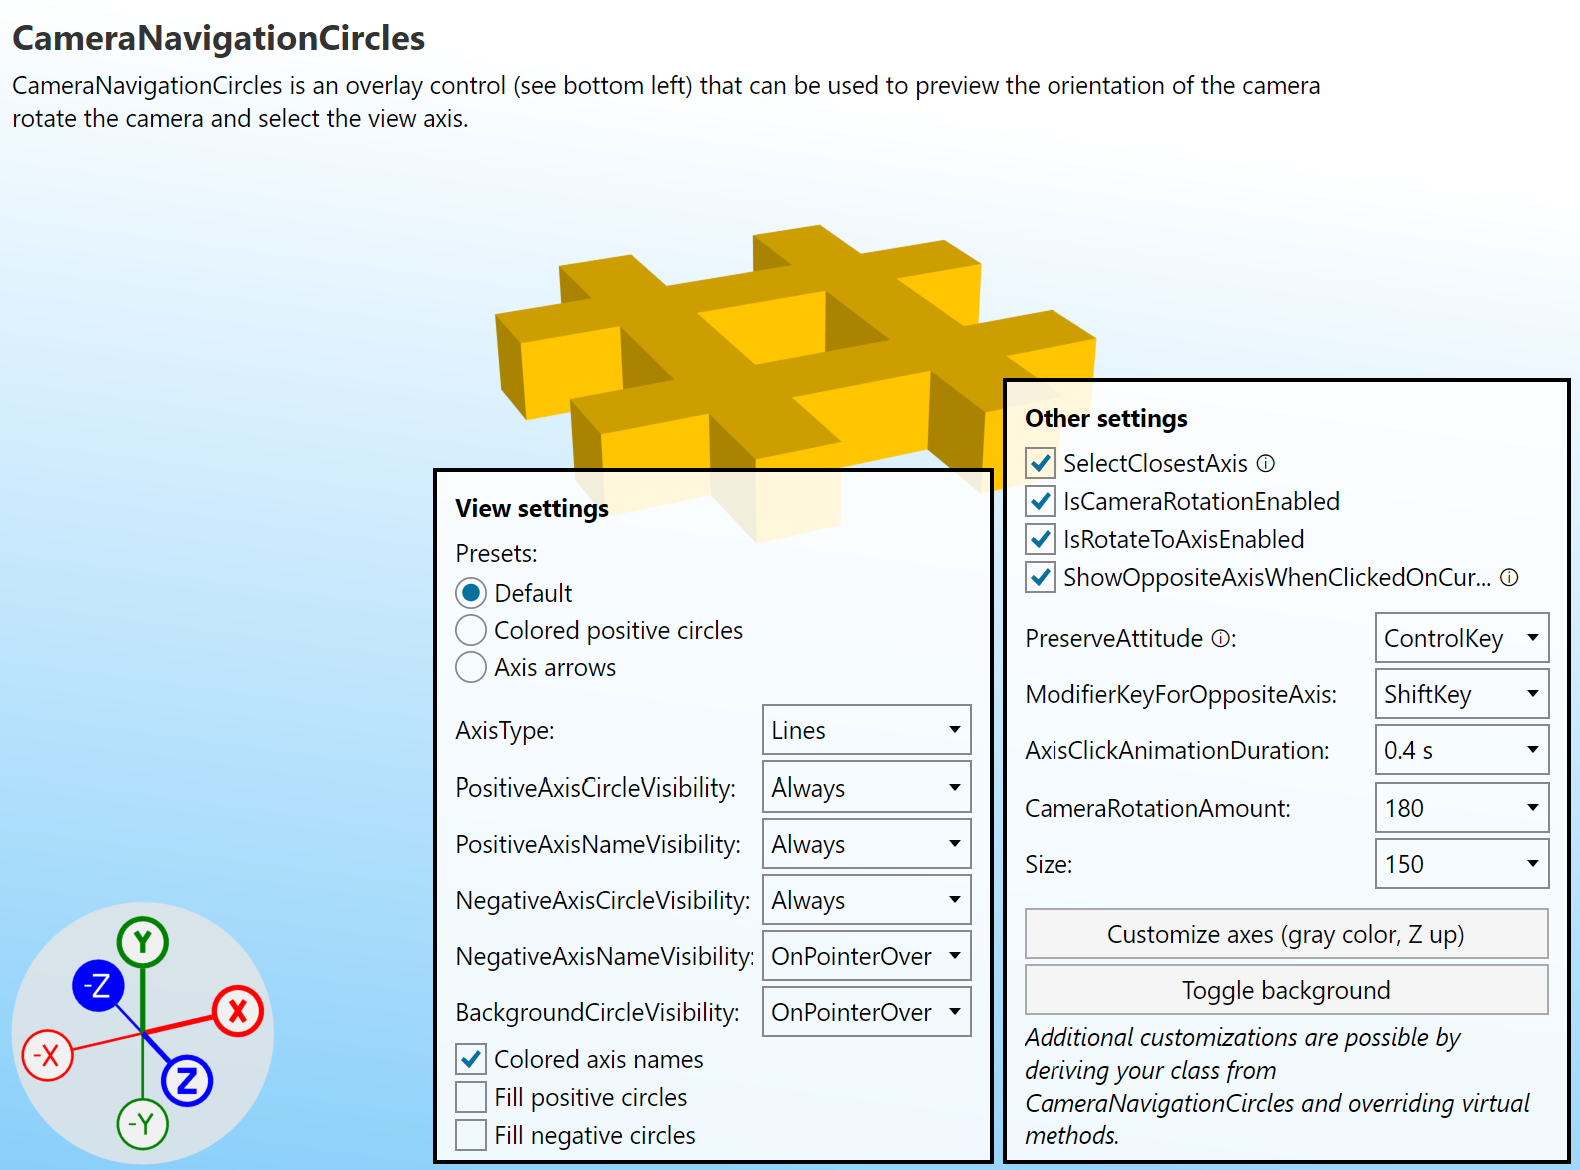
CameraNavigationCircles sample with many settings

CameraNavigationCircles class is derived from a new OverlayPanelBase class. This class can be used to show a 3D scene with a different camera and 3D objects on top of the main 3D scene. Rendering the overlay 3D scene can be done by rendering the scene to a texture and showing that texture by using sprites. This mechanism was also used by CameraAxisPanel in the previous version.

But the problem with using sprites is that before the sprite can be shown, the engine needs to wait until the overlay scene is rendered. This synchronization adds significant delay to rendering, especially for overlays that change a lot - like the CameraAxisPanel that changes on each camera change.

The new OverlayPanelBase class can solve that by providing another way to render the overlay: objects from the overlay scene are simply rendered at the end of rendering objects from the main scene. So after the user changes the camera, all that is required to render the next frame is to update two small scene buffers (they define the camera matrices and scene view size; one scene buffer is required for the main scene and one for the overlay scene). After that, the previously recorded command buffer can be executed again.

The new CameraNavigationCircles also uses that rendering mode so that it can be rendered very fast.

Note that CameraAxisPanel and CameraNavigationCircles are not yet available to WebGL. I am planning to add support for that in the next version.

The next big new feature is support for world-size line thickness and pixel size. In the previous version, the LineThickness value was specified in screen-size coordinates. This means that a line with thickness 1 produces 1-pixel-wide lines (when no dpi-scale is used). Because 3D lines are usually not actual 3D objects that have volume, real mass and are part of the 3D scene, screen-space line thickness is usually desired. 

But sometimes, users want to scale the lines with the 3D objects. For example, when showing edge lines on a large 3D object, screen-space thick lines are clearly visible when the object is close to the camera. But if the user zooms out a lot, all that remains of the 3D object are edge lines because they don't scale with distance. To solve that, all the lines now support IsLineThicknessInWorldSpace property. It is set to false by default, but when set to true, the LineThickness value is specified in world-space coordinates. The following screenshot shows a sample that demonstrates this:
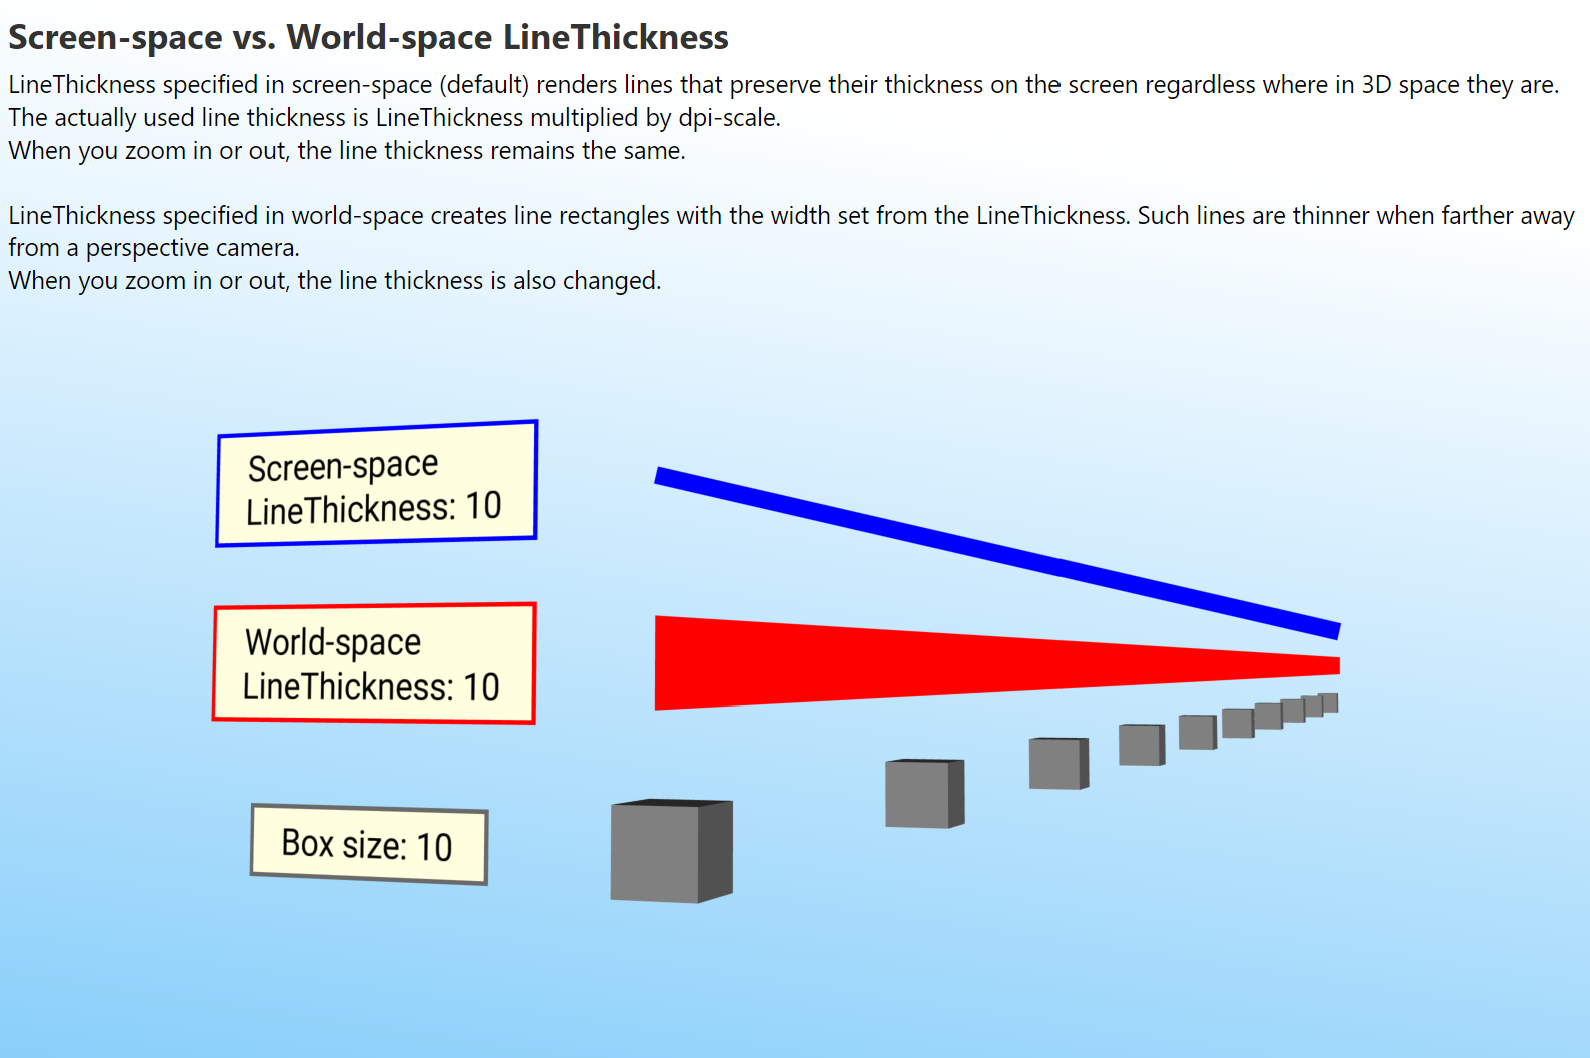
3D lines with screen-space and world-space line thickness

World-space size is now also supported for rendering pixels by the new IsWorldSize property. This can also be used to render billboards (2D textures that are always facing the camera) in world space, for example:
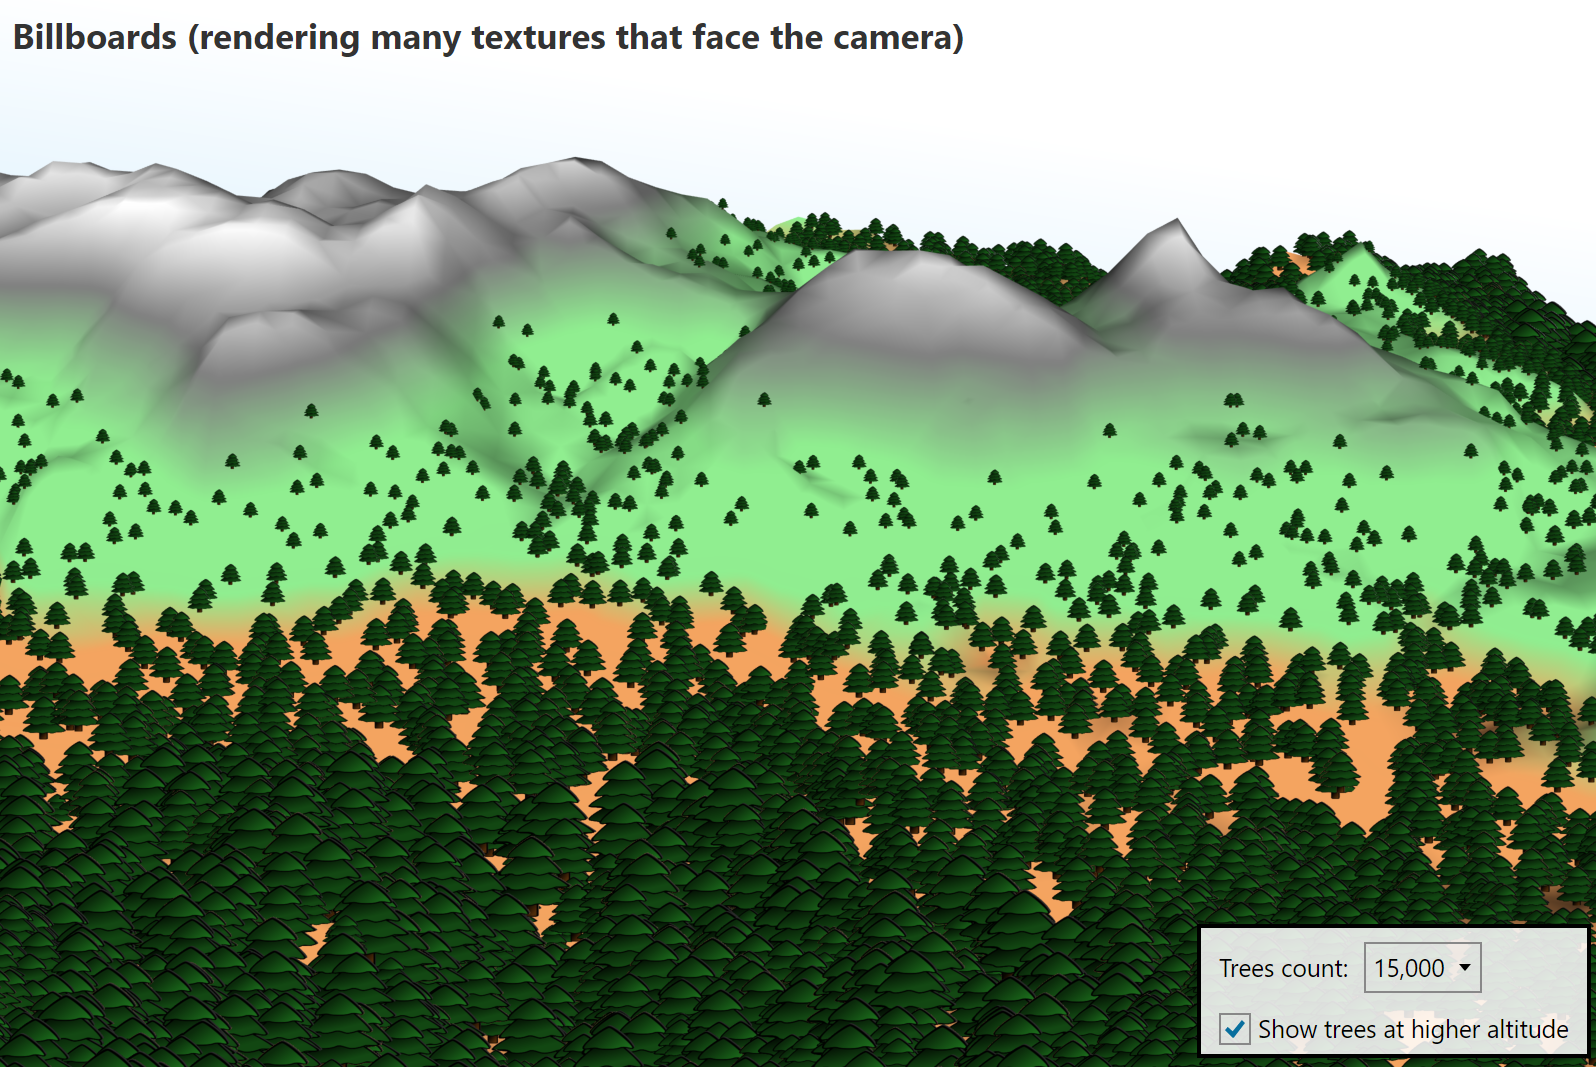
Rendering billboards (pixels with textures)

As described at the beginning, Ab4d.SharpEngine.WebGL library also got many new features that were missing compared to the Vulkan library.

I am especially happy that I found a solution for hardware-accelerated 3D lines. Because WebGL does not support geometry shaders, I was not able to use the code from the Vulkan library. Instead, I need to use instancing, where a simple quad mesh is transformed in a vertex shader to form a line that is specified by the start and end positions. This works very fast and can also render line patterns and supports both screen-space and world-space line thickness.

But rendering connected lines (PolyLineNode) with mitered and beveled joints and rendering line caps (arrows and other shapes) are still not supported. I will try to add support for that in the next version.

On the other hand, in the next version I will try to reuse the instancing algorithm from WebGL and use it in the Vulkan engine as another option to render lines. This will be very beneficial for using Ab4d.SharpEngine on macOS and iOS because there geometry shader is also not supported. So, using instancing can provide proper thick-line support for those systems (now you need to use a specially compiled MoltenVK library to add partial support for thick lines).

With other new features, the list of missing features in the WebGL version of the library is now very short - see Ab4d.SharpEngine.WebGL implementation details.

And here is a screenshot of an Electron app showing PBR sample running on macOS:
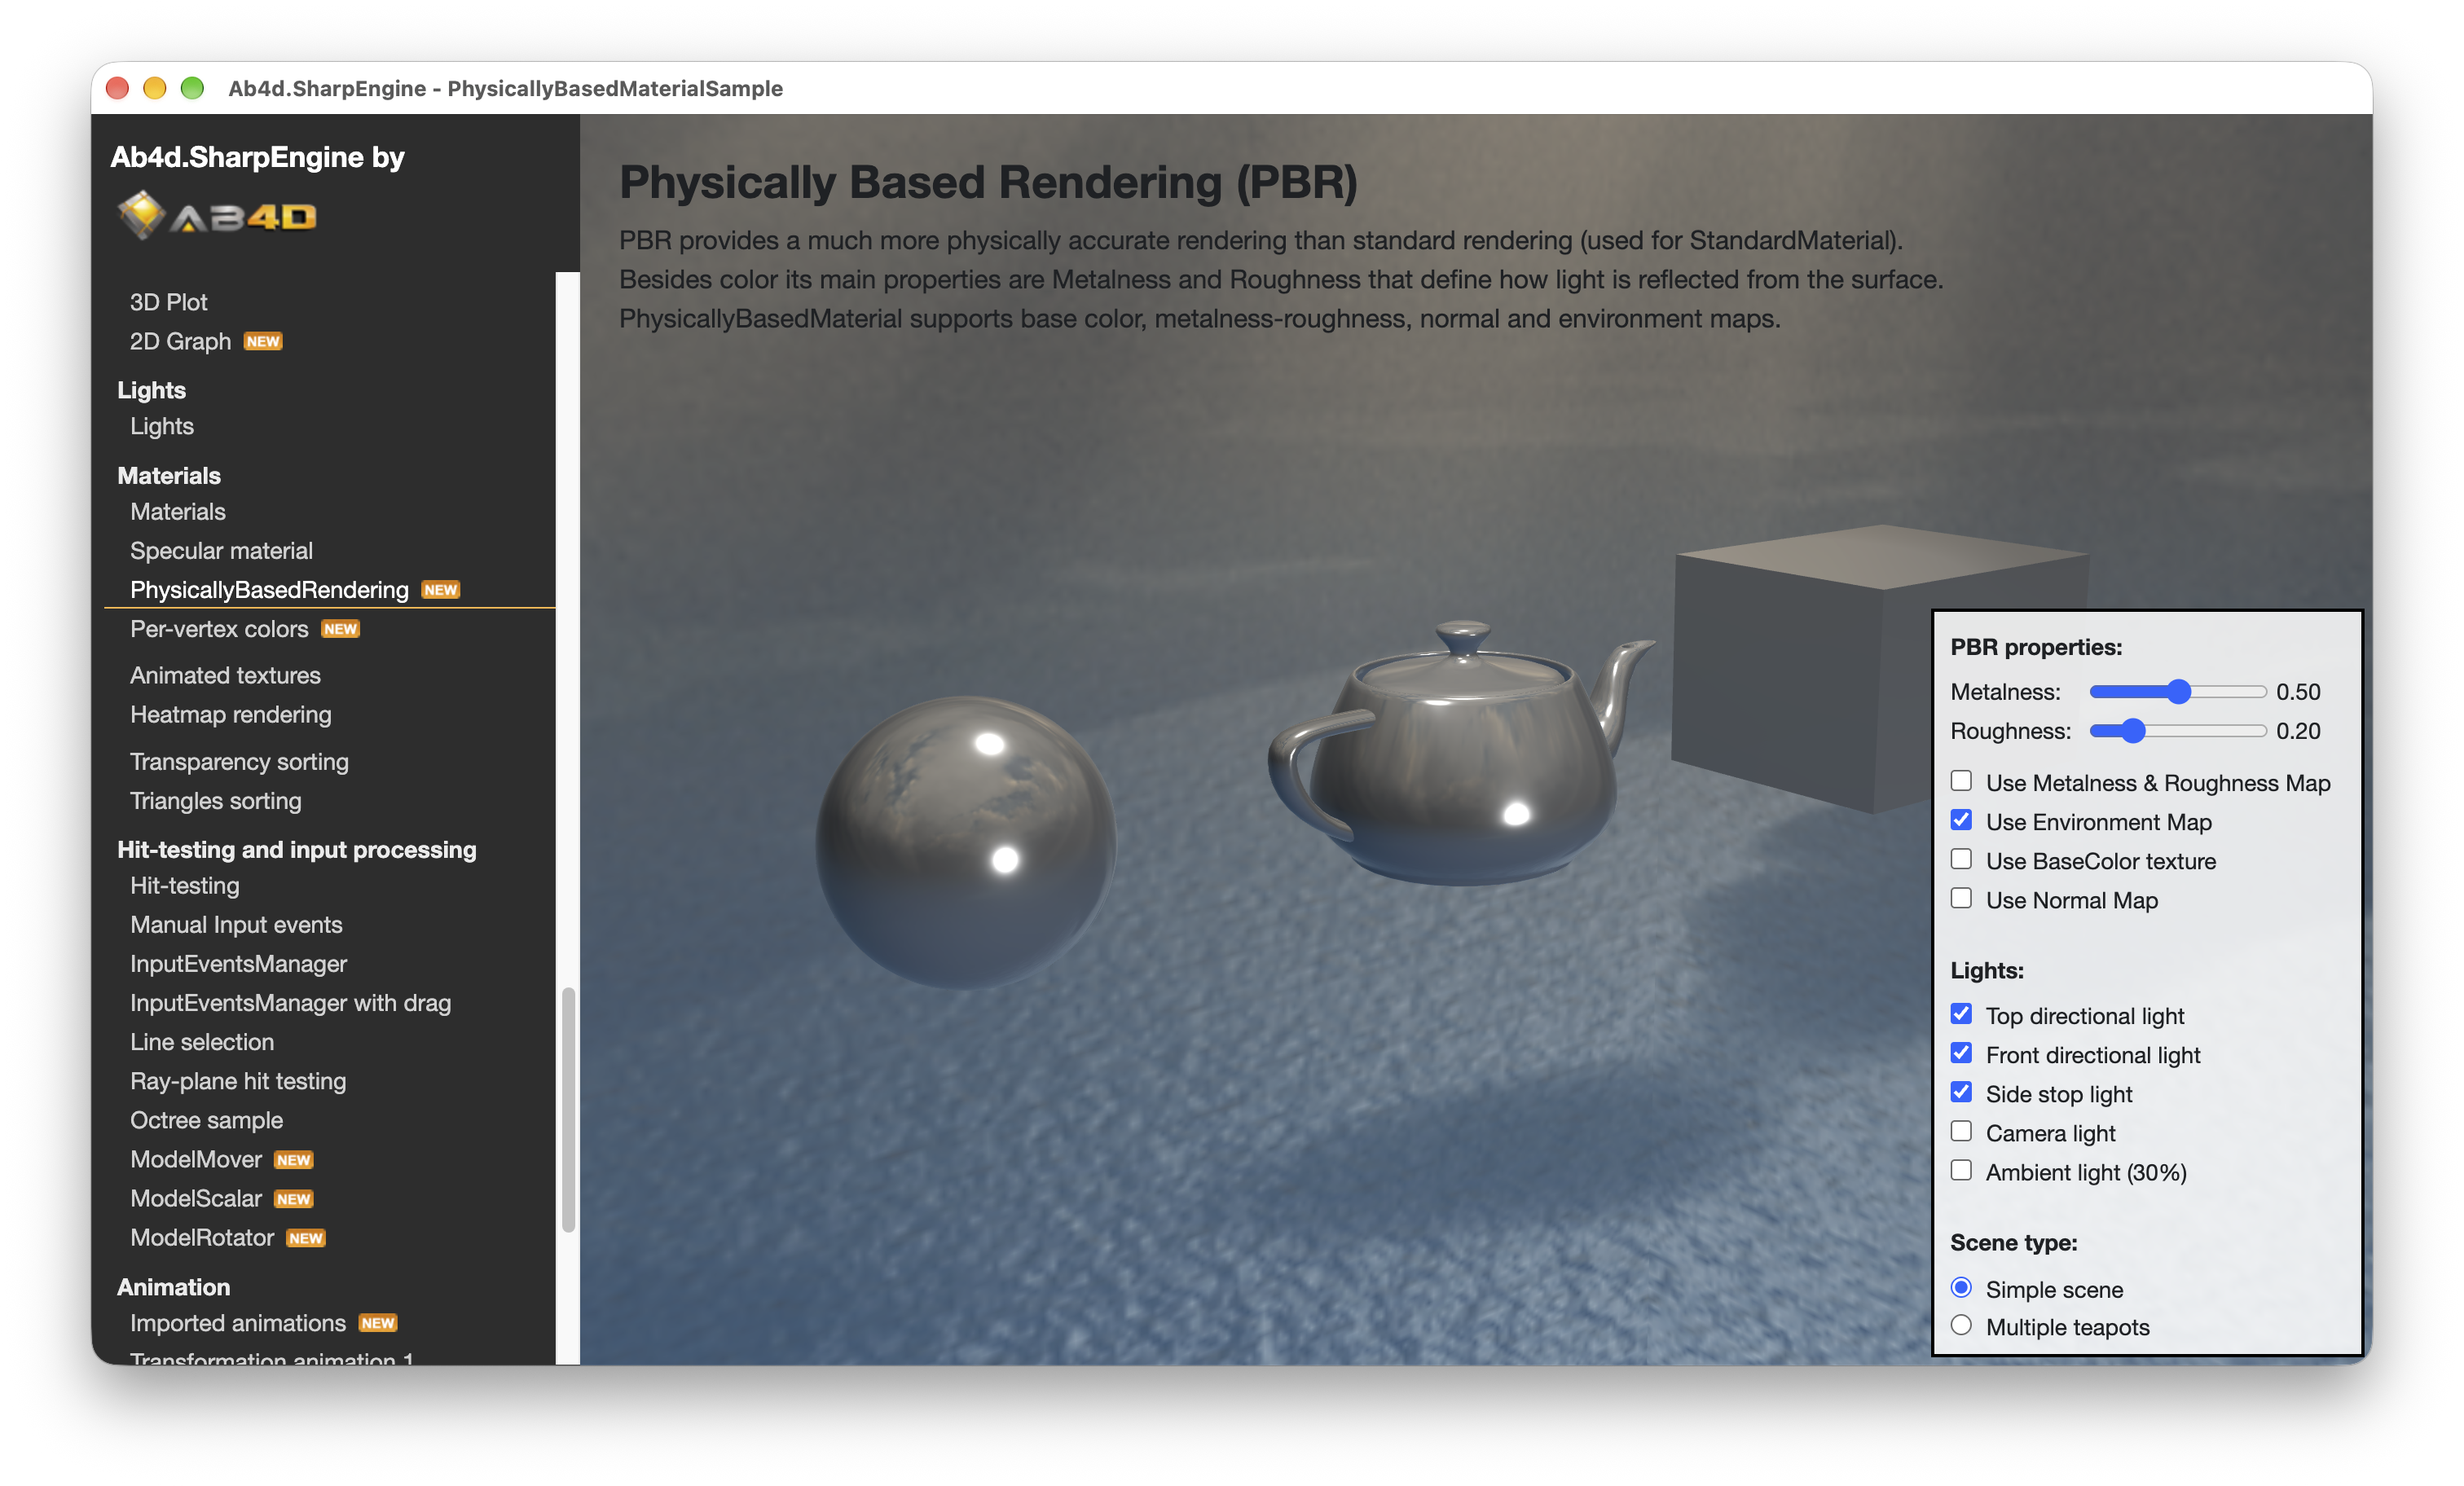
Electorn app with PBR sample running on macOS

There are also many other improvements and fixes. You can see a list of all the changes at SharpEngine Change log.

Now I am planning to prepare a new version of Ab3d.PowerToys and Ab3d.DXEngine libraries. 

Also, because many software development tasks are done by AI agents, I will prepare Skills to help agents better understand SharpEngine objects and troubleshoot issues. I am also planning to provide an MCP server that will allow agents to get 3D scene information and rendered screenshots from the running application.

New version of Ab4d.SharpEngine with improved shadows and animation

by abenedik 3. July 2026 13:57

I am happy to inform you that a new version of Ab4d.SharpEngine has been published.

The major new features of this version are:

  • added support for shadow rendering,
  • added support for importing keyframe and skeletal animations,
  • improved performance when used in Avalonia with Vulkan backend or WinForms apps.


The main new feature is support for proper shadows. Before, the engine only supported rendering planar shadows. There the shadow was only visible on a 3D plane. But now with proper shadow support, the shadow can be rendered on all objects.

To make the shadows look as nice as possible without using ray tracing, the new version of Ab4d.SharpEngine uses Percentage Closer Soft Shadows (PCSS) algorithm. This can render realistic shadows where the shadow is sharp close to the shadow casting object and gets blurred when the distance increases. This creates a light penumbra. The penumbra amount is controlled by the ShadowLightSize parameter - small lights create harder shadows, and larger lights create more pronounced penumbra. See screenshots from the new sample:

Ab4d.SharpEngine with Percenatage Closer Soft Shadows (PCSS)


It is also possible to create a shadow from a SpotLight:

Ab4d.SharpEngine with spot light PCSS


And when the ShadowLightSize is set to 0, this produces a hard shadow (in this case, it is good to increase the ShadowMapSize to create a more precise shadow):

Ab4d.SharpEngine with hard shadows


Note that the default shadow settings may not work for all 3D scenes. If you are not satisfied with the shadow quality or you get shadow artifacts, such as shadow acne, you may need to adjust the ShadowConstantBias, ShadowSlopeBias and ShadowNormalBias properties to change the bias that may solve the problems. See the comments in the new shadow sample for more info.


Another important new feature of the engine is support for importing keyframe and skeletal animations. Keyframe animations animate the object’s transformations (translate, scale, rotation). Skeletal animations animate individual mesh positions by animating the so-called skeleton - based on the position weight values, each position is then adjusted as the skeleton is animated.

The animations can be imported from glTF files by using Ab4d.SharpEngine.glTF library or from almost all other file formats by using a third-party Assimp importer and Ab4d.SharpEngine.Assimp library.

The following screenshot shows a sample skeletal animation (skeleton is shown with red lines):

Skeletal animation in Ab4d.SharpEngine


If you are using Avalonia and are rendering complex 3D scenes, then you will be happy to learn that the new version provides significant performance improvement when using Avalonia with Vulkan backend (the Avalonia startup code in program.cs initializes the Avalonia to use Vulkan for rendering UI elements). In this case the SharpEngine does not do a back buffer copy operation and also does not wait for the rendering and copying to be finished. In the previous version rendering complex scenes may block the UI thread until rendering was done. Now waiting is done on the graphics card in the background. This makes the UI thread more responsive.

Also, when using WinForms, the performance is improved. What is more, in WinForms app the rendering process can be better controlled by the following new properties on SharpEngineSceneView class: RenderAsManyFramesAsPossible, RenderingTimerInterval and FramesPerSecond.


The last improved feature that I want to mention is improved FitIntoView functionality. When using an orthographic camera, it is quite easy to provide an accurate fit-into-view. But when using a perspective camera, I have not yet found a perfect algorithm. However, the new version improves the accuracy of the fit-into-view. It is still not perfect, but should work better than before.

There are also many smaller improvements and fixes. See the change log for more info.


The WebGL version of the engine did not get any special new features, but because both libraries use shared code, the new version now also supports importing keyframe and skeleton animations and improved FitIntoView (Percentage Closer Soft Shadows are not yet supported).

New Ab4d.SharpEngine with many great new features and the first version for the browser published

by abenedik 2. April 2026 09:56

I am really happy to inform you that a major new version of Ab4d.SharpEngine is now available.

The main new feature of this release is support for browsers and browser-based apps, such as Electron. Before I describe that in more detail, let me list some other great new features:

  • added support for PhysicallyBasedRendering (PBR) materials,
  • added camera rotation, movement and zoom smoothing,
  • added highly customizable 3D graph axes,
  • added hardware accelerated rendering of two-sided materials,
  • added support for super-fast hit testing of pixels and point clouds,
  • added support for frustum culling,
  • improved slicer and generation of curve lines,
  • added option to force starting the Avalonia with Vulkan backend app on a dedicated GPU.

And there are many more new features and fixes. See the release description on GitHub for a complete list of changes.


To jump start into the capabilities of the new 3D rendering engine for the web, check the online working demo.

If you are following the development at AB4D, then you were already expecting the release of the 3D render for the browser. But you may be expecting the release a few weeks earlier and with version number 1.0. But when trying to create the samples that would be shared with the WebGL and Vulkan versions of the engine, I realized it would be much better to release both libraries at the same time. So, now both Ab4d.SharpEngine (for Vulkan) and Ab4d.SharpEngine.WebGL use the same version 4.0. 

Also, you may have noticed that I have renamed the Ab4d.SharpEngine.Web into Ab4d.SharpEngine.WebGL (Web → WebGL). This now better represents the rendering technology and leaves room for an optional WebGPU version in the future. I was also thinking about renaming the Ab4d.SharpEngine into Ab4d.SharpEngine.Vulkan, but have decided not to do that to avoid disruption to NuGet package naming. However, in the future, I will try to preserve all the common and shared classes in the Ab4d.SharpEngine library and create a specialized Ab4d.SharpEngine.Vulkan library that would contain only the API-specific code. But I have to find a good way to preserve performance without using many virtual functions.

This also meant that I had to postpone the release of Ab4d.SharpEngine.WebGL and speed up the release of Ab4d.SharpEngine (postponing implementation of 3D shadows).

Anyway, the joined release cycle now allows having shared samples projects that are now all in the GitHub Samples repo that now have 18 different solutions (.sln files)!

Many samples can share 100% of the source code from the Ab4d.SharpEngine.Samples.Common project. But because not all the features are supported in WebGL, some samples need to exclude parts of the code by using "#if VULKAN" precompiler directive. The following article describes How to share the code for desktop, mobile and browser platforms.

As seen in the Ab4d.SharpEngine.WebGL implementation details most of the features are already supported in WebGL library. In my opinion, the most important feature that is currently missing is support for thick lines and line caps (arrows). The reason for that is that WebGL does not support the geometry shader or LineThickness property. There is no good way to implement that. In the future, there will probably be an option to support thick lines by generating line meshes on the CPU. This is much slower and requires the mesh to be regenerated on each camera change. Another option that is already available is to use TubeLines (Lines-TubeLinesSample). But with TubeLines the line thickness is defined in the world coordinate system and not in the screen coordinate system (if LineNode.LineThickness is set to 2, then the line will always be 2 pixels wide multiplied by DpiScale regardless of where in the 3D world it is).

Please note that when checking the performance of WebAssembly, the Debug and also the Release builds of WebAssembly are significantly slower than the Published / Deployed build. So always check the performance of the published code. You can also check the performance with the online working demo.

The rendering engine comes with many samples. The main sample is Blazor WebAssembly that uses a shared common project to demonstrate the main features of the engine. There are also samples that show how to include the published wasm project in any web page served by an ASP.NET Core web server, a Node.js Express server, or a Python socket server. Each project also has its readme.md file that provides additional details.

Another very interesting sample shows how to use Ab4d.SharpEngine.WebGL in an Electron app. Electron is one of the most popular frameworks for creating desktop applications that run on Windows, Linux and macOS. It is used by many applications, including Visual Studio Code, Slack, Discord, GitHub Desktop, and many others.

For example, the following screenshot shows an Electron app that shows a complex oil rig 3D model that was imported from a dragged and dropped file:

Complex oil rig model in Electron app with Ab4d.SharpEngine


Now let me describe some additional new features of version 4.0.

Rendering of PhysicallyBasedRendering (PBR) materials was added to the Vulkan part of the rendering engine (not yet for the WebGL). It provides a top-quality rendering system that accurately calculates how light bounces from different materials. Those light properties are defined by metalness and roughness values. The following screenshot shows how those two values change the outlook of the model:

PBR materials with different metalness and roughness

Because different parts of the model can have different materials, the models usually come with a texture that defines metalness and roughness values for each part of the model. To simulate bumpiness, the PBR also supports normal maps. And what is more, the PBR shaders in the Ab4d.SharpEngine can also render environment maps that show the reflections of the environment on the models (this can be seen in the previous screenshot on models with low roughness and high metalness).

The following screenshot shows a complex model rendered with PBR shader:

Flight helmet PBR model with Ab4d.SharpEngine

PBR materials are also used by default in the glTF files. Therefore, the glTFImporter was updated to support loading PBR textures (maps). But to preserve the backward compatibility, you need to enable that by setting the new UsePbrMaterial property to true. When it is set to false, the glTFImporter will create StandardMaterials instead of PhysicallyBasedMaterials.


Those who are using Ab4d.SharpEngine for rendering 3D data in a graph will be happy to know that the new version of the engine includes the AxisWithLabelsNode and AxisBoxNode objects, which can display highly customizable axes. The AxisBoxNode can also dynamically show or hide the axes based on the camera angle. The following screenshots show some of the new capabilities:

Multiple 3D axes

AxesBoxNode with dynamically showing 3D axes based on camera angle

3D plot with contour lines


Then there are a few new features that were ported from the last version of Ab3d.PowerToys. In my opinion, the most important of those features is camera smoothing. Now it is possible to smooth the camera's rotation, movement and zooming. This makes the camera change in a much more natural way - the camera does not just “jump” to the new position, but it uses easing animation to change orientation or move. Because the camera is the main interface between your application and the user, camera smoothing can significantly improve the user experience.


Another two new features that were ported from Ab3d.PowerToys include improved slicing support and improved curve line generation. The new Slicer class improves slicing performance and also allows generating filled sliced meshes and slice polygon lines. In the new version, the curve lines can now be generated by using an adaptive algorithm that adds more points where the curvature is higher. This requires significantly fewer curve line positions than when using a fixed number of positions per segment. See the following blog post for more details about that. Also, those three features are all available for Vulkan and WebGL versions of Ab4d.SharpEngine.


Lastly, I would like to describe three new features that can significantly improve the performance in some cases. The first is added support for rendering two-sided materials with one draw call. Many times we want to render the front and the back side of the model with the same material. Before, this required two draw calls. But now the StandardMaterial with the IsTwoSided property set to true can be rendered with a single draw call. So, if all the objects in the scene are rendered with two-sided materials, this improves the rendering performance by 100% (halves the number of draw calls and fragment shader invocations).

Often, we render a 3D scene with many objects behind the camera. In those cases, we can significantly improve performance by issuing draw calls only for visible objects. This is not possible with the new BoundingFrustum struct, which can be used for frustum culling (checking whether an object's bounding box is currently visible to the current camera).

On laptops with multiple GPUs, Windows starts all apps by default with the integrated GPU. A recommended way to solve that is for the user to manually set the app to use High Performance option in the Graphics Settings. But now it is possible to force using a dedicated GPU. But when you use Avalonia with Vulkan backend apps, then the new version adds an option to force using a dedicated GPU. See Instructions on how to do that in a new Ab4d.SharpEngine Performance Tips.

I am very passionate about improving the performance of the engine. If you would like me to check how to improve your app's performance, please contact me, and we will arrange an online meeting with screen sharing where I will try to find ways to improve your app.


Most of the communication between the users of Ab4d.SharpEngine and me are done by email. Some users also used the forum. But recently, sending emails from the forum has become very unreliable; I may not receive an email about a new forum post, or the user may not get a notification about my reply. Therefore, I have decided to make the forum read-only. This way, all the existing answers remain available. But for new questions, please use the Issues or Discussions on the GitHub repo for Ab4d.SharpEngine.Samples .


And as usual, to conclude, I would like to quickly present my future plans.

The first thing I will work on is proper support for shadows. Currently, the only option is to use planar shadows. Recently, I found an algorithm that produces really nice soft shadows. I am really excited about that because I am sure that the results will be awesome. Also, I would like to add support for showing CameraNavigationCircles (as in Ab3d.PowerToys). And I have some plans to improve rendering performance for very complex BIM models. Also, I would like to improve the performance of Volume rendering.

And since everyone is now talking about AI agents, I plan to provide Skills files with instructions on how to use Ab4d.SharpEngine. This way, the agents will be able to write c# code that will generate and update the 3D scene. Maybe there could also be an MCP server that generates rendered bitmaps of the 3D scene and provides the AI with scene, camera and other object information while the app is running. Working with Ab4d.SharpEngine is already quite easy, but with better AI support, this will be even easier.