As usual, shortly after a new .Net release, I am releasing new versions of Ab3d.PowerToys and Ab3d.DXEngine.
This is another bigger release with great new features and some important fixes. But before revealing what is new for Ab3d.PowerToys and Ab3d.DXEngine, I would like to present a brand new product.
As long as I am providing 3D graphics libraries, there has been a single most requested feature: provide support for importing .step and .iges files.
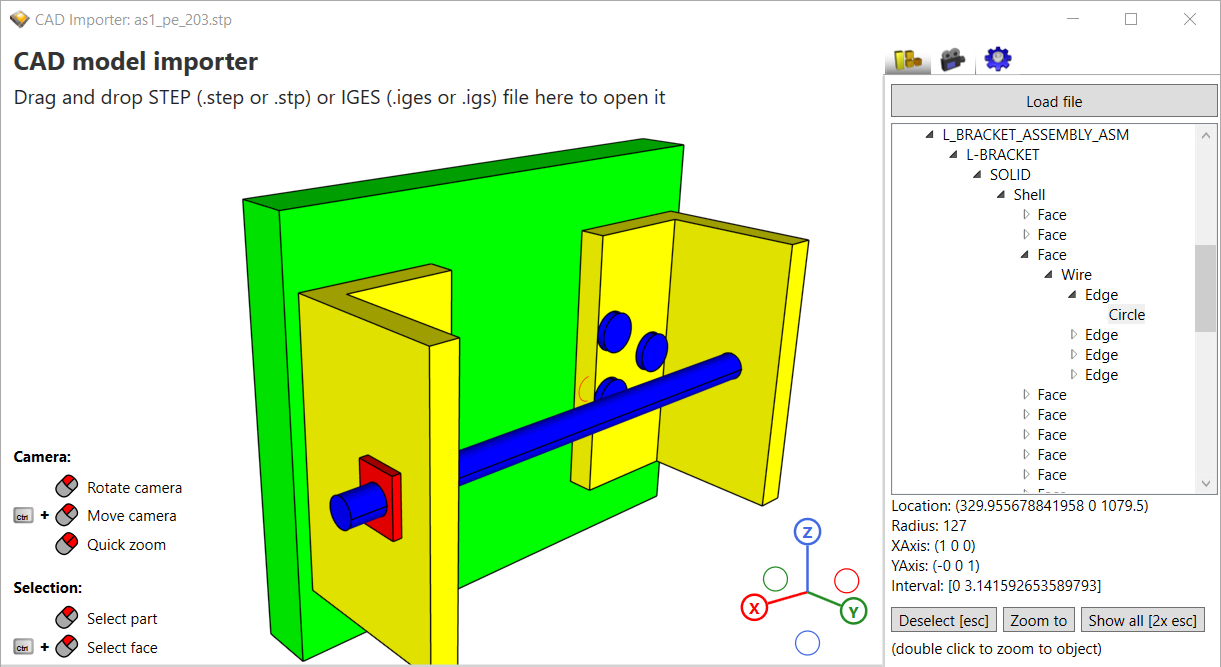
Finally, I would like to announce that this is now possible with the new Ab4d.OpenCascade library. See the screenshots from the new CadImporter sample application:

So far it was possible to use ReaderObj, glTFImporter or Assimp importer to import 3D models from many file formats. But all those file formats store their models as triangles or simple meshes that were defined by simple polygons. So after importing the meshes, it was relatively easy to show them using a rendering engine. But CAD applications like SolidWorks, CATIA, Autodesk Fusion 360, Autodesk Inventor, Pro/Engineer, Siemens NX, and others define their 3D models by using mathematically defined surfaces. All of those applications can store the models to .step or .igen files. Importing 3D models from those files first requires understanding all surface types and then triangulating them into meshes with triangles. Only after that can they be sent to the graphics card to render them.
The new Ab4d.OpenCascade library uses a third-party native OpenCascade library to read .step and .iges files and triangulate their models. This way the CadImporter class from the Ab4d.OpenCascade library can get 3D meshes that can be used by Ab3d.DXEngine (or Ab4d.SharpEngine) to render the 3D objects. The importer also preserves the names and hierarchical structure of the CAD parts (Compound or Solid). The faces and edges that define the parts can be also retrieved. For each edge, it is possible to get the original curve with its parameters. For example, you can get a location and a radius for a Circle (as seen in the image above); for BSpline curve you can get control points (Poles), weights and knots. What is more, it is possible to get the exact part volume and surface area (not from triangulated mesh but from actual mathematically defined objects).
The third-party OpenCascade library has its own license that allows free commercial use. The Ab4d.OpenCascade library can be used freely when the library is used with Ab3d.DXEngine or Ab4d.SharpEngine. The library provides the imported data in standard .Net types (int, float, double, simple arrays and structs) so it can be used by any other .Net code without Ab3d.DXEngine or Ab4d.SharpEngine. But in this case the source code for the Ab4d.OpenCascade library needs to be purchased (contact support for more info).
This is the first version of the importer, so your feedback is much appreciated. If you want some additional data from the .step or .iges files or would like to use some additional functionality from the OpenCascade library, please let me know.
The sample CadImporter application can be downloaded from CadImporter GitHub page.
And now to the new Ab3d.DXEngine. My favorite new feature is the new DynamicPlanarShadowRenderingProvider. It can render soft planar shadows with shadow darkness based on the objects' distance from the shadow plane. A screenshot best describes this:
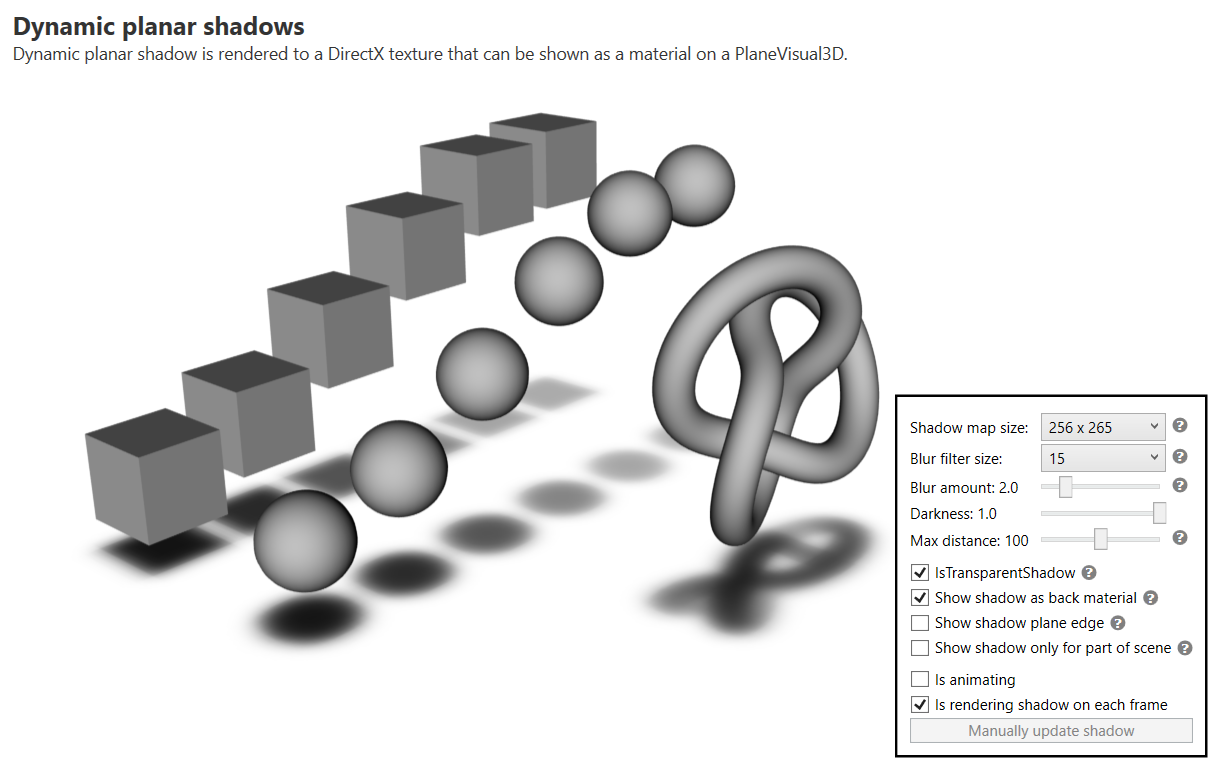
This looks even better when seen live in the sample because the objects are animated, and this updates the shadow dynamically.
The DynamicPlanarShadowRenderingProvider renders a shadow to a texture that can be set to a material that is shown by a 3D plane. When using static 3D objects (for example in ModelViewer sample in Ab3D.DXEngine samples), the shadow can be rendered only once and then the same texture can be shown as long as the 3D scene does not change. In an animated scene, the shadow can be updated on each frame.
This puts the DynamicPlanarShadowRenderingProvider somewhere between the already existing shadow providers: PlanarShadowRenderingProvider and VarianceShadowRenderingProvider. The PlanarShadowRenderingProvider is the simplest option for rendering shadows. It transforms all 3D objects into flat 3D models (using a shadow matrix). This creates a sharp shadow that is easy to render. The VarianceShadowRenderingProvider is a more standard shadow provider - it renders the objects from the light's position to a so-called shadow map that stores the distances from the 3D objects to the light. Those distances are then used when rendering 3D objects to determine whether the rendered pixel is in shadow or not. This can render shadow on any object (not only to a flat plane). The Variance term in the name means that a special technique that provides softer shadows is used. The shadow is always the same color, regardless of the object's distance. This is accurate for light that comes from a single source. But in reality, most of the light comes from ambient light that bounces around the walls and other objects.
In this case, the shadow is dark only when close to the object, but when the object is farther away, the shadow is not that strong anymore. This is what the new DynamicPlanarShadowRenderingProvider tries to achieve.
The DynamicPlanarShadowRenderingProvider renders the shadow to a texture that can be shown on a 3D plane. The shadow can also be rendered to a transparent texture. This is also seen in the screenshot above.
However, when using VarianceShadowRenderingProvider, it was not possible to render the shadow to a transparent 3D plane. You always needed to have an opaque object to see the shadow. But with the new version, there is a new VarianceShadowMaterial that can be used to render the shadow to a transparent texture (areas that are not in shadow are transparent).
The new shadow provider can improve the visual quality of the rendered scene. But when using 3D lines, the feature that provides the most significant improvement in the visual quality is super-sampling (SSAA). Graphics cards provide hardware support for multi-sampled anti-aliasing (MSAA), which significantly improves rendering quality. But super-sampling takes that to another level and can produce super smooth 3D lines. When SSAA is used, the 3D scene is rendered to a bigger texture that is then down-sampled to the final size.
But the cost of rendering a bigger texture can be quite significant. By default, Ab3d.DXEngine does not use SSAA (NormalQualityHardwareRendering GraphicsProfile is used). But many users changed that to HighQualityHardwareRendering and that uses 4xSSAA. This renders the 3D scene to a texture with 4 times as many pixels (width and height are multiplied by 2). Because in Ab3d.DXEngine the lighting calculations are done in a pixel shader, this means that 4xSSAA requires 4 times more pixel shader executions compared to rendering a scene without SSAA (and there is also an additional cost of down-sampling). Luckily, the graphics cards are incredibly fast and this is usually not a problem.
But what if I tell you that the new version can achieve almost the same visual quality as the previous version but at half the cost? The previous version supported only the following values for super-sampling count: 1 (disabled), 4, 16 and 64. Those values increased the width and height by a factor of 2, 4, or 8. However, after some research, I found out that almost the same visual quality can be achieved by using 2xSSAA - increasing the number of pixels by 2. In this case, the width and height of the texture are increased by a factor of 1.41 (a square root of 2). Rendering a scene with 2xSSAA can be done twice as fast as 4xSSAA because it requires only half of the pixel shader invocations.
So, the new version of Ab3d.DXEngine supports all values from 1 to 64 for super-sampling count, including 2, 3, and others. There is also a new OptimizedHighQualityHardwareRendering GraphicsProfile that supports 2xSSAA.
See the following screenshot for comparison:
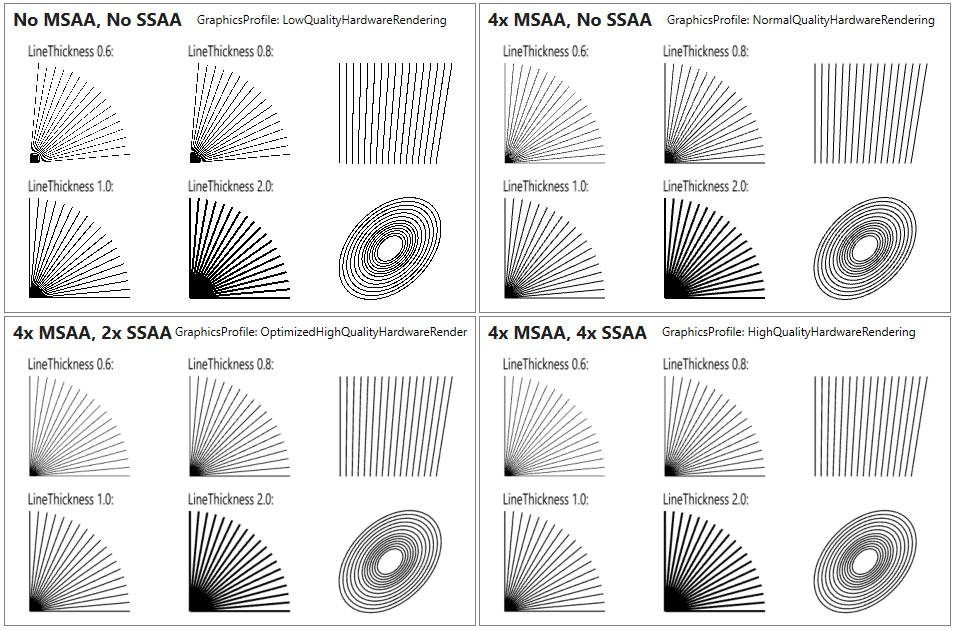
The top left part shows rendering without any anti-aliasing. The top right shows the improvement when using 4xMSAA (multi-sample anti-aliasing). The bottom left uses the new 2xSSAA (super-sampling anti-aliasing) + 4xMSAA. The bottom right uses 4xSSAA + 4xMSAA. The visual quality between the bottom two renderings is almost the same, but the left version is twice faster to render.
The following code enables the new OptimizedHighQualityHardwareRendering:
MainDXViewportView.GraphicsProfiles = new GraphicsProfile[]
{
    GraphicsProfile.OptimizedHighQualityHardwareRendering, // 2xSSAA + 4xMSAA
    GraphicsProfile.NormalQualitySoftwareRendering, // 4xMSAA
    GraphicsProfile.Wpf3D
};
The last new feature that I would like to describe in more detail is support for pixel hit-testing and point-cloud hit-testing.
From the first version on the Ab3d.DXEngine supports the standard hit-testing that generates a ray from a camera and mouse coordinates and then checks which triangles are intersected by the ray. Later a special hit testing that use ID bitmap was introduced. In this case, the whole scene is rendered in such a way that each 3D object gets a color that is calculated from the object's ID. This way, it is possible to check what color is under the mouse and from the color get the ID of the object. This is also very useful for mesh instancing where a huge number of meshes are rendered. In this case, it would take very long to check each mesh for ray intersections.
With the new version, it is also possible to render ID bitmap from pixels. To support that, set the new UseVertexIdColor property on the PixelEffect to true. This will render each pixel by a color that is defined from the index of the pixel.
To see that in action, check the new "Ab3d.DXEngine hit testing / Using Vertex ID Bitmap" sample. The sample also provides support for measuring distances on a point-cloud. See the screenshot:
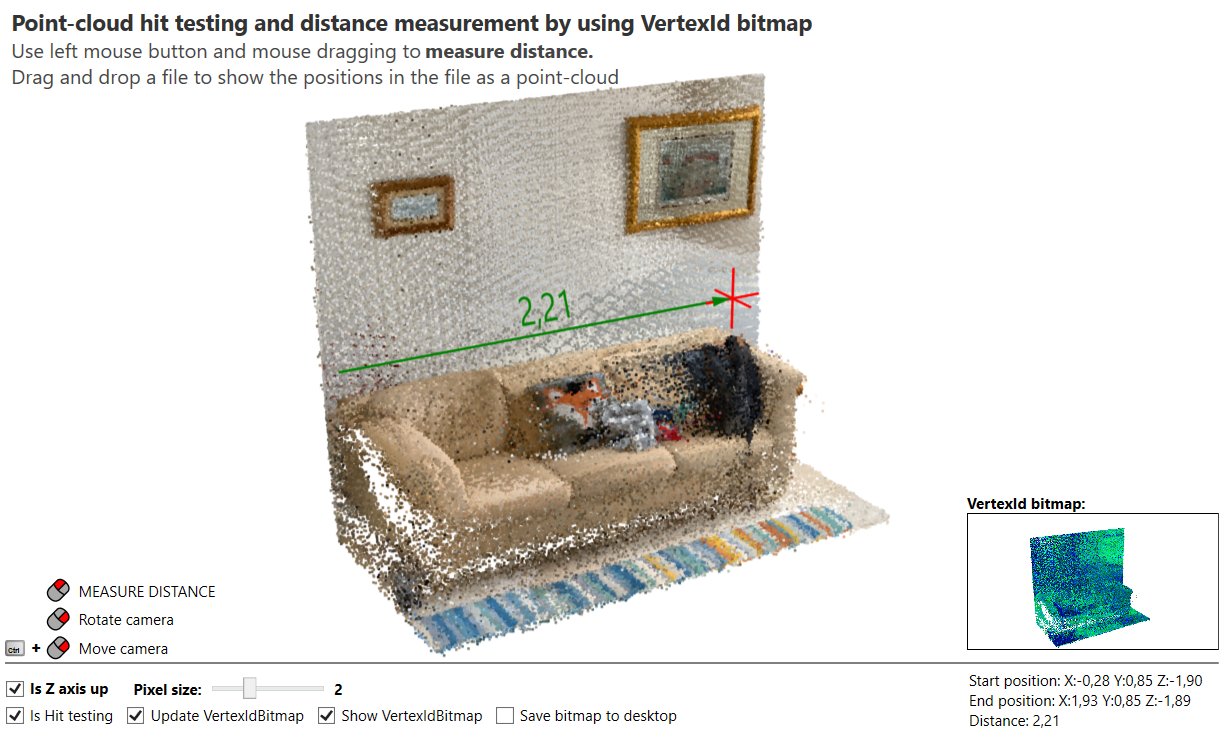
The used ID bitmap can be seen in the bottom right corner.
There are also some other new features. And as always, this version also comes with some bug fixes. Let me mention just some of them:
- fixed selecting lines with LineSelectorData when some lines are completely behind the camera,
- fixed FitIntoView in some cases when parent ModelVisual3D objects have transformation applied,
- improved edge line generation,
- prevented showing render artifacts (may be shown as partially rendered image while camera is rotated rapidly),
- prevented some exceptions like "childNode is already child of another SceneNode" and "StartBackgroundWaiting was called ..."
See the whole list of changes here and here.
To see the changes by yourself it is best to get the latest version of Ab3d.PowerToys samples and Ab3d.DXEngine samples. Check for NEW and UP icons (UP icons also provide a tooltip with additional information). If your updated subscription has already expired, you can still still get the new samples and start them. This will start a new trial version for the new version. If you have an expired subscription and have used the libraries for at least 2 years, contact me for a renewal discount (valid only in December).
Next week, I plan to release a new beta version of Ab4d.SharpEngine with many new features. Then until the end of February the new official version of Ab4d.SharpEngine will be released. If you want to purchase the Ab4d.SharpEngine, then now is the best time to do that because you can use a 30% discount in December.
And because we are already in December, I would like to wish you happy and peaceful holidays and all the best in the new year.