I am very excited to finally release a new major version of the Ab3d.DXEngine library and a new big release of the Ab3d.PowerToys library.
The list of major new features includes support for Physically Based Rendering (PBR), significantly improved hit-testing, better shadow rendering and many other performance and usability improvements. The new version also uses the latest version of SharpDX (v4.2).
The following image is showing the new Physically Based Rendering in action:
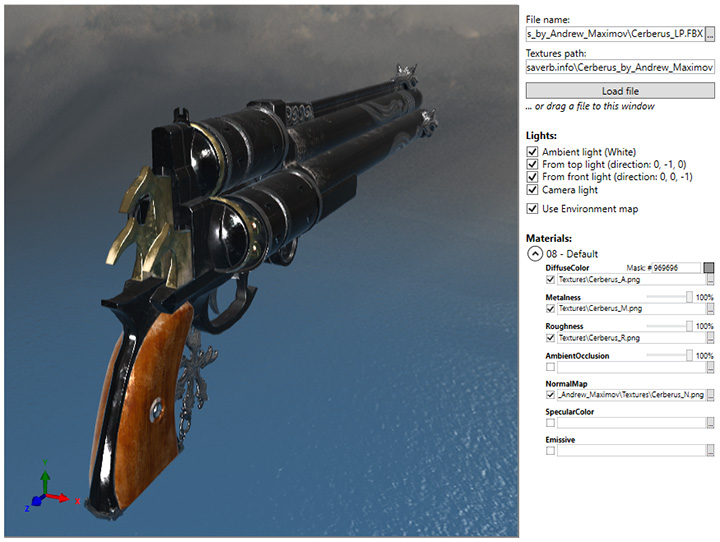
Standard materials define diffuse color, specular color and specular power. In most cases this allows rendering quite realistic 3D scenes. But because this lighting model is using many simplifications it cannot provide a very realistic rendering. To solve that, some bright minds dug into the lighting physics and based on what is really going on a Physically Based Rendering (PBR) was "born". In this lighting model the major two properties that define how material is shown are metalness and roughness. Metalness distinguishes between metallic and non-metallic objects. This has the major effect on how much light is reflected and how much is absorbed and returned as diffuse light. Roughness defines how clearly the environment is reflected and how big and bright the specular shiness is.
In PBR it is possible to use textures to define different metalness and roughness values for different parts of the model. This can be nicely seen in the image above where the wooden parts or the pistol are rendered differently from the metallic parts because they have different metalness values.
The following image shows sample models with different metalness and roughness values:
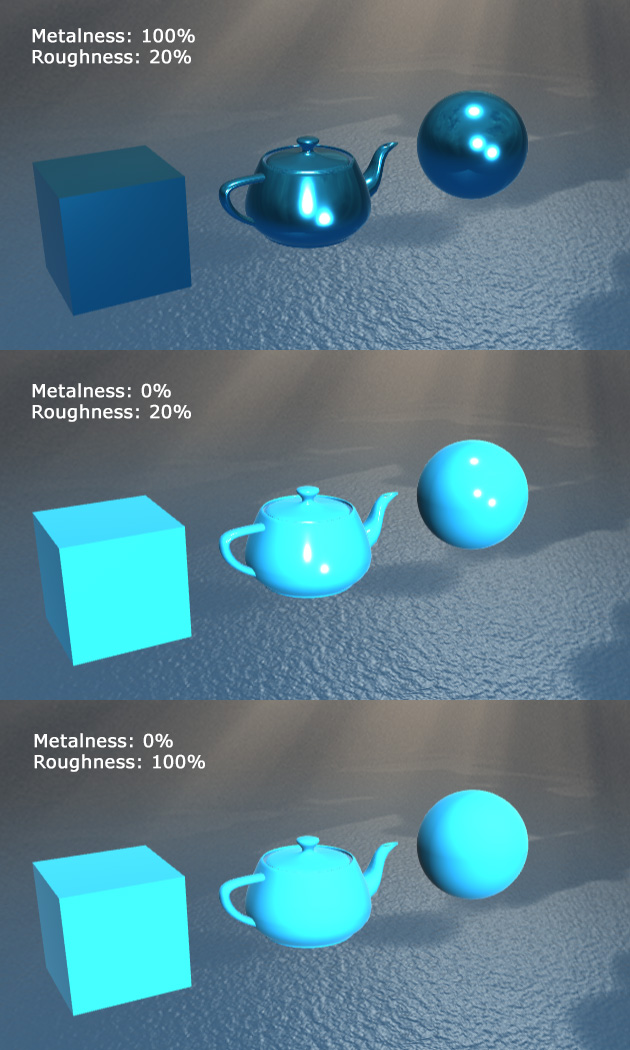
Besides metalness and roughness, the PhysicallyBasedMaterial in Ab3d.DXEngine also supports base color (diffuse color), emissive map, ambient occlusion map and normal map (also called bump map).
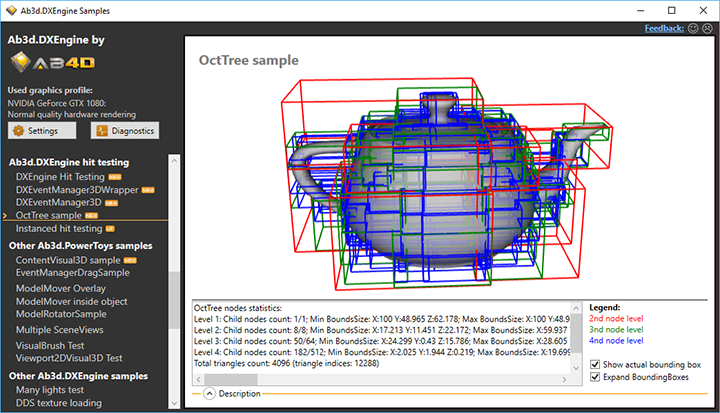
Another great new feature of the new version of Ab3d.DXEngine is much better support for hit testing. Hit testing is used for all the interactions of the mouse or touch with the 3D objects. In hit testing, a ray is created from the mouse or touch position and then the ray is checked against the 3D scene and the hit objects are returned. In previous versions of the library all the hit testing was done by using hit testing build into WPF. This worked well in most cases. But it was not able to use it for optimized SceneNode objects that were not created from WPF objects because those objects were not "visible" from WPF. Also, hit testing on instanced objects required that WPF 3D objects were created for each instance. This greatly increased initialization time and memory usage.
The new version of Ab3d.DXEngine how includes its own hit testing code that supports all types of SceneNode objects. What is more, the new code works much faster than the hit testing code in WPF. It can do hit testing on instanced objects without creating 3D objects for each instance. When hit testing a mesh, each triangle in the mesh needs to be tested against the 3D ray. Because some meshes can have hundreds of thousands of triangles, this can take some time. But the new Ab3d.DXEngine can also very efficiently hit test such meshes. In that case an oct-tree structure (https://en.wikipedia.org/wiki/Octree) is used to group the triangles in the mesh into small nodes. This way only a fraction of the total number of triangles needs to be checked. This provides enormous performance benefits. The following screenshot shows how oct-tree is used to divide a teapot object:
Another significant performance improvement is related to the use of the IsVisible property. This property is defined by all the objects that are derived from the BaseVisual3D objects from Ab3d.PowerToys library. This includes most of the Visual3D objects (BoxVisual3D, SphereVisual3D, ect.), all 3D line Visual3D and some other objects.
When you want to hide an object, it is very convenient to just set IsVisible to false. To show the object again, you can just set IsVisible back to true. What happened behind the scenes was that the object that was hidden was removed from the 3D scene. When IsVisible was set back to true, the object was added back to the 3D scene. This meant that when complex objects were hidden and shown, all the DirectX resources were disposed and then created again. So this quite common operation was not as fluent as it should be.
The new version of Ab3d.DXEngine greatly improves that because now setting the IsVisible property to false does not change the 3D scene but just marks the object to be skipped when rendered. This way hiding and showing an object is now an instantaneous action.
To provide advanced IsVisible processing to any Model3D object and not only objects derived from BaseVisual3D, the new Ab3d.PowerToys library provides a new ContentVisual3D object. For example, ContentVisual3D can be used to show or hide a 3D object that is read from a file (usually defined with a Model3DGroup).
The new IsVisible processing also has a disadvantage that I need to mention here. Because the 3D scene is not changed when IsVisible is set to false, this means that DXEngine will not render the object, but it will be still present in the WPF 3D objects tree. Therefore, if you are using WPF hit testing, you might get a hit result on an object that is actually not shown. The easiest way to solve that is to use hit testing from DXEngine. You can also filter the hit objects by checking if they are derived from BaseVisual3D and then checking the value of IsVisible property. It is also possible to disable the new IsVisible processing.
If you are using PixelsVisual3D to render many pixels, you will be happy to hear that now it is possible to specify a different color and a different size for each of the pixels. Also, pixels can be quickly hidden with setting pixel's alpha color value to 0 or size to 0.
Another bigger change with DXEngine is that the SharpDX library that is used as a managed DirectX wrapper has been updated from v4.0.1 to v4.2. This means that you will need to update this library. You can get the new version from NuGet or from the same folder as the DXEngine library.
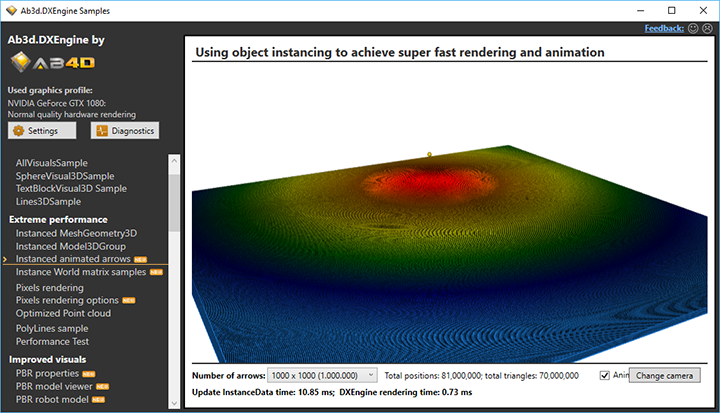
Among other new things there are also a few new very interesting samples. One of them is demonstrating how to very efficiently use object instancing to animate many objects. The following screenshot is showing a real-time animation of one million (!) 3D arrows that runs at 60 fps:
Another screenshot shows the same sample with less arrow and a different camera angle:
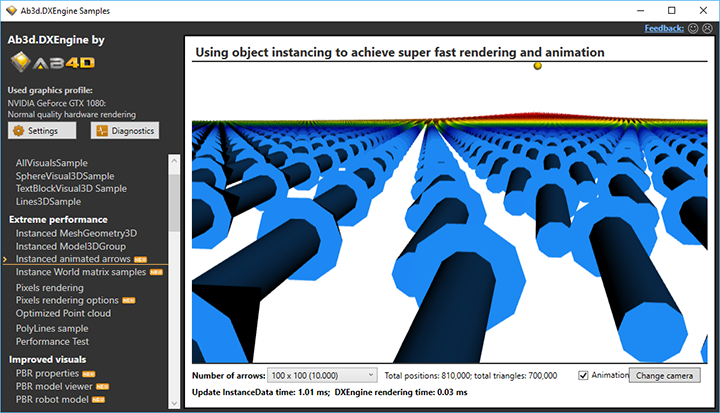
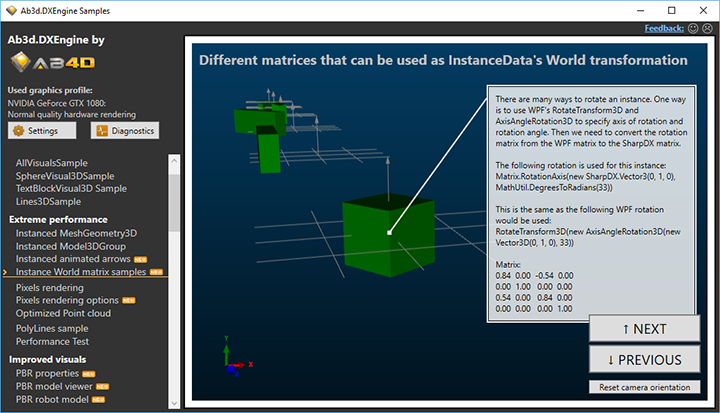
The trick to doing such an animation is to construct the correct transformation matrix (instance's world matrix) that transforms the 3D arrow mesh so that it points in the correct direction. Because this may not be very easy to understand, there is another new sample that teaches you step by step how to create such matrices - here is a screenshot from that sample:
This knowledge is very important for performance because it teaches you how to use instancing for scenarios that you may not think of. And using instancing instead of many simple objects is in many cases the most beneficial performance improvement that you can do.
Because there are many WinForms users of Ab3d.DXEngine, I have updated the WinForms samples project and added code that shows new efficient ways to use the rendering engine. The samples also got new code comments.
So far I have been mostly wringing about Ab3d.DXEngine. But also the Ab3d.PowerToys library got tons of new features and capabilities.
One of the most important new one is that the library now comes with the new version of Assimp importer (http://www.assimp.org or https://github.com/assimp/assimp). This means that many new file formats are supported - the new list of supported file formats that can be imported is really long: .3d, .3ds, .3mf, .ac, .ac3d, .acc, .amf, .ase, .ask, .assbin, .b3d, .blend, .bvh, .cob, .csm, .dae, .dxf, .enff, .fbx, .glb, .gltf, .hmp, .ifc, .ifczip, .irr, .irrmesh, .lwo, .lws, .lxo, .md2, .md3, .md5anim, .md5camera, .md5mesh, .mdc, .mdl, .mesh, .mesh.xml, .mot, .ms3d, .ndo, .nff, .obj, .off, .ogex, .pk3, .ply, .pmx, .prj, .q3o, .q3s, .raw, .scn, .sib, .smd, .stl, .stp, .ter, .uc, .vta, .x, .x3d, .x3db, .xgl, .xml, .zgl.
Also, the list of file formats you can export to has been extended significantly. You can now export to the following file formats: dae, x, stp, obj, obj, stl, stl, ply, ply, 3ds, gltf, glb, gltf, glb, assbin, assxml, x3d, fbx, fbx, 3mf.
If you were already using Assimp importer and would like to switch to a new version, note that the new version has different native libraries requirements. See the comments in the samples or the Ab3d.PowerToys.Assimp.chm help file for more info.
There are also many other features or improvements. For example, if you were using WireGridVisual3D to show a wire grid, you will be happy to hear that now it is possible to define different major and minor grid lines. This makes the grid much nicer and required a minimal change in the code.
To get a full list of changes, see the Ab3d.PowerToys versions history web page.
Also, check the Ab3d.DXEngine versions history.
Commercial users can get the new version from their User Account web page. Others can download the new evaluation version. The best way to know more about the new features is to check the new samples projects. As always, the new samples are marked with NEW icon and the samples that are significantly updated with UP icon.
Let me finish with a few words about my future plans.
One of the things that I would like to implement as soon as possible is to create a special version of the dll that could be distributed through NuGet and would provide evaluation and commercial version. This would also allow me to move the samples to the GitHub.
I also have a few ideas on how to provide some solutions to improve performance in some commonly used scenarios. I also want to update the support for Oculus Rift (also with help from some customer provide support for Avatars) and add support for OpenVR. And there are many other great new things waiting on my todo list.
So stay tuned...