PBR support and many other new features in new versions of Ab3d.DXEngine and Ab3d.PowerToys

by abenedik 29. August 2018 22:48

I am very excited to finally release a new major version of the Ab3d.DXEngine library and a new big release of the Ab3d.PowerToys library.

The list of major new features includes support for Physically Based Rendering (PBR), significantly improved hit-testing, better shadow rendering and many other performance and usability improvements. The new version also uses the latest version of SharpDX (v4.2).

The following image is showing the new Physically Based Rendering in action:
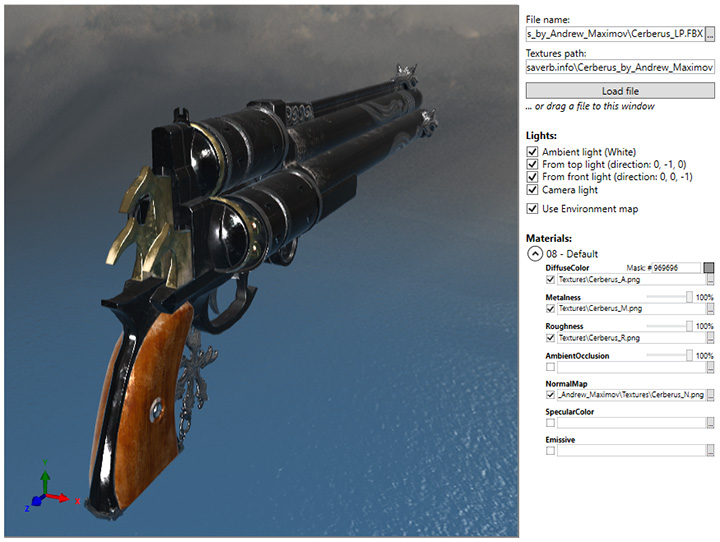
Pistol model rendered with PBR material with Ab3d.DXEngine

Standard materials define diffuse color, specular color and specular power.   In most cases this allows rendering quite realistic 3D scenes. But because this lighting model is using many simplifications it cannot provide a very realistic rendering. To solve that, some bright minds dug into the lighting physics and based on what is really going on a Physically Based Rendering (PBR) was "born". In this lighting model the major two properties that define how material is shown are metalness and roughness. Metalness distinguishes between metallic and non-metallic objects. This has the major effect on how much light is reflected and how much is absorbed and returned as diffuse light. Roughness defines how clearly the environment is reflected and how big and bright the specular shiness is.

In PBR it is possible to use textures to define different metalness and roughness values for different parts of the model. This can be nicely seen in the image above where the wooden parts or the pistol are rendered differently from the metallic parts because they have different metalness values.

The following image shows sample models with different metalness and roughness values:
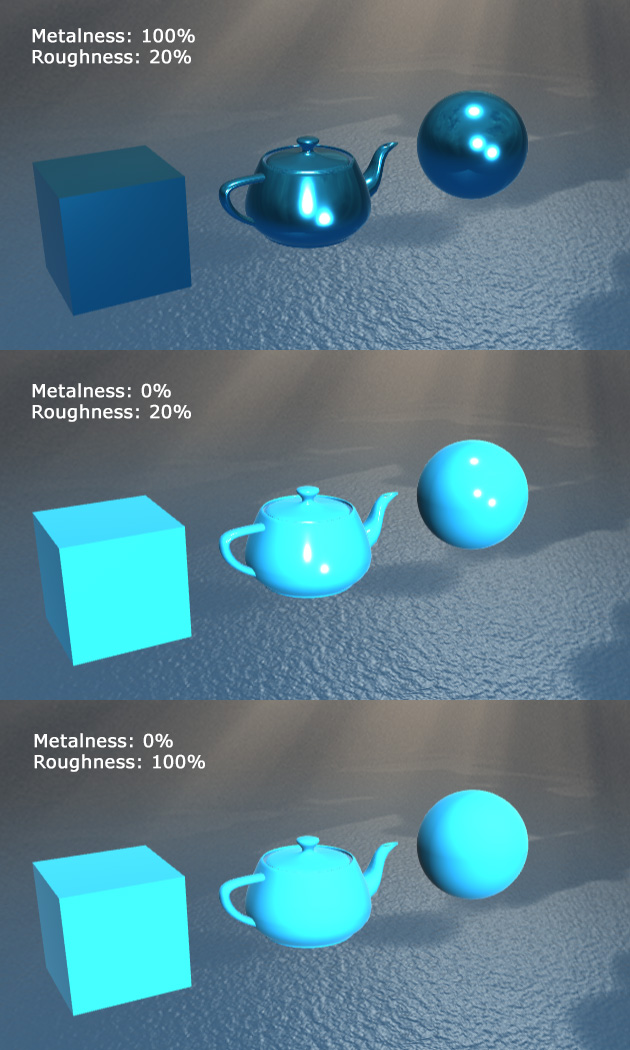
models with different metalness and roughness values

Besides metalness and roughness, the PhysicallyBasedMaterial in Ab3d.DXEngine also supports base color (diffuse color), emissive map, ambient occlusion map and normal map (also called bump map).

Another great new feature of the new version of Ab3d.DXEngine is much better support for hit testing. Hit testing is used for all the interactions of the mouse or touch with the 3D objects. In hit testing, a ray is created from the mouse or touch position and then the ray is checked against the 3D scene and the hit objects are returned. In previous versions of the library all the hit testing was done by using hit testing build into WPF. This worked well in most cases. But it was not able to use it for optimized SceneNode objects that were not created from WPF objects because those objects were not "visible" from WPF. Also, hit testing on instanced objects required that WPF 3D objects were created for each instance. This greatly increased initialization time and memory usage.

The new version of Ab3d.DXEngine how includes its own hit testing code that supports all types of SceneNode objects. What is more, the new code works much faster than the hit testing code in WPF. It can do hit testing on instanced objects without creating 3D objects for each instance. When hit testing a mesh, each triangle in the mesh needs to be tested against the 3D ray. Because some meshes can have hundreds of thousands of triangles, this can take some time. But the new Ab3d.DXEngine can also very efficiently hit test such meshes. In that case an oct-tree structure (https://en.wikipedia.org/wiki/Octree) is used to group the triangles in the mesh into small nodes. This way only a fraction of the total number of triangles needs to be checked. This provides enormous performance benefits. The following screenshot shows how oct-tree is used to divide a teapot object:
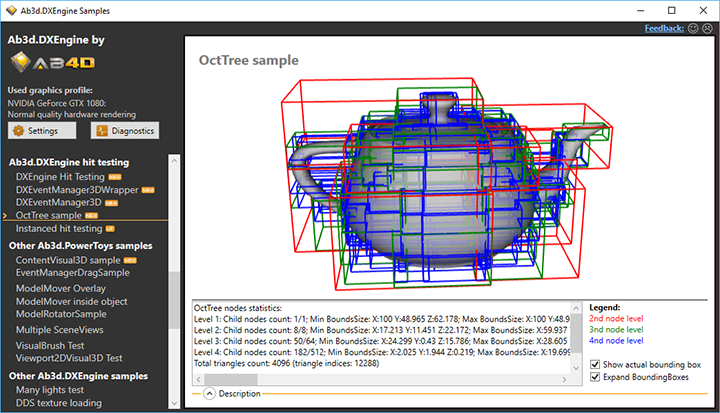
Teapot divided by oct-tree structure

Another significant performance improvement is related to the use of the IsVisible property. This property is defined by all the objects that are derived from the BaseVisual3D objects from Ab3d.PowerToys library. This includes most of the Visual3D objects (BoxVisual3D, SphereVisual3D, ect.), all 3D line Visual3D and some other objects.

When you want to hide an object, it is very convenient to just set IsVisible to false. To show the object again, you can just set IsVisible back to true. What happened behind the scenes was that the object that was hidden was removed from the 3D scene. When IsVisible was set back to true, the object was added back to the 3D scene. This meant that when complex objects were hidden and shown, all the DirectX resources were disposed and then created again. So this quite common operation was not as fluent as it should be.

The new version of Ab3d.DXEngine greatly improves that because now setting the IsVisible property to false does not change the 3D scene but just marks the object to be skipped when rendered. This way hiding and showing an object is now an instantaneous action.

To provide advanced IsVisible processing to any Model3D object and not only objects derived from BaseVisual3D, the new Ab3d.PowerToys library provides a new ContentVisual3D object. For example, ContentVisual3D can be used to show or hide a 3D object that is read from a file (usually defined with a Model3DGroup).

The new IsVisible processing also has a disadvantage that I need to mention here. Because the 3D scene is not changed when IsVisible is set to false, this means that DXEngine will not render the object, but it will be still present in the WPF 3D objects tree. Therefore, if you are using WPF hit testing, you might get a hit result on an object that is actually not shown. The easiest way to solve that is to use hit testing from DXEngine. You can also filter the hit objects by checking if they are derived from BaseVisual3D and then checking the value of IsVisible property. It is also possible to disable the new IsVisible processing.

If you are using PixelsVisual3D to render many pixels, you will be happy to hear that now it is possible to specify a different color and a different size for each of the pixels. Also, pixels can be quickly hidden with setting pixel's alpha color value to 0 or size to 0.

Another bigger change with DXEngine is that the SharpDX library that is used as a managed DirectX wrapper has been updated from v4.0.1 to v4.2. This means that you will need to update this library. You can get the new version from NuGet or from the same folder as the DXEngine library.

Among other new things there are also a few new very interesting samples. One of them is demonstrating how to very efficiently use object instancing to animate many objects. The following screenshot is showing a real-time animation of one million (!) 3D arrows that runs at 60 fps:
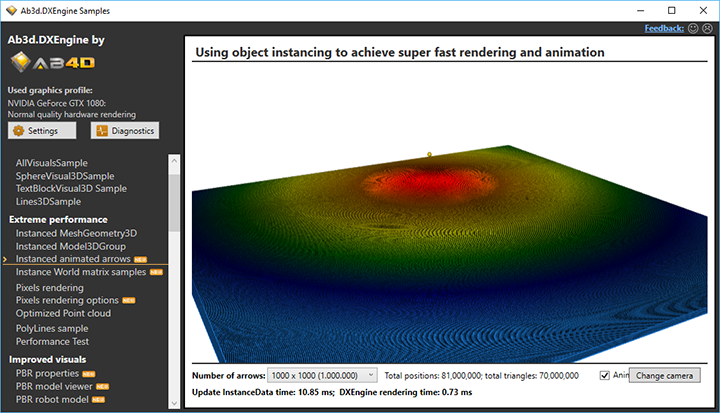
Animating 1 million 3D arrows with instancing in Ab3d.DXEngine

Another screenshot shows the same sample with less arrow and a different camera angle:
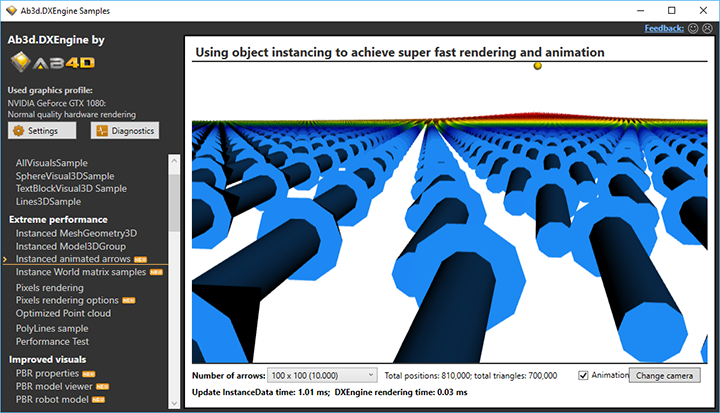
Animating 3D arrows with instancing in Ab3d.DXEngine

The trick to doing such an animation is to construct the correct transformation matrix (instance's world matrix) that transforms the 3D arrow mesh so that it points in the correct direction.  Because this may not be very easy to understand, there is another new sample that teaches you step by step how to create such matrices - here is a screenshot from that sample:
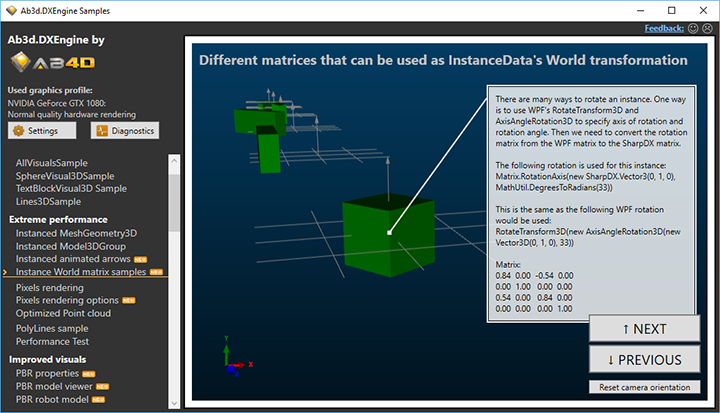
Instancing matrices guide

This knowledge is very important for performance because it teaches you how to use instancing for scenarios that you may not think of. And using instancing instead of many simple objects is in many cases the most beneficial performance improvement that you can do.

Because there are many WinForms users of Ab3d.DXEngine, I have updated the WinForms samples project and added code that shows new efficient ways to use the rendering engine. The samples also got new code comments.


So far I have been mostly wringing about Ab3d.DXEngine. But also the Ab3d.PowerToys library got tons of new features and capabilities.

One of the most important new one is that the library now comes with the new version of Assimp importer (http://www.assimp.org or https://github.com/assimp/assimp). This means that many new file formats are supported - the new list of supported file formats that can be imported is really long: .3d, .3ds, .3mf, .ac, .ac3d, .acc, .amf, .ase, .ask, .assbin, .b3d, .blend, .bvh, .cob, .csm, .dae, .dxf, .enff, .fbx, .glb, .gltf, .hmp, .ifc, .ifczip, .irr, .irrmesh, .lwo, .lws, .lxo, .md2, .md3, .md5anim, .md5camera, .md5mesh, .mdc, .mdl, .mesh, .mesh.xml, .mot, .ms3d, .ndo, .nff, .obj, .off, .ogex, .pk3, .ply, .pmx, .prj, .q3o, .q3s, .raw, .scn, .sib, .smd, .stl, .stp, .ter, .uc, .vta, .x, .x3d, .x3db, .xgl, .xml, .zgl.

Also, the list of file formats you can export to has been extended significantly. You can now export to the following file formats: dae, x, stp, obj, obj, stl, stl, ply, ply, 3ds, gltf, glb, gltf, glb, assbin, assxml, x3d, fbx, fbx, 3mf.

If you were already using Assimp importer and would like to switch to a new version, note that the new version has different native libraries requirements. See the comments in the samples or the Ab3d.PowerToys.Assimp.chm help file for more info.

There are also many other features or improvements. For example, if you were using WireGridVisual3D to show a wire grid, you will be happy to hear that now it is possible to define different major and minor grid lines. This makes the grid much nicer and required a minimal change in the code.


To get a full list of changes, see the Ab3d.PowerToys versions history web page.

Also, check the Ab3d.DXEngine versions history.

Commercial users can get the new version from their User Account web page. Others can download the new evaluation version. The best way to know more about the new features is to check the new samples projects. As always, the new samples are marked with NEW icon and the samples that are significantly updated with UP icon.


Let me finish with a few words about my future plans. 

One of the things that I would like to implement as soon as possible is to create a special version of the dll that could be distributed through NuGet and would provide evaluation and commercial version. This would also allow me to move the samples to the GitHub.

I also have a few ideas on how to provide some solutions to improve performance in some commonly used scenarios. I also want to update the support for Oculus Rift (also with help from some customer provide support for Avatars) and add support for OpenVR. And there are many other great new things waiting on my todo list.


So stay tuned...

Tags: , , , ,

Ab3d.PowerToys | DXEngine

Ab3d.DXEngine hotfix published

by abenedik 22. December 2017 11:02

I would like to inform you that a hotfix for Ab3d.DXEngine has been published.

This hotfix fixes a few issues that are mostly related to the DPI scale. This is the list of fixes:

  1. Fixed using actual system DPI scale in DXViewportView.
  2. Fixed using DPI scale when rendering hardware accelerated PolyLines.
  3. Improved using dpi values in RenderToBitmap method.
  4. Fixed using Attenuation values when using PointLight.


1)

The first issue is that the DXViewportView did not use the actual system scale factor (used for high DPI monitors).

For example, when a user set system scale factor to 200% (192 DPI), then WPF scales all its elements accordingly. This means that a Rectangle with size 800 x 600 is actually rendered to 1600 x 1200 pixels. The Ab3d.DXEngine did not automatically set the dpi scale so by default the 3D scene was rendered to 800 x 600 pixels and then WPF scaled the rendered scene to 1600 x 1200 pixels.

It was possible to solve this with manually set the DpiScaleX and DpiScaleY properties on DXViewportView.

The new version improves that so that the DpiScaleX and DpiScaleY properties are automatically set from the actual system dpi values.


2)

The second issue is also related to DPI scale settings. The problem was that the thickness of the hardware accelerated 3D polylines (introduced in the Ab3d.DXEngine 2.3) was not increased when the DPI scale was bigger than 1.

This means that on high DPI monitors the polylines (also 3D text lines) appear too thin. What is more, when simple disconnected lines and connected polylines are rendered on the same 3D scene, the thickness of the disconnected lines will be correctly increased, but the thickness of the polylines will not be increased by the dpi scale.


This problem is solved in this hotfix.


3)

The third issue that is solved is that dpi values in RenderToBitmap method are now correctly used.


4)

The last issue that is solved in this hotfix is that PointLight Attenuation values are now correctly used in the shader. The Attenuation values can be used to specify how the light strength is decreased with the distance from the light.


Those fixes should make the engine run well on high DPI monitors.

To conclude, I would really like to wish you a Merry Christmas, all the best in the new year and that you will create amazing applications with great 3D graphics.

Tags: , , ,

DXEngine

New version of Ab3d.DXEngine and Ab3d.PowerToys bring support for normal mapping and many other great new features

by abenedik 6. December 2017 23:26

I am happy to inform you that a great new update of main 3D libraries is available.

This time most work was done to improve the Ab3d.DXEngine - DirectX rendering engine.


The highlights of the new version are:

  • Added support for normal mapping (also called bump mapping).
  • Added rendering 3D lines with patterns (enables rendering of dashed and dotted 3D lines).
  • Improved texture loading with support for loading DDS files.
  • Improved Assimp importer that can now also read and play keyframe and skinned animations from many 3D file formats (including fbx and dae).


DirectX 11 normal or bump mapping with DXEngine

Normal mapping is now supported with a new MultiMapMaterial class. This material defines a list of maps or textures where for each map its usage type is defined. This way it is possible to define a material with diffuse, normal, specular and also environment map. A drawback of the current version is that shadow rendering is not yet supported where rendering objects with MultiMapMaterial .


Dashed and dotted 3D lines with Abd3.DXEngine

3D lines rendering is greatly improved in this version of Ab3d.DXEngine. There is now a new ILinePattern interface that defines LinePattern, LinePatternScale and LinePatternOffset properties. This not only allows rendering dashed and dotted lines but with changing LinePatternOffset it also provides an option to animate the dashed lines - for example, to show a way or direction. Also, this version now supports full hardware acceleration of rendering connected 3D lines (polylines). This means that you do not need to use special properties to render connected 3D lines as disconnected 3D lines anymore.


What is more, both Ab3d.DXEngine and also Ab3d.PowerToys now have a new MitterLimit property that defines when a sharp line connection is turned into beveled (cut) line connection.


Skeletal animation with Ab3d.PowerToys

3D models can be read into your application with using Assimp importer library that can read data from almost any 3D file format. But until now only static models can be imported. The only way to play animations was to use Ab3d.Reader3ds library and play animations stored with 3ds files. But the new version of Ab3d.PowerToys.Assimp library supports reading keyframe and also skinned animations. There is also a new AssimpAnimationController that can play both keyframe and skinned animations. This way it is possible to read animations from almost any 3D file format that support storing animation data.


Optimized point cloud DirectX rendering with Ab3d.DXEngine

A lot of work was also dedicated to providing an efficient way of rendering many millions of pixels - the so-called point clouds. The new OptimizedPointMesh class can optimize rendering of huge point clouds in two ways. First, it can determine which parts of point cloud are visible to the camera. Second, on the visible parts it can check the following positions and if they would be rendered so close together that the distance on the screen would be less then one pixel, they are rendered only once as only one pixel. Those two optimizations can in most of the cases provide huge performance improvements (but still, investing in a high-end graphics card is the most efficient way to deliver substantial performance gains).


When 3D models with very detailed textures (for example 4096 x 4096) are loaded, the texture initialization can take quite a lot of time and memory. Most of the time and memory is used to create mipmaps of the texture. Those are required to get efficient color sampling on the graphics card. To improve this, modern 3D games use DDS texture formats. This file format is optimized for the graphic card and also alredy include mipmaps.


The new version of Ab3d.DXEngine provide a few easy ways to load DDS textures instead of standard png or other files. This can significantly improve load time.


There are also many other improvements and fixes. The following is the full list of changes:

Ab3d.DXEngine v2.3:

  • Implemented rendering materials with diffuse, normal (bump) and specular texture. Note: does not work yet with shadow rendering.
  • Added MultiMapMaterial that can be used to render material with diffuse, normal, specular and environment reflection texture.
  • Added DXAttributeType.MeshTangentArray that can be set to the MeshGeometry3D with SetDXAttribute extension method and allows attaching tangent array to MeshGeometry3D
  • Added Ab3d.DirectX.Utilities.MeshUtils.CalculateTangentVectors method (can be used calculate tangents on the CPU for objects that are rendered with normal / bump map)
  • Added support for rendering 3D lines with custom pattern. This allows rendering dashed and dotted lines (only for disconnected 3D lines; not for poly-lines):
  • Added ILinePattern interface with properties that define line pattern: LinePattern, LinePatternScale and LinePatternOffset.
  • Implemented ILinePattern with LineMaterial object.
  • Added LinePattern, LinePatternScale and LinePatternOffset to DXAttributeType. This way it is possible to specify line pattern parameters on LineVisual3D objects with using SetDXAttribute extension method.
  • Added support for rendering connected 3D lines (PolyLineVisual3D, etc.) with full hardware acceleration. Note that lines with arrows are not rendered with full hardware acceleration.
  • Changed default value of DXScene.RenderConnectedLinesAsDisconnectedLinesThicknessLimit from 3 to 0 - so connected lines that are thinner than 3 are not rendered as disconnected lines by default.
  • Added IPolyLine interface with IsPolyLine and MiterLimit properties.
  • Updated LineMaterial to implement IPolyLine interface.
  • Improved time and memory consumption when reading textures.
  • Added Ab3d.DirectX.TextureLoader.LoadShaderResourceView method that can be used to load textures from standard image files (png, jpg, tiff, gif, bmp) and from DDS files.
  • Added Ab3d.DirectX.TextureLoader.CreateShaderResourceView method that can create ShaderResourceView from texture stored in byte array (for cases when bitmap is read from a stream).
  • Added static bool LoadDdsIfAvailable field to WpfMaterial. When LoadDdsIfAvailable us true, then the texture loader will check if there is a DDS file with the same name but dds file extension. In this case the DDS file will be loaded. Using dds files can greatly improve required load time and memory usage.
  • Added static CreateTexture2D method to WpfMaterial that creates a ShaderResourceView from the specified WPF BitmapSource.
  • Created OptimizedPointMesh class that can be used to show point cloud and can dynamically reduce the number of rendered positions to improve rendering performance.
  • Make CalculateCameraPlanes on DXScene public. The method calcualates zNear and zFar values for the specified camera.
  • Added ParentNodeChanged and ResourcesInitialized events to SceneNode.
  • Added ForegroundRenderingQueue to DXScene. This is a new rendering queue that is rendered after GeometryRenderingQueue but before TransparentRenderingQueue.
  • Set default values of ReadZBuffer and WriteZBuffer properties on PixelMaterial to true.
  • Removed ScreenSpaceLineNode constructors that takes both isPolyLine and LineMaterial as parameters - IsPolyLine values is now provided only by LineMaterial parameter (when it implements the IPolyLine interface).
  • Added CustomRenderableNode and CustomRenderablePrimitive. Those two SceneNode classes simplify using custom rendering logic to render 3D objects with providing a callback method that is called to render the 3D object (used can call Draw calls on DirectX device in the callback method).
  • Added DXAttribute OnSceneNodeCreatedAction. Its value can be set to a callback method defined by an Action<SceneNode>. The callback method is called after a SceneNode is created from the WPF object.
  • Added DXAttribute OnDXResourcesInitializedAction. Its value can be set to a callback method defined by an Action<object>. The callback method is called after the specified DXEngine's resource is initialized and DirectX resource objects are created.
  • Fixed problems when color from PixelEffect is used to render 3D lines instead of the color defined in the LineColor property (and vice-versa).
  • Added dpiX and dpiY parameters to DXView.RenderToBitmap method (they default to 96 but can be changed by the user).

Breaking changes:

  • Renamed Ab3d.DirectX.ContexStatesManager class to Ab3d.DirectX.ContextStatesManager to fix spelling of the class.

Apart from samples that demonstrate new functionality the following samples are also added or improved:

  • Added BackgroundObjectsCreation sample that shows how it is possible to initialize 3D objects on the background thread so that when they are shown the UI thread is not blocked for a longer time.
  • Added Frustum culling sample. The sample shows how to determine which 3D objects are visible in the camera view. 
  • Improved WinForms sample to show how to use DXViewportView in WinForms with SharpDX.RenderForm. Using DXViewportView in WinForms application allows easy conversion of samples from Ab3d.DXEngine and Ab3d.PowerToys to WinForms application.


Ab3d.PowerToys v8.1

  • Added MiterLimit property to PolyLineVisual3D, MultiPolyLineVisual3D, RectangleVisual3D and LineArcVisual3D (all lines derived from BasePolyLineVisual3D). The MiterLimit value specifies when the mitered line joint is changed into beveled line joint.
  • Added support to read 3D lines from obj files with ReaderObj. Before lines can be read, the ReaderObj.ParentModelVisual3D property must be set. Lines color is get from material's diffuse color (or ReaderObj.DefaultMaterial). Line thickness is always set to 1.
  • Improved XInputCameraController when to continuously move up or down when the DPad buttons are pressed and when MoveVerticallyWithDPadButtons is true  (before user needed to release the button and press again)
  • Added support for ModelUIElement3D objects when calling ModelUtils.GetBounds and ModelIterator.IterateGeometryModel3DObjects methods
  • Added CurrentFrameNumber property to AnimationController
  • Changed type used for FrameNumber in animation classes from int to double.
  • Fixed Ab3d.Utilities.Dumper.GetMatrix3DText to correctly use the specified indentText and newlineText
  • Added static FormatMatricesHorizontally method to Ab3d.Utilities.Dumper class
  • Fixed Camera.GetMousePositionOnPlane method when using OrthographicCamera and when camera's Offset is not zero (Offset is changed when camera is moved).
  • Added a new constructor to Ab3d.Utilities.Plane class that takes a position on a plane and plane's normal.
  • Added GetClosestPointOnPlane method to Ab3d.Utilities.Plane class
  • Added GetPerspectiveScreenSize, GetOrthographicScreenSize, GetPerspectiveWorldSize and GetOrthographicWorldSize to Ab3d.Utilities.CameraUtils
  • Added GetWorldSize and GetScreenSize to BaseCamera
  • Added static bool ImmediatelyLoadTextureFiles field to MaterialTypeConverter to control how the BitmapImages are created (can prevent locking the read file because file is in use). See comments for the field for more info.
  • Line3DFactory.CreatePolyLine3D method was renamed into Line3DFactory.CreateMultiPolyLine3D for those overrides that takes a List of Point3DCollection objects
  • Added protected OnMouseMove, OnMouseButtonUp, OnMouseButtonDown and OnMouseWheel to MouseCameraController. This make it possible to use MouseCameraController in WinForms application (with SharpDX.RenderForm).
  • Improved performance of calling AlignWithCamera on TextBlockVisual3D

Breaking changes:

  • Changed Ab3d.Utilities.Plane class to use a more standard a*x + b*y + c*z + d = 0 equation instead of a*x + b*y + c*z = d. If you are creating Plane object with a, b, c and d parameters, then you will need to flip the sign of the d parameter.

Assimp:

  • Added support to read bones and skeleton information.
  • Added support to play keyframe and skeletal animation (use Ab3d.Assimp.AssimpAnimationController that is defined in Assimp folder in main Ab3d.PowerToys samples project).
  • Set name of the created WPF materials from names defined in the file. The material's name can be read with material.GetName extension method (defined in Ab3d namespace).
  • Added GetAssimpMeshForGeometryModel3D, GetWpfMaterialForAssimpMaterial and GetAssimpMaterialForWpfMaterial to AssimpWpfConverter.

Tags: , , , ,

Ab3d.PowerToys | DXEngine

Model Boolean operations, improved camera control and many other new features in new major version of Ab3d.PowerToys

by abenedik 4. August 2017 20:41

I am happy to announce that a major new version of Ab3d.PowerToys and a new version of Ab3d.DXEngine have been released today. 

This is by far the biggest update in the history of Ab3d.PowerToys library. It brings many great new features and improvements. The following are some of the main new features:

  • added support to rotate camera around selected 3D position (or around 3D position behind mouse cursor),
  • added zoom to mouse position or custom 3D position,
  • added support for controlling camera with 3D mouse (from 3dconnexion) or game controller,
  • added slice tool to cut 3D models with a plane,
  • added Boolean operations for 3D models,
  • added support for keyframe camera and object animations,
  • added TextBlockVisual3D to easily show text with border on a 3D plane,
  • added support for showing object edge lines instead of triangle wireframe.


Let’s describe those features with more details and with some screenshots.

The following image shows a screenshot from a sample that demonstrates camera rotation around custom position:


In the previous version of Ab3d.PowerToys it was only possible to rotate around the Viewport3D’s center position. Zooming in and out was also possible only to the center position. With the new version it is very easy to specify custom rotation and zooming position. It is also possible to rotate around or zoom into the position under the mouse cursor. As you can see from the image, it is also possible to show a marker that shows around which position the cameras is rotated. This marker can be fully customized.

Good camera control is at the heart of a good user experience. And to make the camera control great for even the most demanding users, it is now possible to add support for 3D mouse from 3DConnexion. This allows experienced users to be much more productive and to control the camera in the best possible way.

Ab3d.PowerToys now includes two new very powerful utilities to manipulate 3D models.

The first new utility allows slicing 3D models into 2 parts with specifying a custom slice plane. The following image shows a simple robot arm model that was sliced with this tool:


Another utility allows creating 3D models with using Boolean operations on 3D models. The following screenshot shows the available operations and their results:


The next screenshot shows two sample models created with subtracting various models from a box model:


The right object also shows texture on a 3D model. The texture coordinates for that model were calculated with new texture generation algorithms – in this sample a cubic projection was used.

The previous image also shows another new feature of the new library – showing text with border on a 3D plane model. For example the “Subtract” text was created with the following XAML:

<visuals:TextBlockVisual3D Position="-150 -45 100" PositionType="Center"
                           Text="Subtract" Foreground="Yellow" Background="Black" 
                           BorderBrush="White" BorderThickness="1" TextPadding="5 3"
                           Size="80 30" UpDirection="0 0.3 -1"/>

Showing 3D text is now really very easy. The TextBlockVisual3D object provides many options to customize the look of the text and the border. The following image shows a screenshot from a sample that shows usage of many of the TextBlockVisual3D properties: 


The new version also adds great support for camera and model animations. This allows creating nice camera transitions from one view to another.

To improve support for CAD like applications, the new version adds support for showing object edge lines. When object wireframe was shown in previous version, it always showed 3D lines for the triangles that define the 3D models. In the new version it is possible to show only 3D lines on the edges of objects. This shows a much better representation of the object to the user. Edge lines support is added to all standard 3D models from the library and also to ReaderObj and Assimp library so the imported 3D models can be also shown with edge lines (if the 3D file format support polygons and not only triangles). The following image shows standard 3D models with edge lines:


The samples project has also been improved. It has many very interesting new samples. For example one shows how to create billboards – rectangles with text or images that are always oriented towards the camera. The other shows how to select 3D lines with moving the mouse close to the line (not onto the lines which can be problematic in case of thin lines). 

Also note the NEW and UP icons in the list of samples for new and updated samples. To get a better understanding of the sample, check the sample description and comments in code behind.

There are also many other new features, improvement and bug fixes. For a full list of changes see the version history web page.


Some of the new features of Ab3d.PowerToys also require an updated Ab3d.DXEngine. If you want to get full hardware accelerated rendering of edge lines, then you need a new version of Ab3d.DXEngine. 

The new version can also improve sharpness of rendered 3D scene with setting UseLayoutRounding property on DXViewportView to true. This should prevent putting the rendered image to sub-pixel boundaries.

Another change in the new version Ab3d.DXEngine is that it now uses the latest version of SharpDX library – version 4.0.1. This also means that you will need to update the references to SharpDX. You can use the one from NuGet or the dll-s that are supplied with Ab3d.DXEngine. In case you used version 2.6.3 before, you will also need to add reference to SharpDX.Mathematics assembly.


I really hope that the versions of the libraries will serve you well and allow you to easily add great new features to your applications that will amaze your customers.

Tags: , , , ,

Ab3d.PowerToys | DXEngine

Great new features available with new version of Ab3d.DXEngine

by abenedik 23. February 2017 21:45

A new version of Ab3d.DXEngine library has been published.

Again, I am very excited about the new features in the engine. Just check the images below and you will see that the new Ab3d.DXEngine allows you to create some amazing effects in 3D graphics.

Let's start with added support for rendering 3D models that can have different colors in each vertex (position).

The following screenshot shows a new "heat distribution map" sample:

In the bottom center part of the screenshot you can see two red rays that connect over the 3D model. The position where the rays are connected is used to calculate the 3D position on the teapot - this position is used as ray hit position. Then, for each position in the teapot model, the distance from the position to the ray hit position is calculated. The calculated distance is then converted into specific color that shows the amount of heat (red is hot and blue is cold). This way we get different color values for each positon of the teapot.

After we have the colors for positions, we can use the new VerextColorMaterial to render the 3D model.

This is very useful for showing scientific data on 3D models.


Another use of this technique is to render height map with different colors. The color at each height map position is based on the height of the position. To demonstrate that, there is a new "landscape generation" sample:

This sample is also showing how to use Diamond square algorithm (https://en.wikipedia.org/wiki/Diamond-square_algorithm) to generate realistic height maps. This algorithm starts with a few positions and then iteratively adds additional details to the map. To show how this process works, the sample can animate the size of the map from 3x3 to the map with much higher resolution (1025 x 1025 or higher).

Additionally, as you see in the lower right corner, the sample shows a nice legend with linear gradient. The control that shows the legend is also part of the sample and can be easily customized and reused in your own project.


If you are using Ab3d.DXEngine to create a CAD like application, you will be happy to hear that the new version allows rendering hidden 3D lines with special line color and line thickness. Hidden 3D lines are lines that are behind other 3D objects - thin yellow line in the following screenshot:

The previous version of Ab3d.DXEngine already supported rendering 3D lines that were visible though 3D objects, but you could not change the appearance of the hidden part of the line. The new version allows using new HiddenLineMaterial that renders only the hidden part of the line (part that is behind other 3D objects) and that allows specifying different color and line thickness for that hidden part.

Another improvement regarding rendered 3D lines is that the new version now automatically renders thin connected 3D lines (PolyLineVisual3D, LineArcVisual3D, TextVisual3D and other lines where line thickness is less or equal then 3) as disconnected 3D lines. This allows full hardware acceleration of connected 3D lines (rendering millions of connected 3D lines instead of thousands).

Connected 3D lines are 3D lines where the end point of one line is the start point of the next line and where the connection between the two lines is "smoothed". In Ab3d.PowerToys library the connected 3D lines are created with the following objects: PolyLineVisual3D, LineArcVisual3D, RectangleVisual3D, MultiPolyLineVisual3D, TextVisual3D, LineWithTextVisual3D, CenteredTextVisual3D. The problem with connected 3D lines is that additional triangle needs to be added to create the smooth connection between the lines. This is quite complicated operation and is not supported in DXEngine's geometry shader that creates 3D lines.

But when the LineThickness is small, then the additional triangle between connected lines is very small and hardly noticeable - in this case the connected lines can be rendered as disconnected 3D lines - without additional triangle to smooth the connection between lines. When the lines are rendered as disconnected lines, the geometry for the lines can be generated in geometry shader and this allows rendering millions of lines.

In the previous version of DXEngine, it was possible to set the RenderConnectedLinesAsDisconnected property on DXScene to true to render all connected lines as disconnected. In the new version it is possible to fine tune that with specifying the LineThickness limit that will define which connected 3D lines will be rendered as disconnected lines - this is done with new RenderConnectedLinesAsDisconnectedLinesThicknessLimit property (by default it is set to 3).

The following screenshot from an updated ConnectedLinesRendering sample shows fully accelerated 3D lines shown in red:

The thick lines (black lines with LineThickness 10 and 20) are still rendered the old way - the geometry for the 3D lines is generated by the code in the Ab3d.PowerToys library. There the smooth connections between line segments is easily seen. On the other hand, the thin lines (red lines with LineThickness 1 and 3) can be safely rendered without smooth connections and can be therefore fully hardware accelerated.

To get better understanding of this please check the ConnectedLinesRendering sample - there you can dynamically adjust the RenderConnectedLinesAsDisconnectedLinesThicknessLimit with a slider and see the results.

3D lines got another improvement - now the actual LineThickness that is used to render the 3D lines also takes the monitor DPI settings into account - 3D line on high DPI monitor will be actually rendered thicker so that for the user they will look the same as on the monitor with standard DPI (96).


If you have checked the DXEngine forum, then you know that there is now support for rendering many pixels. The number of pixels that can be rendered by modern graphics card is really amazing. The following screenshot from DXEngine samples is showing 100 million (!) pixels:

Each of the cubes in the screenshot is actually created from 1 million pixels (100 x 100 x 100 pixels). To see interesting patterns (instead of solid red color), each pixel's size is only 0.1.

The easiest way to show many pixels is to use new PixelsVisual3D object. After creating the object, you only need to set the color of the pixels, size of the pixels and an array with pixel locations. There are also other ways to render pixels - see PixelRenderingSample sample for more info.


The new version also improves showing VisualBrushes, DrawingImages and other textures that need to be rendered into bitmap to be shown with DXEngine.

In the previous versions, the size of the rendered bitmap was determined by the DXEngine. It was possible to change that by changing the RenderedBrushTextureWidth and RenderedBrushTextureHeight properties on the WpfMaterial object. But this was not very user friendly.

The new version greatly improves that and provides an easy way to set the desired size of rendered bitmap with using the CachedBitmapSize DXAttribute. The following example will set render size to 512 x 512 for the BigPlane's Material:

BigPlane.Material.SetDXAttribute(DXAttributeType.CachedBitmapSize, new SharpDX.Size2(512, 512));

An improved VisualBrush sample shows that in more details. It also demonstrates how to dynamically adjust the rendered bitmap size based on the distance from the camera - so objects that are closer to the camera gets higher resolution rendering (to make text better readable) and objects that are far from the camera can use smaller bitmaps (to save memory).


The new version also provides a few improvements for rendering many instances of objects. The first improvement related to this is a new UseAlphaBlend property on InstancedMeshGeometry3DNode - when it is set to true, the InstancedMeshGeometry3DNode will use alpha blending which will allow rendering semi-transparent instances - the actual alpha level is specified with the color that can be set for each instance.

InstancedMeshGeometry3DNode object also get a fix for using IsBackFaceMaterial property which makes rendering back faces of the instances correct. Also, InstancedModelGroupVisual3D now support rendering GeometryModel3D objects that have BackMaterial set.


There are also a few other improvements and fixes. The full list of changes is here:

  • Added VertexColorEffect and VertexColorMaterial - this adds support for rendering 3D objects with specifying color for each vertex (position).
  • Added PixelEffect, PixelMaterial and PixelsVisual3D - allows rendering millions of 3D pixels.
  • Added HiddenLineMaterial that can render 3D lines that are behind other 3D objects (should be hidden).
  • Added RenderConnectedLinesAsDisconnectedLinesThicknessLimit property to DXScene and set its default value to 3. This will render connected 3D lines (PolyLines, LineArc, Text3D, ect.) as disconnected 3D lines and therefore provide full hardware acceleration of 3D lines when LineThickness is less or equal then 3.
  • Added scaling LineThickness and PixelSize with current DPI scaling factor.
  • Fixed WpfMaterial.Refresh method to update VisualBrush.
  • Added CachedBitmapSize to DXAttributeType - this simplify setting the size of the rendered bitmap with calling SetDXAttribute extension method on WPF's material (instead of using RenderedBrushTextureWidth and RenderedBrushTextureHeight on WpfMaterial).
  • Added RenderToBitmapOnEveryFrame property to WpfMaterial - this instructs DXEngine to render the WPF material into bitmap before each frame is rendered.
  • Improved using RenderedBrushTextureWidth and RenderedBrushTextureHeight on WpfMaterial object for rendering materials with DrawingImage.
  • Fixed using IsBackFaceMaterial property in InstancedMeshGeometry3DNode.
  • Added rendering BackMaterial for GeometryModel3D objects rendered with InstancedModelGroupVisual3D.
  • Added UseAlphaBlend property to InstancedMeshGeometry3DNode and added support for rendering semi-transparent objects in InstancedModelGroupVisual3D.
  • Added "Get camera info" action to DiagnosticsWindow (and to DXEngineSnoop) to get detailed information about the camera that is currently used.
  • Added a new overload of WpfMaterial.SetUsedDXMaterial method that does not take parentDXDevice as parameter (the existing method that takes parentDXDevice is marked as Obsolete).
  • Fixed problems with showing and updating the 3D Scene that could sometimes occur on monitors with high DPI settings and with high UI thread usage before the first frame is rendered.
  • Added protected virtual Dispose method to SceneNodeVisual3D so that derived classes can dispose their resources in the overridden Dispose method.
  • Added IsDisposing to SharedDXResource (base class to most of the classes in DXEngine).

Tags: , , ,

DXEngine

New Oculus Rift support with updated OculusWrap project and full DXEngine support

by abenedik 6. January 2017 00:03

Let's start with a screenshot:

Ab3d.DXEngine rendering for Oculus Rift

This screenshot shows you that the Ab3d.DXEngine now fully supports Oculus Rift. And as you can see from the the window title and Oculus Performance overlay it has no problems with rendering at 90 FPS and still having plently of performance headroom.

What is more, because there were no up-to-date wrapper library for Oculus SKD available (the newest was OculusWrap, but it was discontinued on April 2016), I have decided to update the OculusWrap library to support the latest Oculus SDK (1.10.2) and published the updated library to GitHub to https://github.com/ab4d/Ab3d.OculusWrap.

The previous two paragraphs mean two things:

1) If you would like to use Oculus Rift in .Net and would like a low level access to the native Oculus library, you can do that now with the updated Ab3d.OculusWrap library.

2) If you want to stay in the comfort of using WPF 3D, Ab3d.PowerToys and Ab3d.DXEngine libraries and would like to add Oculus Rift support, you can now do that with adding just a few lines of code.


So if you have an Oculus Rift headset, you are most welcome to go to the above GitHub address and enter the VR world generated by .Net code.

Tags: , , , ,

Ab3d.PowerToys | DXEngine

Major new version of DXEngine (DirectX 11 rendering engine) bring many new features including shadow rendering

by abenedik 30. November 2016 22:40

I am really happy to inform you that after many hours of coding that resulted in tons of new features and improvements a major new version of Ab3d.DXEngine is released. Ab3d.DXEngine is a super fast 3D rendering engine that uses DirectX 11 and SharpDX and can be used in .Net Desktop applications.

The biggest new feature is support for shadow rendering. Ab3d.DXEngine uses variance shadow mapping technique that can produce nice soft shadow with little artifacts (based on the article in GPU Gems). The following screenshot shows an example taken from samples that come with the library:

In the lower right corner of the screenshot you can see various shadow settings that allow easy control over shadow resolution and amount of softness.

Another great improvement is a new option that allow rendering 3D lines that are visible through solid objects. This is a great feature for showing selected 3D objects.

The new version also improves handling frozen WPF 3D objects – for example frozen DiffuseMaterial or MeshGeometry3D. Before frozen objects were not very well reused by DXEngine. The new version handles this much better and this can improve initialization time, memory usage and rendering performance.

Ab3d.DXEngine is using SharpDX library for providing access to native DirectX API. The previous version of Ab3d.DXEngine used SharpDX version 2.6.3. The reason for this was that version 2.6.3 was the latest version that supported .Net 4.0 framework. Later version of SharpDX require .Net 4.5. Because Ab3d.DXEngine comes with build for both .Net 4.0 and .Net 4.5, it was possible to update the .Net 4.5 version so that it now uses the latest SharpDX version 3.1.0. The build for .Net 4.0 still uses SharpDX 2.6.3 - here a slightly updated version is used that supports feature level 11.1 (before 11.0 was supported).

This release also comes with a new diagnostics tool that is called DXEngineSnoop. As the name suggests, the tool can “snoop” (from WPF Snoop) into a running WPF application, finds the DXViewportView and attaches to its events and then provides live diagnostics and performance data. The tool also allows starting many actions that show various details about the rendering process – for example hierarchical view of SceneNodes.

The following screenshot shows the DXEngineSnoop window after it has been attached to a running DXEngine (right side shows context menu that is opened when user click on the menu icon):

This tool can help improve understanding of how Ab3d.DXEngine works behind the scene.

I will write more about that in one of the future articles. Now I can just quickly describe the process: first the DXViewportView converts all the WPF 3D models that are defined in Viewport3D into different SceneNodes. The hierarchical organization of SceneNodes can be seen with clicking on “Dump SceneNodes”. The SceneNodes than create low level objects that are put into various Rendering Queues (for example transparent objects are put into “Transparent RenderingQueue”). Those two steps are done in the Update part of the rendering (on the left side seen as UpdateTime). Then rendering of objects in Rendering Queues begin. The operations that happen there are defined in the RenderingSteps collection (can be seen with clicking on “Dump RenderingSteps”). Those steps can change when different rendering modes are used – for example shadow rendering require some additional rendering steps that render shadow map; stereoscopic rendering require a simple loop that repeats some rendering steps for left and for right eye. RenderingSteps collection is fully customizable and provides a great extensibility point for many engine customizations.

DXEngineSnoop can be also used to diagnose memory issues with providing simple way to start tracking object creation and to easily show reports of live objects. There is also a new section in the DXEngine help file that describes how to check for memory leaks.

The new version also brings many stability and performance improvements.

For example, when rendering thousands of models with object instancing, it is now possible to do a faster update of data when only a few objects were changed (their color or transformation is changed). For cases when object data are changed often it is now possible to further improve performance with creating a dynamic instance buffer (with UseDynamicInstanceBuffer property).

There are also some other minor performance improvements. But the majority of work was done on improving support for customizing the engine. This means that it will be easier to add new features and extend the engine to provide additional rendering functionality.

Also, users that know how to program with SharpDX and DirectX and would like to include existing SharpDX code into the engine have now more options to do that. There are also a few new samples with extended code comments about that. If you are doing a low-level customization, I would recommend that you contact me and we can discuss the best options for your use case.

To show new functionality, there are also a few new samples. Some older samples were also improved.

What is more, the new version comes with a new WinForms project that shows three different ways how to use DXEngine to easily show great DirectX 11 graphics inside WinForms application. The following screenshot shows one of the samples:


I do not want to make this blog post too long. Therefore, I will not publish the huge change log here but would rather invite you to check it on the DXEngines’s web page.

Instead, I would like to conclude with a few future plans.

First, I would like to publish the sample that shows how to use DXEngine with Oculus Rift. Actually, there is already a working sample that brings full Oculus Rift support to WPF and WinForms (and without need to understand the world of DirectX). The samole just need some additional plising before being published. If you cannot wait for an official release, you can contact me and I will send you the current version.

Then I will start working on a new version of Ab3d.PowerToys. I already have many many great ideas. The main focus will be to make the library better suited for CAD like scenarios. As a result, I want to create a big sample that will be a simple CAD like application written in .Net and that will use Ab3d.PowerToys and Ab3d.DXEngine.

Tags: , , ,

DXEngine