I am really happy that after a long development all great new features of Ab3d.PowerToys library are now available.
The biggest new feature is that now it is possible to import 3D models into WPF or WinForms application from almost any 3D file – including Collada, fbx, blend, dxf, ase, lwg and many more (see http://assimp.sourceforge.net/main_features_formats.html).
This is possible with help of Open Source Assimp importer library and a new Ab3d.PowerToys.Assimp helper library that converts Assimp’s Scene object into WPF 3D objects.
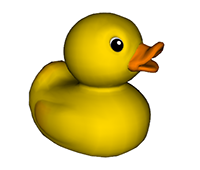
For example the following XAML imports a Collada duck.dae file:
<assimpVisuals:AssimpModelVisual3D Source="/Resources/duck.dae"
                            Position="0 0 0" PositionType="Center"
                            SizeX="100"//>
And the result is of course the standard Collada duck 3D model:
And what is more, just as Assimp importer is free to use, the new Ab3d.PowerToys.Assimp library is also free to use without need to purchase a commercial version of Ab3d.PowerToys (when not used with commercial version of Ab3d.PowerToys, Ab3d.PowerToys.Assimp is distributed under MIT license).
And today I have many other very good news for you.
Let’s continue with presenting you a whole new sample project – Ab3d.PowerToys.AssimpViewer.
This project uses Assimp library to import 3D models from file and show 3D model in the application. What makes it very interesting is that it has some advanced features like:
- Shows objects names and hierarchies
- Shows detailed information about 3D objects
- Allows object selection with mouse
- Showing bounding box, normals and triangles for selected object.
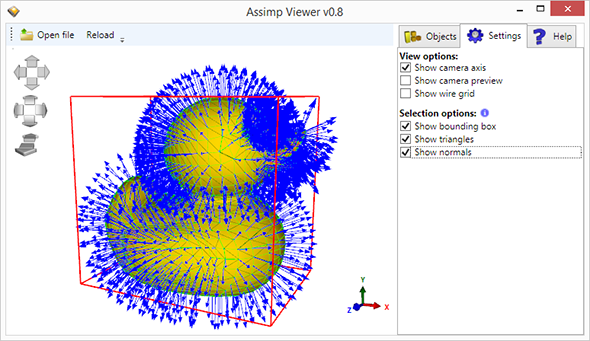
For example the following image shows selected duck model with bounding box, triangles and normals:
This makes it similar to what is possible with Viewer3ds application. The main difference is that for AssimpViewer you can see the whole source code.
This application also demonstrates a new ModelDecoratorVisual3D class that makes showing selected object incredibly simple – for example:
<visuals1:ModelDecoratorVisual3D x:Name="SelectedModelDecorator"
                                     ShowBoundingBox="False" BoundingBoxLineColor="Red" BoundingBoxLineThickness="2"
                                     ShowNormals="True" NormalsLineColor="Blue" NormalsLineThickness="1"
                                     ShowTriangles="True" TrianglesLineColor="Green" TrianglesLineThickness="1"
                                     TargetModel3D="{Binding ElementName=MyModel3D}"
                                     RootModelVisual3D="{Binding ElementName=ContentRootVisual3D}"/>
As you can see, we just set the target model (selected model), parent Visual and then decide how we want to decorate the selected model – with bounding box, with normal or with triangles. Super simple.
Another improvement from the new version of Ab3d.PowerToys library is a better and nicer CameraAxisPanel – as seen in the lower right corner the new version now shows real 3D arrows instead of 3D lines with arrows. This looks much nicer.
This sample is still under construction (version 0.8). I have big plans with it. I want to turn it into a simple 3D editor where you will be able to add multiple 3D objects from multiple files, move the models around, scale and rotate them. I know that many customers are working on some similar applications. Creating such sample application could mean a huge development time saving for many of them.
And now to some other new features.
Many customers are concerned about WPF 3D performance when they need to show very complex 3D models with a lot of 3D parts. One reason for performance problem can be that WPF is using DirectX 9 rendering and that it does not have an optimal rendering pipeline. But many times the reason for slow rendering is that simply too many GeometryModel3D objects are rendered.
This can cause problems because each GeometryModel3D is rendered with using its own DirectX draw call. Draw call is a low level command, that instructs graphics driver and graphics card how to draw one object. Because graphics drivers need to prepare many things before the data from draw call can be send to graphics card, draw calls are very expensive operations. This is also true for DirectX and high end 3D games – usually games tend to keep number of draw calls per frame under 3000. Higher numbers can slow down rendering regardless of the hardware.
With Ab3d.PowerToys we cannot improve the WPF 3D rendering pipeline, but with a new ModelOptimizer it is possible to significantly reduce the number of required draw calls and therefore improve rendering performance. This is done with analyzing the model and combing all models that have the same material into one model – so that only one draw call is needed instead of many.
The following image shows the ModelOptimizer sample that shows (marked with red arrow) that ModelOptimizer has reduces number of objects from 3381 to only 30.
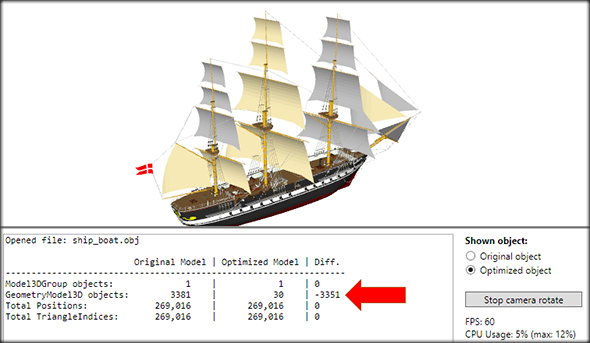
This had significant impact on performance. With optimized model the frame rate was easily at 60 FPS (on i7 3770 CPU and GeForce 560 Ti). But when the original model was shown, the FPS dropped to 14.
A drawback of using ModelOptimizer is that you loose the original object structure (but this can be solved with saving the hierarchy and individual objects data into some custom data structure before optimizing the model).
There have been some other improvements.
For example showing 3D models from obj files has been simplified with adding ObjModelVisual3D that can be used in XAML. MaterialTypeConverter has also been improved so that it now Visual Studio 2013 designer can show textures on 3D models. Updating 3D lines has also been improved to allow more flexibility when the lines are updates and when not.
To simplify debugging there are now many extension methods that can be called from Visual Studio Immediate Window to show you many details of the 3D object (see “Dump and Name sample” for more info).
Now it is also very easy to set name to any Model3D object, Visual3D, MeshGeometry or Material – this can be simply done with new extension method: SetName. To get the name, you just call GetName method.
The whole list of improvements and fixes is really long. You can see it on the PowerToys web page (scroll down to versions history).
Finally I would like describe my future plans. I have already mentioned that I want to improve AssimpViewer sample. To do that I will add new helper objects that will make moving, rotating and scaling selected object very easy. I am also planning to add support for reading compiled 3D model files (Visual Studio 2013 can compile 3D models from fbx, dae and obj files into its own file format). This would remove the need to use Assimp importer in your projects.
And I am also working hard on a new DirectX 11 rendering engine that should eradicate rendering performance problems and will also bring improved rendering quality to WPF 3D world. I hope that I will be able to release a first open beta version in the beginning of the next year.
As always, the existing customers can get the latest version of Ab3d.PowerToys (and Ab3d.PowerToys.Assimp library) from their User Account pages. Others please install the new evaluation version form our Downloads page.
And the final great news is a reward to all of you that have read this blog post to the end – to get the reward check out our web site today!