A new version of Ab3d.DXEngine library has been published.
Again, I am very excited about the new features in the engine. Just check the images below and you will see that the new Ab3d.DXEngine allows you to create some amazing effects in 3D graphics.
Let's start with added support for rendering 3D models that can have different colors in each vertex (position).
The following screenshot shows a new "heat distribution map" sample:
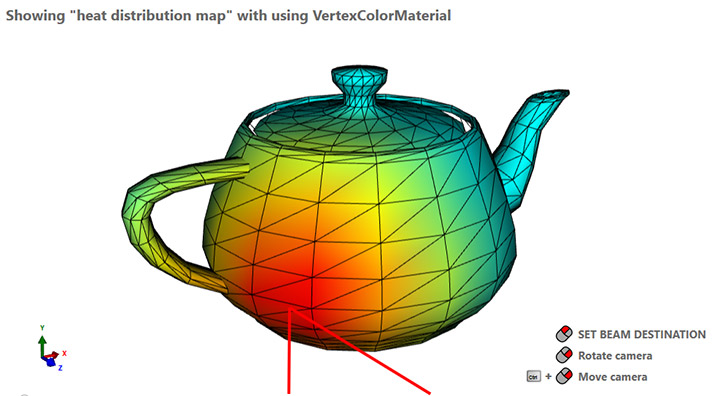
In the bottom center part of the screenshot you can see two red rays that connect over the 3D model. The position where the rays are connected is used to calculate the 3D position on the teapot - this position is used as ray hit position. Then, for each position in the teapot model, the distance from the position to the ray hit position is calculated. The calculated distance is then converted into specific color that shows the amount of heat (red is hot and blue is cold). This way we get different color values for each positon of the teapot.
After we have the colors for positions, we can use the new VerextColorMaterial to render the 3D model.
This is very useful for showing scientific data on 3D models.
Another use of this technique is to render height map with different colors. The color at each height map position is based on the height of the position. To demonstrate that, there is a new "landscape generation" sample:
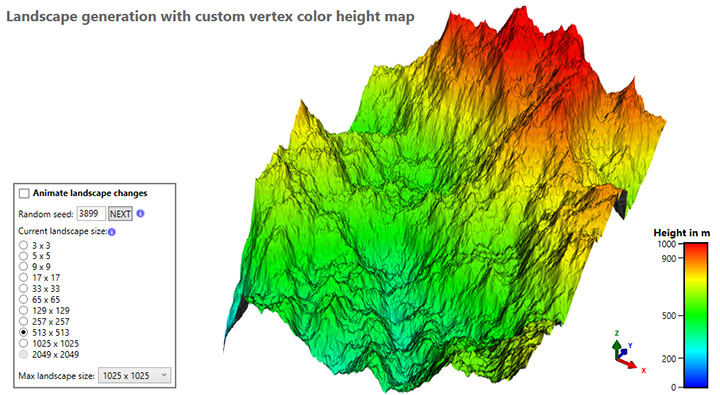
This sample is also showing how to use Diamond square algorithm (https://en.wikipedia.org/wiki/Diamond-square_algorithm) to generate realistic height maps. This algorithm starts with a few positions and then iteratively adds additional details to the map. To show how this process works, the sample can animate the size of the map from 3x3 to the map with much higher resolution (1025 x 1025 or higher).
Additionally, as you see in the lower right corner, the sample shows a nice legend with linear gradient. The control that shows the legend is also part of the sample and can be easily customized and reused in your own project.
If you are using Ab3d.DXEngine to create a CAD like application, you will be happy to hear that the new version allows rendering hidden 3D lines with special line color and line thickness. Hidden 3D lines are lines that are behind other 3D objects - thin yellow line in the following screenshot:
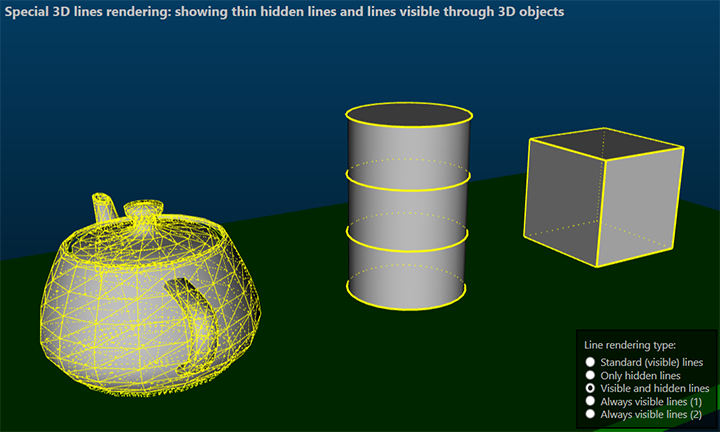
The previous version of Ab3d.DXEngine already supported rendering 3D lines that were visible though 3D objects, but you could not change the appearance of the hidden part of the line. The new version allows using new HiddenLineMaterial that renders only the hidden part of the line (part that is behind other 3D objects) and that allows specifying different color and line thickness for that hidden part.
Another improvement regarding rendered 3D lines is that the new version now automatically renders thin connected 3D lines (PolyLineVisual3D, LineArcVisual3D, TextVisual3D and other lines where line thickness is less or equal then 3) as disconnected 3D lines. This allows full hardware acceleration of connected 3D lines (rendering millions of connected 3D lines instead of thousands).
Connected 3D lines are 3D lines where the end point of one line is the start point of the next line and where the connection between the two lines is "smoothed". In Ab3d.PowerToys library the connected 3D lines are created with the following objects: PolyLineVisual3D, LineArcVisual3D, RectangleVisual3D, MultiPolyLineVisual3D, TextVisual3D, LineWithTextVisual3D, CenteredTextVisual3D. The problem with connected 3D lines is that additional triangle needs to be added to create the smooth connection between the lines. This is quite complicated operation and is not supported in DXEngine's geometry shader that creates 3D lines.
But when the LineThickness is small, then the additional triangle between connected lines is very small and hardly noticeable - in this case the connected lines can be rendered as disconnected 3D lines - without additional triangle to smooth the connection between lines. When the lines are rendered as disconnected lines, the geometry for the lines can be generated in geometry shader and this allows rendering millions of lines.
In the previous version of DXEngine, it was possible to set the RenderConnectedLinesAsDisconnected property on DXScene to true to render all connected lines as disconnected. In the new version it is possible to fine tune that with specifying the LineThickness limit that will define which connected 3D lines will be rendered as disconnected lines - this is done with new RenderConnectedLinesAsDisconnectedLinesThicknessLimit property (by default it is set to 3).
The following screenshot from an updated ConnectedLinesRendering sample shows fully accelerated 3D lines shown in red:
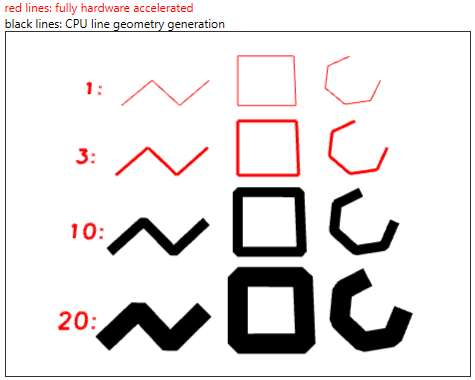
The thick lines (black lines with LineThickness 10 and 20) are still rendered the old way - the geometry for the 3D lines is generated by the code in the Ab3d.PowerToys library. There the smooth connections between line segments is easily seen. On the other hand, the thin lines (red lines with LineThickness 1 and 3) can be safely rendered without smooth connections and can be therefore fully hardware accelerated.
To get better understanding of this please check the ConnectedLinesRendering sample - there you can dynamically adjust the RenderConnectedLinesAsDisconnectedLinesThicknessLimit with a slider and see the results.
3D lines got another improvement - now the actual LineThickness that is used to render the 3D lines also takes the monitor DPI settings into account - 3D line on high DPI monitor will be actually rendered thicker so that for the user they will look the same as on the monitor with standard DPI (96).
If you have checked the DXEngine forum, then you know that there is now support for rendering many pixels. The number of pixels that can be rendered by modern graphics card is really amazing. The following screenshot from DXEngine samples is showing 100 million (!) pixels:
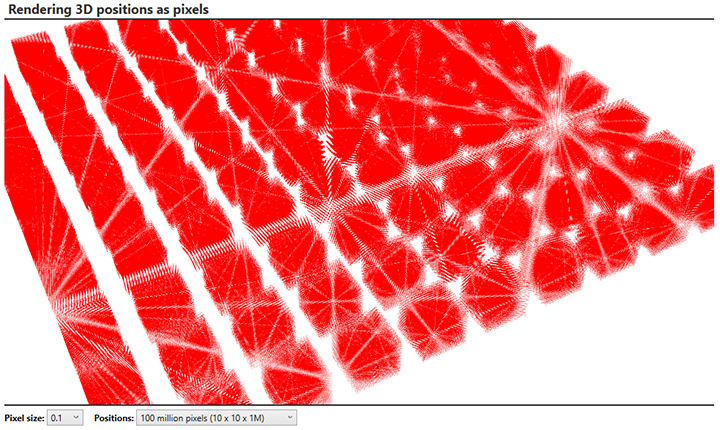
Each of the cubes in the screenshot is actually created from 1 million pixels (100 x 100 x 100 pixels). To see interesting patterns (instead of solid red color), each pixel's size is only 0.1.
The easiest way to show many pixels is to use new PixelsVisual3D object. After creating the object, you only need to set the color of the pixels, size of the pixels and an array with pixel locations. There are also other ways to render pixels - see PixelRenderingSample sample for more info.
The new version also improves showing VisualBrushes, DrawingImages and other textures that need to be rendered into bitmap to be shown with DXEngine.
In the previous versions, the size of the rendered bitmap was determined by the DXEngine. It was possible to change that by changing the RenderedBrushTextureWidth and RenderedBrushTextureHeight properties on the WpfMaterial object. But this was not very user friendly.
The new version greatly improves that and provides an easy way to set the desired size of rendered bitmap with using the CachedBitmapSize DXAttribute. The following example will set render size to 512 x 512 for the BigPlane's Material:
BigPlane.Material.SetDXAttribute(DXAttributeType.CachedBitmapSize, new SharpDX.Size2(512, 512));
An improved VisualBrush sample shows that in more details. It also demonstrates how to dynamically adjust the rendered bitmap size based on the distance from the camera - so objects that are closer to the camera gets higher resolution rendering (to make text better readable) and objects that are far from the camera can use smaller bitmaps (to save memory).
The new version also provides a few improvements for rendering many instances of objects. The first improvement related to this is a new UseAlphaBlend property on InstancedMeshGeometry3DNode - when it is set to true, the InstancedMeshGeometry3DNode will use alpha blending which will allow rendering semi-transparent instances - the actual alpha level is specified with the color that can be set for each instance.
InstancedMeshGeometry3DNode object also get a fix for using IsBackFaceMaterial property which makes rendering back faces of the instances correct. Also, InstancedModelGroupVisual3D now support rendering GeometryModel3D objects that have BackMaterial set.
There are also a few other improvements and fixes. The full list of changes is here:
- Added VertexColorEffect and VertexColorMaterial - this adds support for rendering 3D objects with specifying color for each vertex (position).
- Added PixelEffect, PixelMaterial and PixelsVisual3D - allows rendering millions of 3D pixels.
- Added HiddenLineMaterial that can render 3D lines that are behind other 3D objects (should be hidden).
- Added RenderConnectedLinesAsDisconnectedLinesThicknessLimit property to DXScene and set its default value to 3. This will render connected 3D lines (PolyLines, LineArc, Text3D, ect.) as disconnected 3D lines and therefore provide full hardware acceleration of 3D lines when LineThickness is less or equal then 3.
- Added scaling LineThickness and PixelSize with current DPI scaling factor.
- Fixed WpfMaterial.Refresh method to update VisualBrush.
- Added CachedBitmapSize to DXAttributeType - this simplify setting the size of the rendered bitmap with calling SetDXAttribute extension method on WPF's material (instead of using RenderedBrushTextureWidth and RenderedBrushTextureHeight on WpfMaterial).
- Added RenderToBitmapOnEveryFrame property to WpfMaterial - this instructs DXEngine to render the WPF material into bitmap before each frame is rendered.
- Improved using RenderedBrushTextureWidth and RenderedBrushTextureHeight on WpfMaterial object for rendering materials with DrawingImage.
- Fixed using IsBackFaceMaterial property in InstancedMeshGeometry3DNode.
- Added rendering BackMaterial for GeometryModel3D objects rendered with InstancedModelGroupVisual3D.
- Added UseAlphaBlend property to InstancedMeshGeometry3DNode and added support for rendering semi-transparent objects in InstancedModelGroupVisual3D.
- Added "Get camera info" action to DiagnosticsWindow (and to DXEngineSnoop) to get detailed information about the camera that is currently used.
- Added a new overload of WpfMaterial.SetUsedDXMaterial method that does not take parentDXDevice as parameter (the existing method that takes parentDXDevice is marked as Obsolete).
- Fixed problems with showing and updating the 3D Scene that could sometimes occur on monitors with high DPI settings and with high UI thread usage before the first frame is rendered.
- Added protected virtual Dispose method to SceneNodeVisual3D so that derived classes can dispose their resources in the overridden Dispose method.
- Added IsDisposing to SharedDXResource (base class to most of the classes in DXEngine).