I am really happy to inform you that after many hours of coding that resulted in tons of new features and improvements a major new version of Ab3d.DXEngine is released. Ab3d.DXEngine is a super fast 3D rendering engine that uses DirectX 11 and SharpDX and can be used in .Net Desktop applications.
The biggest new feature is support for shadow rendering. Ab3d.DXEngine uses variance shadow mapping technique that can produce nice soft shadow with little artifacts (based on the article in GPU Gems). The following screenshot shows an example taken from samples that come with the library:
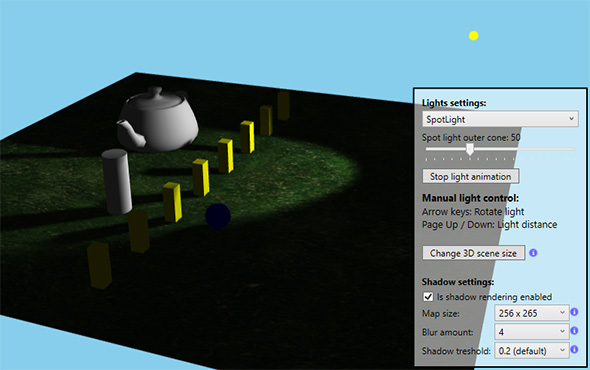
In the lower right corner of the screenshot you can see various shadow settings that allow easy control over shadow resolution and amount of softness.
Another great improvement is a new option that allow rendering 3D lines that are visible through solid objects. This is a great feature for showing selected 3D objects.
The new version also improves handling frozen WPF 3D objects – for example frozen DiffuseMaterial or MeshGeometry3D. Before frozen objects were not very well reused by DXEngine. The new version handles this much better and this can improve initialization time, memory usage and rendering performance.
Ab3d.DXEngine is using SharpDX library for providing access to native DirectX API. The previous version of Ab3d.DXEngine used SharpDX version 2.6.3. The reason for this was that version 2.6.3 was the latest version that supported .Net 4.0 framework. Later version of SharpDX require .Net 4.5. Because Ab3d.DXEngine comes with build for both .Net 4.0 and .Net 4.5, it was possible to update the .Net 4.5 version so that it now uses the latest SharpDX version 3.1.0. The build for .Net 4.0 still uses SharpDX 2.6.3 - here a slightly updated version is used that supports feature level 11.1 (before 11.0 was supported).
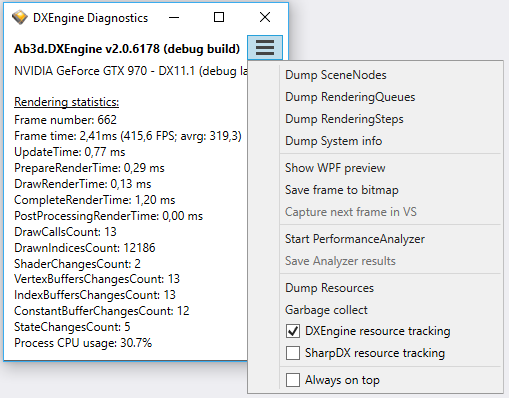
This release also comes with a new diagnostics tool that is called DXEngineSnoop. As the name suggests, the tool can “snoop” (from WPF Snoop) into a running WPF application, finds the DXViewportView and attaches to its events and then provides live diagnostics and performance data. The tool also allows starting many actions that show various details about the rendering process – for example hierarchical view of SceneNodes.
The following screenshot shows the DXEngineSnoop window after it has been attached to a running DXEngine (right side shows context menu that is opened when user click on the menu icon):
This tool can help improve understanding of how Ab3d.DXEngine works behind the scene.
I will write more about that in one of the future articles. Now I can just quickly describe the process: first the DXViewportView converts all the WPF 3D models that are defined in Viewport3D into different SceneNodes. The hierarchical organization of SceneNodes can be seen with clicking on “Dump SceneNodes”. The SceneNodes than create low level objects that are put into various Rendering Queues (for example transparent objects are put into “Transparent RenderingQueue”). Those two steps are done in the Update part of the rendering (on the left side seen as UpdateTime). Then rendering of objects in Rendering Queues begin. The operations that happen there are defined in the RenderingSteps collection (can be seen with clicking on “Dump RenderingSteps”). Those steps can change when different rendering modes are used – for example shadow rendering require some additional rendering steps that render shadow map; stereoscopic rendering require a simple loop that repeats some rendering steps for left and for right eye. RenderingSteps collection is fully customizable and provides a great extensibility point for many engine customizations.
DXEngineSnoop can be also used to diagnose memory issues with providing simple way to start tracking object creation and to easily show reports of live objects. There is also a new section in the DXEngine help file that describes how to check for memory leaks.
The new version also brings many stability and performance improvements.
For example, when rendering thousands of models with object instancing, it is now possible to do a faster update of data when only a few objects were changed (their color or transformation is changed). For cases when object data are changed often it is now possible to further improve performance with creating a dynamic instance buffer (with UseDynamicInstanceBuffer property).
There are also some other minor performance improvements. But the majority of work was done on improving support for customizing the engine. This means that it will be easier to add new features and extend the engine to provide additional rendering functionality.
Also, users that know how to program with SharpDX and DirectX and would like to include existing SharpDX code into the engine have now more options to do that. There are also a few new samples with extended code comments about that. If you are doing a low-level customization, I would recommend that you contact me and we can discuss the best options for your use case.
To show new functionality, there are also a few new samples. Some older samples were also improved.
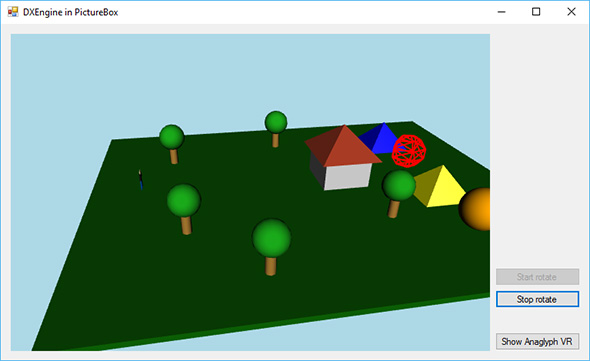
What is more, the new version comes with a new WinForms project that shows three different ways how to use DXEngine to easily show great DirectX 11 graphics inside WinForms application. The following screenshot shows one of the samples:
I do not want to make this blog post too long. Therefore, I will not publish the huge change log here but would rather invite you to check it on the DXEngines’s web page.
Instead, I would like to conclude with a few future plans.
First, I would like to publish the sample that shows how to use DXEngine with Oculus Rift. Actually, there is already a working sample that brings full Oculus Rift support to WPF and WinForms (and without need to understand the world of DirectX). The samole just need some additional plising before being published. If you cannot wait for an official release, you can contact me and I will send you the current version.
Then I will start working on a new version of Ab3d.PowerToys. I already have many many great ideas. The main focus will be to make the library better suited for CAD like scenarios. As a result, I want to create a big sample that will be a simple CAD like application written in .Net and that will use Ab3d.PowerToys and Ab3d.DXEngine.